How To List Disks on Linux

For the system administrator, checking that disks are working properly is a big concern.

In many cases, you will have to list all the disks available on your computer, with their sizes, in order to make sure that they don’t run out of space.

If they were to run out of space, you could essentially have your server down, preventing all your users from accessing it.

In this tutorial, we are going to see how you can easily list disks available on your Linux machine.

Prerequisites

For some of the commands used in this tutorial, you will need administrator rights in order to have the full output of the command.

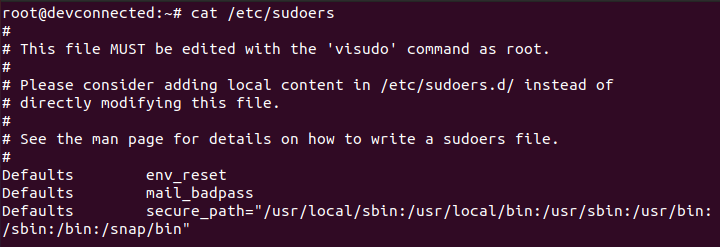
In order to check that you have sudo rights, you can execute the “sudo” command with the “-l” option.

$ sudo -l

check-sudo-rights

If you see matching entries, it means that you are a privileged account on this machine.

However, if you are notified that you “can’t run sudo on this computer“, have a read at our dedicated tutorials for Ubuntu or CentOS (RHEL equivalent).

List Disks on Linux using lsblk

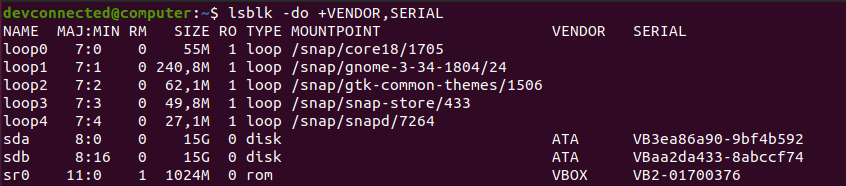
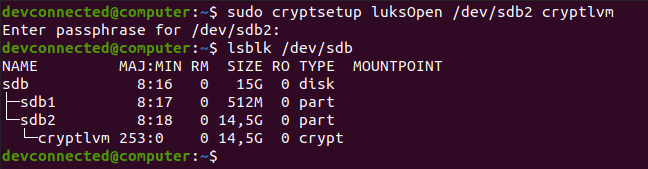
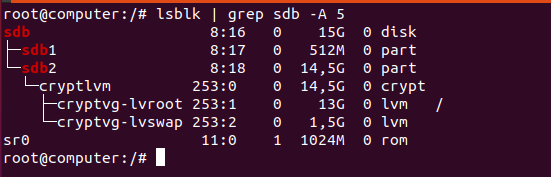
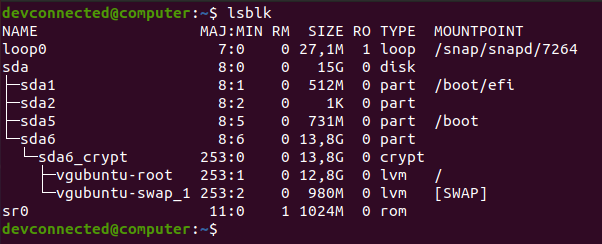
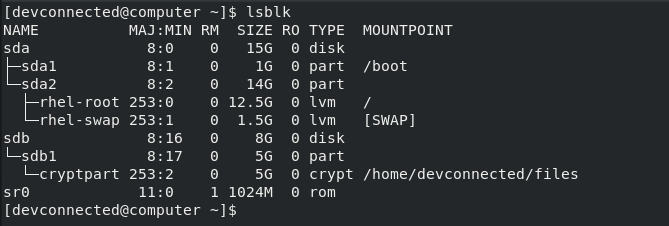
The easiest way to list disks on Linux is to use the “lsblk” command with no options. The “type” column will mention the “disk” as well as optional partitions and LVM available on it.

$ lsblk

List Disks on Linux using lsblk-command

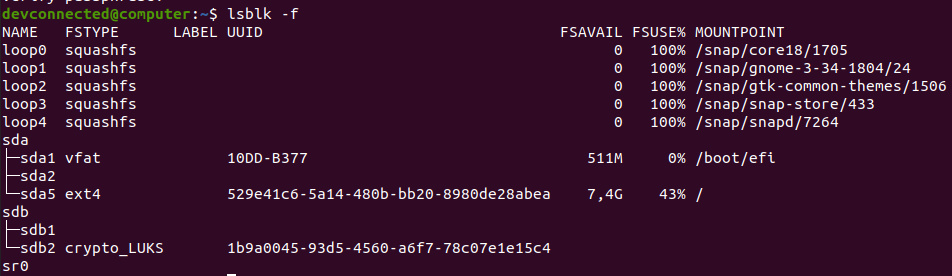
Optionally, you can use the “-f” option for “filesystems“. This way, your disks will be listed as well as partitions and filesystems formatted on them.

$ lsblk -f

list-disks-lsblk-command

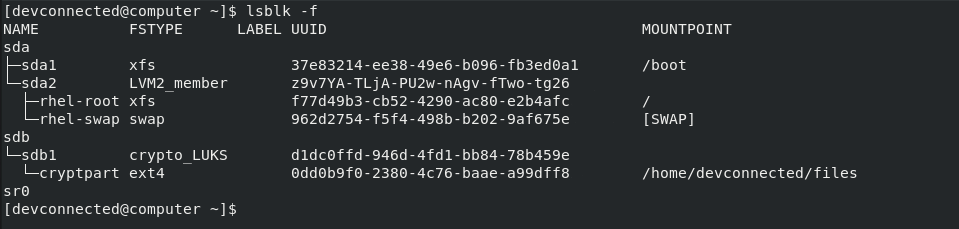
By executing the “lsblk” command, you are presented with multiple different columns :

  • Name : the name of the device. It is quite important for you to know that Linux devices have a specific prefix depending on the nature of the device. “sd” in this case refers to SCSI devices but it is also short for SATA connections as most drives use SATA nowadays;
  • Filesystem type : if your partition contains a filesystem, it should be listed in this column (xfs, swap or encrypted devices);
  • Label : in some cases, in order to avoid using a UUID, you can choose to have a label for your device;
  • UUID : a universal unique identifier. This identifier should be unique worldwide and uniquely identify your device;
  • Mountpoint : if your filesystem is mounted, you should be able to see the actual mountpoint.

Awesome, you successfully listed your disks on Linux using “lsblk”.

However, in some cases, you are interested in listing your disks with the actual hardware information linked to it.

If I want to remove a disk from my Linux machine, knowing the actual physical port or the vendor can be quite useful.

List Disks Information using lshw

In order to list disk information on Linux, you have to use the “lshw” with the “class” option specifying “disk”. Combining “lshw” with the “grep” command, you can retrieve specific information about a disk on your system.

$ sudo lshw -class disk

$ sudo lshw -class disk | grep <disk_name> -A 5 -B

lshw-command-linux-1

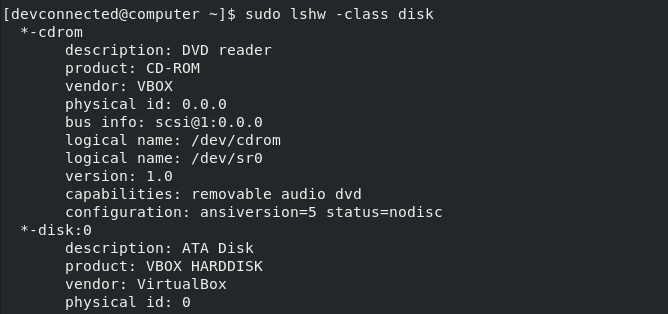
As you can see, by running the “lshw” with no grep filters, you are presented with all the disks available on your computer.

If you want to target a specific disk on your computer, you can “pipe” the command with “grep” in order to only list the disks that you want.

list-disks-using-lshw-1

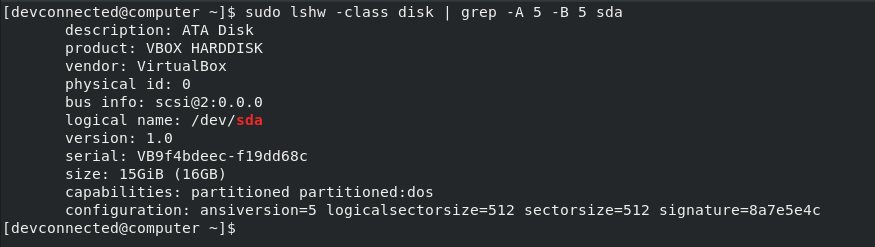
As you can see, using this command, you have way more information about your disks : the description, the product and its vendor as well as the actual bus info (where it might be plugged on your mother board).

Using this information, you can unplug it and replace it with another one very easily.

Awesome, you know how to list your disk information using “lshw” now.

Alternatives to lsblk : fdisk or hwinfo

The “lsblk” command is not the only command that you can use in order to have a listing of your disks on Linux. There are two other commands : fdisk (that is often used for partitioning) and hwinfo.

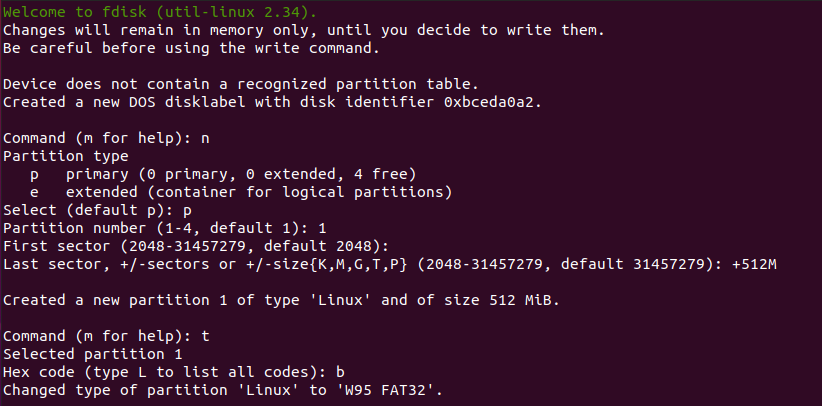
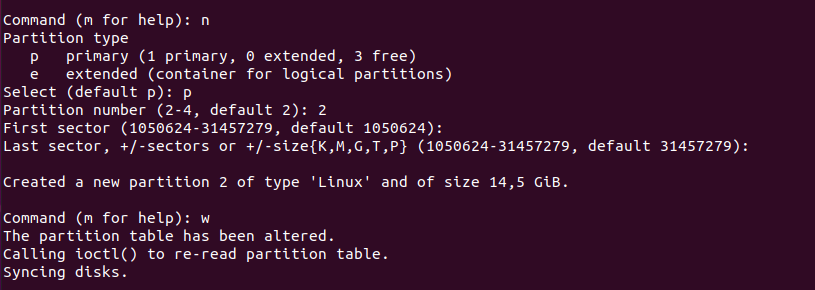
First, if you use the “fdisk” command with the “-l” option, you will be presented with all the partitions available on your machine as well as disks.

$ sudo fdisk -l

fdisk-command

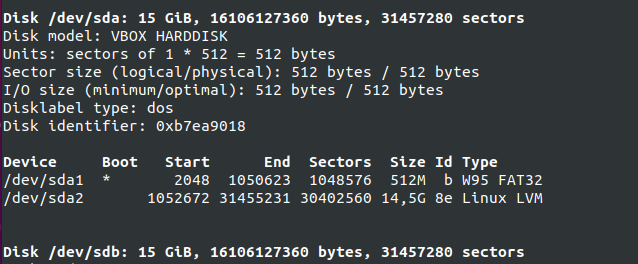
As you can see there, you have a very detailed description of your main disk. You can even verify the partitions available on it as well as the bootable flag for example.

However, “fdisk” is not the only way for you to list disks, you can also use the “hwinfo” command with the “–disk” option.

$ sudo hwinfo --disk

hwinfo-command-linux

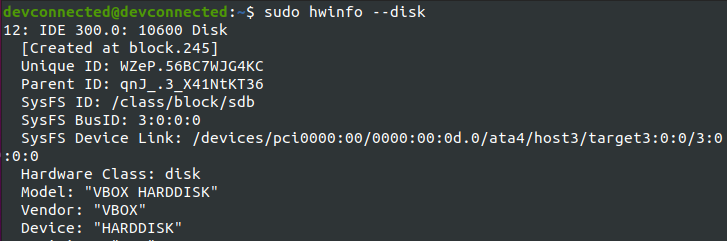
Using the “hwinfo” command without any options is quite hard to read. Luckily for you, there is an option that you can use in order to restrict the output to the disk list.

In order to achieve that, you have to use the “–short” option.

$ sudo hwinfo --disk --short

hwinfo-disk

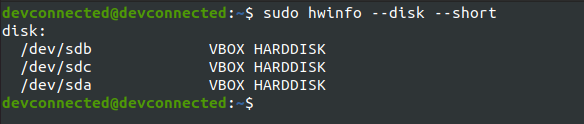
As you can see, the output is quite concise but it gives you a clear idea on disks available.

Finally, for advanced system administrators, you can have a look at the “/dev/disk” folder.

$ ls -l /dev/disk/

dev-disk-folder

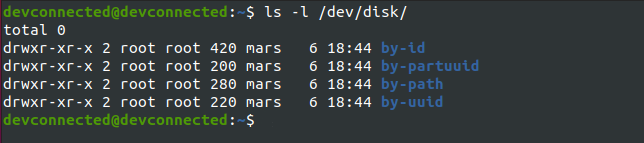
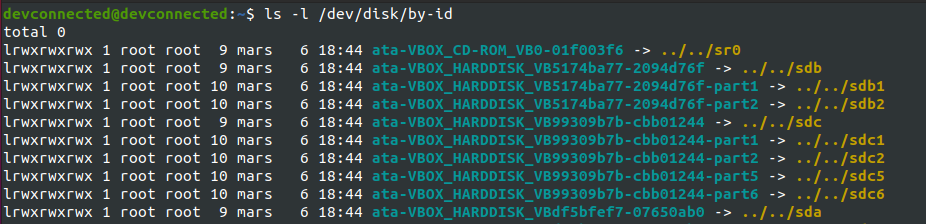
In this folder, you can check the “by-id” folder if you are looking for disks or the “by-uuid” one if you are looking for partitions.

$ ls -l /dev/disk/by-id

dev-disk-by-id

List Disk Using Graphical Interface

To list disks on Linux using the graphical interface, you have to go to the “Activities” and look for a program called “Disks”.

activities-menu-linux

When in the “Activities” menu, you can type “Disks” and look for an output similar to the one depicted below.

disks-activity-linux

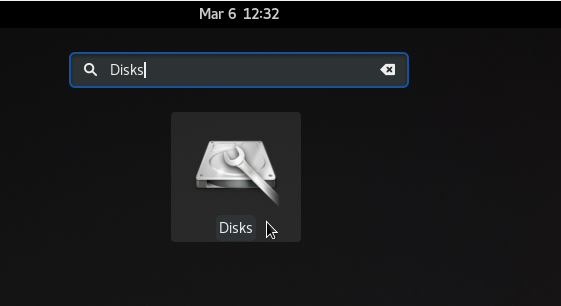
When clicking on “Disks”, you will be presented with the list of disks available on your Linux machine.

disks-window

As you can see, in the “Disks” window, you have the “hard disk” as well as “block devices” which are the LVM devices that you may have created during the distribution installation.

When clicking on a specific disk, you can see its disk size, the serial number as well as the partitions and the contents that may be stored on it.

Great! You now have the list of disks that are plugged on your computer.

Conclusion

In this tutorial, you learnt how you can easily list your disks on Linux using the “lsblk” command.

You have learnt that the same result can be achieved using many different commands : hwinfo, fdisk or lshw.

If you read this tutorial in order to learn how you can see your disk usage on Linux, you should read our tutorial on the subject.

If you are interested in Linux System Administration, we have a complete section dedicated to it, make sure to have a look.

How To Add Route on Linux

As a network engineer, you probably spend a lot of time thinking and planning your network infrastructure.

You plan how computers will be linked, physically using specific cables but also logically using routing tables.

When your network plan is built, you will have to implement every single link that you theorized on paper.

In some cases, if you are using Linux computers, you may have to add some routes in order to link it to other networks in your company.

Adding routes on Linux is extremely simple and costless : you can use the Network Manager daemon (if you are running a recent distribution) or the ifconfig one.

In this tutorial, you will learn how you can easily add new routes on a Linux machine in order to link it to your physical network.

Prerequisites

In order to add routes on your Linux machine, you need to have administrator rights.

In order to verify it, you can run the “sudo” command followed by the “-v” option (in order to update your cached credentials).

$ sudo -v

If you don’t have sudo rights, you can have a look at our dedicated articles on getting administrator rights on Ubuntu or CentOS.

Add route on Linux using ip

The easiest way to add a route on Linux is to use the “ip route add” command followed by the network address to be reached and the gateway to be used for this route.

$ ip route add <network_ip>/<cidr> via <gateway_ip>

# Example
$ ip route add 10.0.3.0/24 via 10.0.3.1

By default, if you don’t specify any network device, your first network card, your local loopback excluded, will be selected.

However, if you want to have a specific device, you can add it to the end of the command.

$ ip route add <network_ip>/<cidr> via <gateway_ip> dev <network_card_name>

As an example, let’s say that you want two LAN networks to be able to communicate with each other.

The network topology has three different Linux machines :

  • One Ubuntu computer that has the 10.0.2.2/24 IP address;
  • Another Ubuntu computer that has the 10.0.3.2/24 IP address;
  • One RHEL 8 computer that will act as a simple router for our two networks.

simple-lan-network

The first computer cannot ping the other computer, they are not in the same subnet : 10.0.2.0 for the first computer network and 10.0.3.0 for the second one network.
ping-unreachable

As the two hosts are not part of the same subnet, the ping command goes to the default gateway.

In order to see the routes already defined on your machine, use the “ip route” command with no arguments. You can also use the “ip r” command as an abbreviation.

$ ip r

ip-routes

This is the routing table of your Linux computer : every computer has one. A router happens to manage many more routes than that but it is essentially using the same routing syntax.

So how does one read that?

In order to understand this output, you have to read from top to bottom :

  • By default, network calls will be forwarded to the local default gateway which is 10.0.2.1
  • UNLESS your call is for the 10.0.2.0/24 network. In this case, it will simply be sent on your local network via your default physical link (physically a CAT network cable)
  • UNLESS your call is for the 169.254.0.0/16 network. In this case, it will also be sent on your local network using your default physical link.
Note : did you know? The 169.254.0.0/16 address is called APIPA (for Automatic IP Address Addressing). It is the default IP used by a system that failed to reach a DHCP server on the network.

In our case, in order to call the 10.0.3.2/24 IP address, the call will be forwarded to our 10.0.2.1 router.

However, is our router able to forward calls addressed to the 10.0.3.0/24 network?

A simple “ip r” command on the router can give us a hint.

ip-route-router

As you can see, the router is only linked to the 10.0.2.0/24 network which is obviously an issue.

In order to add a route on our Linux router, we use the “ip route add” command.

$ sudo ip route add 10.0.3.0/24 via 10.0.3.1

ip-route-add

Now, if you were to ping your second computer on the first computer, you would be able to reach it.

ping-first-computer

Awesome, you have successfully added a route from one Linux computer to another!

Adding permanent route configuration on Ubuntu

On Ubuntu, there are three ways of adding a permanent route to your Linux machine :

  • You can add it to your Network Manager configuration file;
  • You can edit your Netplan YAML configuration file;
  • You can add your route to the “/etc/network/interfaces” file if you are using an old Ubuntu distribution.

Using Network Manager

To add a permanent route to the Network Manager, you have to navigate to the connection file located at “/etc/NetworkManager/system-connections”.

listing-network-manager-connections

Edit your “Wired connection” file and add a “route1” property in the IPv4 part of the network configuration.

route1-property-network

The route has to be defined as : the network IP address followed by the CIDR, next the default gateway and finally the next-hop.

In order for the changes to be applied, you can restart your network connection, and execute the “route -n” command in order to see your route.

$ sudo nmcli connection reload

adding-route-network-manager

Awesome, you have added a permanent route to your Linux server!

Using Netplan

Netplan is an Ubuntu exclusive but it can be quite useful if you want to configure your network using a simple YAML file.

To add a permanent route using Netplan, add the following section to your “/etc/netplan” configuration file.

$ sudo vi /etc/netplan/<configuration_file>.yaml

netplan-configuration

For the changes to be applied, you will have to execute the “netplan” command with the “apply” argument.

$ sudo netplan apply

netplan-permanent-route

Congratulations, you have configured your network using Netplan. If you want to read more about Netplan and its objectives, you can have a look at the dedicated documentation.

Using /etc/network/interfaces

To add a permanent route to a distribution using ifup and ifdown, edit the “/etc/network/interfaces” file and add the following section.

$ sudo vi /etc/network/interfaces

auto eth0
iface eth0 inet static
      address 10.0.2.2
      netmask 255.255.255.0
      up route add -net 10.0.3.0 netmask 255.255.0.0 gw 10.0.2.1

Adding permanent route configuration on RHEL

By adding the route in the previous section, there is a chance that your distribution created a file for the route to be persisted.

However, if it is not the case, you need to add it in order to keep your route when restarting your server.

On RHEL and CentOS distributions, you need to create a file named “route-<device>” in the “/etc/sysconfig/network-scripts” folder.

$ sudo vi /etc/sysconfig/network-scripts/route-enp0s3

persistent-routes-linux

Add route on Linux using nmcli

Another way of adding a route on Linux is to use the “nmcli” utility and add an IPV4 route using the “modify” command.

$ sudo nmcli connection modify <interface_name> +ipv4.routes "<network_ip> <gateway_ip>"
Note : need a complete article about the Network Manager? We have a complete article about configuring your network using Network Manager.

For example, using the infrastructure of the previous section, in order to add a route, we would execute the following command.

$ sudo nmcli connection modify enp0s3 +ipv4.routes "10.0.3.0/24 10.0.3.1"

As changes are not made live, you will need to reload your network connections from disk using the “nmcli reload” command.

$ sudo nmcli connection reload

add-route-linux-nmcli-1

Awesome! Now there is a route between your first and second network.

As a consequence, you will be able to ping your second computer from the first computer.

ping-first-network

Adding a route using the network graphical interface

If you are not into executing commands in the terminal, luckily for you, there is a way to add a route on Linux using a graphical interface.

Whether you are on Ubuntu, Debian or RHEL makes no difference as they all share the same network panel on GNOME.

At the top right corner of your screen, look for a small network icon and click on it.

wired-connection-panel

Click on “Wired Connected” and look for the “Wired Settings” panel under it.

wired-settings-rhel

When the panel opens, look for the “Wired” section and click on the small gear wheel right next to it.

network-gear-wheel

In the “Wired” panel, you will be presented with many different parameters : your current IPv4 address, your current MAC address, an optional IPv6 address and your link speed.

local-network-parameters

In the “IPv4” tab, you will be presented with your current IP configured (most likely two for your computer to act as a Linux router).

Right under it, you will see the “Routes” section. In there, you can specify the input of the previous sections.

add-route-graphical-interface

When you are done, click on the “Apply” blue button at the top right corner of the window.

In order for the changes to be applied, you will need to restart your network. You can achieve that by clicking on the “on/off” toggle in the “Wired” window of the network parameters.

restart-network-linux

Done!

You have successfully added a route on Linux using the graphical interface, your computers should now be able to talk to each other.

Troubleshooting Internet issues on Linux

In some cases, you may want to add a route on your Linux because you want to be able to reach websites outside of your local network, say 8.8.8.8 for example.

As an example, let’s say that you have a local router linked to “Internet” that resides at 192.168.178.1/24.

Inspecting your current routes is an easy way for you to guess why you are not able to reach Internet websites.

The thought process is quite simple :

  • Is the IP that I am trying to reach a part of my subnet or not?
  • If yes, I should be able to reach it without any routes, everything will be handled by the ARP protocol and Ethernet.
  • If not, I need to have a route from my computer to a router that is able to forward requests to Internet.

However, remember that routes are two-lane highways : you need to be able to reach an external IP, but the external IP needs to be able to reach back to you.

As a consequence, routes need to be correctly defined on your local network architecture. As a diagram is more useful that a thousand words, here is a way to understand it.

troubleshoot-internet-issues

Whenever you are troubleshooting Internet issues, you have to think with routes : do I have a route from my computer to the computer that I am trying to reach?

Are the computers or routers between me and the target configured to handle my calls?

Reaching a part of the network is great, but is this part of the network able to answer me back?

In our diagram detailed above, our router may receive an answer from Google, but it has to know what to do with the request. In your local home network, you don’t have to worry about it as most of the requests are forwarded using the NAT protocol (short for Network Address Translation Protocol).

Conclusion

In this tutorial, you learnt how you can easily add a new route on many different Linux distributions.

Right now, as for other topics, some tools co-exist on Linux making the network configuration a bit convoluted sometimes.

However, we listed most of the options that you may encounter. If we forgot about an option, make sure to leave a comment for us to know.

If you are interested in Linux System Administration, make sure to have a look at our dedicated section on the website.

How To Find Last Login on Linux

If you are working in a medium to big-sized company, it is quite likely that you are working with many other system administrators.

As you are performing your sysadmin tasks, some users may try to connect to your server in order to perform their daily tasks.

However, in some cases, you may find that something has changed on your server. As a consequence, you are wondering who performed the change.

Luckily for you, there are many ways to find who last logged in on your server.

In this tutorial, you will learn about the different useful commands that you can use in order to check the last logins on your computer.

Find Last Login using last

The easiest way to find the last login on your Linux computer is to execute the “last” command with no options. Using this command, you will be presented with all the last logins performed on the computer.

$ last

# To check the last ten login attempts, you can pipe it with "head"

$ last | head -n 10

Find Last Login using last-command

As you can see, by default, the output is truncated : the “devconnected” user is only displayed as “devconne” with simply using the last command.

If you find last logins using complete usernames and hostnames, you have to append the “-w” option or “–fullnames“.

$ last -w

$ last --fullnames

Find Last Login using last-complete-output

Last Command Columns

When taking a look at the last command, the output can be a bit confusing. There are many columns but we don’t exactly know what they stand for.

First of all, there is a difference between user login and reboots.

As you can see, user logins start with the name of the user that connected to the computer. On the other hand, “reboot” logs obviously start with the “reboot” keyword.

User Log In Columns

For user logs, the meaning of the different columns is the following :

  • Username : the username who connected to the computer;
  • TTY : the index of the TTY used by the user in order to connect to the computer. “:0” denotes that the connection is local and you may use the “tty” command in order to find the device used by the user;
$ tty

Last Command Columnstty-command
The user is using /dev/pts/0 to interact with the system

  • The name of the display : as X is used as the display server on every machine, it may use a local display (:0, :1 and so on) or a remote display. If you are interested in running graphical applications remotely, you may read our guide about the X protocol;
  • Hour of the login : starting the server is quite different from logging into it. This hour represents the time where the password was actually provided in the interface;
  • Login status : either you are “still logged in” or “down” with the duration of the session.

Last Command Columns last-session-duration

For example, in the following example, the session duration was twelve minutes.

Pseudo reboot columns

On every reboot, your system adds a new line to the current list of reboots performed on your computer.

Those special lines, starting with “reboot“, have the following columns :

  • Reboot : specifying that this is not a log in but rather a system reboot;
  • Details about the reboot : in this case it was actually a “system boot” meaning that the system just started;
  • Kernel version : the kernel version loaded when booting up the system. It might be different if you host different version of the kernel on your boot partition.
  • Hour of the boot : the hour represents the time of the system boot. It is either followed by a “still running” indication or the end hour followed by the session duration in paranthesis.

Now that you have seen how you can list all last logins on your server, let’s see if you are interested in bad login attempts.

Find Last Login By Date

In some cases, you may be interested in login that were made since or until a specific date in the past, or in the last five minutes.

To find the last login by date, execute the “last” command with the “–since” command and specify the date to find the last logins for.

Similarly, you can use the “–until” command in order to find login attempts made until a given date in the past.

$ last --since <date>

$ last --until <date>

So what are the dates that you can use in order to search?

Date formats are specified in the last documentation page.

Find Last Login By Date last-date-formats

As an example, let’s say that you want to find all login attempts were in the past two days, you would execute the following command

$ last --since -2days

Find Last Login By Date last-since-two-days

Similarly, if you want to find all login attempts made five days in the past, you would run the following command

$ last --until -5days

As a diagram often helps more than words, here is a way to understand the “–since” and “–until” options.

Find Last Login By Date linux-last-login-command

Find Last Bad Login Attempts using lastb

In order to find the last bad login attempts on your Linux server, you have to use the “lastb” with administrator rights.

$ sudo lastb

If you are not sure about how to check such rights, make sure to read our dedicated guides.

Find Last Bad Login Attempts using lastb-command-linux

As you can see, the output is quite similar to the one from the “last” command : the username attempted, the device used as well as the time of the attempt.

In this case, the duration “(00:00)” will be fixed as a connection attempt has no duration at all.

Note that the device line can display “ssh:notty” in case that the log in attempt was made from a SSH terminal.

Inspecting the auth.log file

Alternatively, you can inspect the content of the “/var/log/auth.log” file in order to see all failed attempts on your server.

$ tail -f -n 100 /var/log/auth.log | grep -i failed

Inspecting the auth.log file auth-log-failed-attempts

Find Last SSH Logins on Linux

In order to find the last SSH logins performed on your Linux machine, you can simply inspect the content of the “/var/log/auth.log” and pipe it with “grep” to find SSH logs.

$ tail -f -n 100 /var/log/auth.log | grep -i sshd

Find Last SSH Logins on Linux sshd-logs-last

Alternatively, you can inspect the logs of the SSH service by running the “journalctl” command followed by the “-u” option for “unit” and the name of the service.

$ sudo journalctl -r -u ssh | grep -i failed

Find Last SSH Logins on Linux journactl-command

Note : interested in listing services and their statuses on your server? Here is a guide about listing your services on Linux.

If you don’t see any logs related to the SSH service, it might be related to your SSH configuration file, namely to the “PrintLastLog” option.

$ cat /etc/ssh/sshd_config | grep PrintLastLog

Find Last SSH Logins on Linux print-last-log-ssh

If this option is set to “No” on your server and you wish to print last logs, make sure to uncomment the line with the “yes” value. Do not forget to restart your SSH server after that.

$ sudo nano /etc/ssh/sshd_config

PrintLastLog yes

$ sudo systemctl restart ssh

$ sudo systemctl status ssh

Great! You learnt how you can find the last SSH logs on your computer.

List User Last Login on Linux

In order to find last login times for all users on your Linux machine, you can use the “lastlog” command with no options. By default, you will be presented with the list of all users with their last login attempts.

Alternatively, you can use the “-u” option for “user” and specify the user you are looking for.

$ lastlog

$ lastlog -u <user>

List User Last Login on Linux lastlog-command

As you can see, with no options, the command will return the list of all accounts on your machine, even the root one and system ones.

Conclusion

In this tutorial, you learnt how you can easily find the last login attempts made on a Linux computer.

Whether those attempts were made through a login shell or a SSH session, you now know which files to inspect and which tools to use in order to retrieve them.

Remember that you can inspect those files but you can also plot them on a dashboarding solution such as Kibana, here’s a guide on how to achieve that.

If you are interested in Linux System Administration, we have a complete section dedicated to it on the website, so make sure to have a look!

How To Encrypt Root Filesystem on Linux

As a system administrator, you probably already know how important it is to encrypt your disks.

If your laptop were to be stolen, even a novice hacker would be able to extract the information contained on the disks.

All it takes is a simple USB stick with a LiveCD on it and everything would be stolen.

Luckily for you, there are ways for you to prevent this from happening : by encrypting data stored on your disks.

In this tutorial, we are going to see the steps needed in order to perform a full system encryption. You may find other tutorials online focused on encrypting just a file or home partitions for example.

In this case, we are encrypting the entire system meaning the entire root partition and the boot folder. We are going to encrypt a part of the bootloader.

Ready?

Prerequisites

In order to perform all the operations detailed in this guide, you obviously need to have system administrator rights.

In order to check that this is the case, make sure that you belong to the “sudo“ group (for Debian based distributions) or “wheel“ (on RedHat based ones).
How To Encrypt Root Filesystem on Linux checking-sudo

If you see the following output, you should be good to go.

Before continuing, it is important for you to know that encrypting disks doesn’t come without any risks.

The process involves formatting your entire disk meaning that you will lose data if you don’t back it up. As a consequence, it might be a good idea for you to backup your files, whether you choose to do it on an external drive or in an online cloud.

If you are not sure about the steps needed to backup your entire system, I recommend that you read the following tutorial that explains it in clear terms.

Now that everything is set, we can begin encrypting our entire system.

Identify your current situation

This tutorial is divided into three parts : one for each scenario that you may be facing.

After identifying your current situation, you can directly navigate to the chapter that you are interested about.

If you want to encrypt a system that already contains unencrypted data, you have two choices :

  • You can add an additional disk to your computer or server and configure it to become the bootable disk : you can go to the part one.
  • You cannot add an additional disk to your computer (a laptop under warranty for example) : you will find the information needed on part two.

If you are installing a brand new system, meaning that you install the distribution from scratch, you may encrypt your entire disk directly from the graphical installer. As a consequence, you can go to part three.

Design Hard Disk Layout

Whenever you are creating new partitions, encrypted or not, it is quite important to choose the hard disk design ahead of time.

In this case, we are going to design our disk using a MBR layout : the first 512 bytes of the bootable disk will be reserved for the first stage of the GRUB (as well as metadata for our partitions).

The first partition will be an empty partition reserved for systems using EFI (or UEFI) as the booting firmware. If you choose to install Windows 10 in the future, you will have a partition already available for that.

The second partition of our disk will be formatted as a LUKS-LVM partition containing one physical volume (the disk partition itself) as well as one volume group containing two logical volumes : one for the root filesystem and another one for a small swap partition.

As you can see, the second stage of the GRUB will be encrypted too : this is because we chose to have the boot folder stored on the same partition.

Design Hard Disk Layout mbr-disk-design

Of course, you are not limited to the design provided here, you can add additional logical volumes for your logs for example.

This design will be our roadmap for this tutorial : we are going to start from a brand new disk and implement all the parts together.

Data-at-rest encryption

This tutorial focuses on data-at-rest encryption. As its name states, data-at-rest encryption means that your system is encrypted, i.e nobody can read from it, when it is resting or powered off.

Data-at-rest encryption data-at-rest-encryption

This encryption is quite useful if your computer were to be stolen, hackers would not be able to read data on the disk unless they know about the passphrase that you are going to choose in the next sections.

However, there would still be a risk that your data is erased forever : having no read access to a disk does not mean that they cannot simply remove partitions on it.

As a consequence, make sure that you keep a backup of your important files somewhere safe.

Encrypting Root Filesystem on New Disk

As detailed during the introduction, we are going to encrypt the root filesystem from a new disk that does not contain any data at all. This is quite important because the encrypted disk will be formatted in the process.

Head over to the system that you want to encrypt and plug the new disk. First of all, identify your current disk, which is probably named “/dev/sda” and the disk that you just plugged in (probably named “/dev/sdb”).

If you have any doubts about the correspondence between names and disk serials, you can append vendors and serials with the “-o” option of lsblk.

$ lsblk -do +VENDOR,SERIAL

Encrypting Root Filesystem on New Disk listing-drives-linux

In this case, the disk with data is named “/dev/sda” and the new one is named “/dev/sdb”.

First of all, we need to create the layout we specified in the introduction, meaning one partition that is going to be a EFI one and one LUKS-LVM partition.

Creating Basic Disk Layout

The first step on our journey towards full disk encryption starts with two simple partitions : one EFI (even if we use MBR, in case you want to change in the future) and one for our LVM.

To create new partitions on your disk, use the “fdisk” command and specify the disk to be formatted.

$ sudo fdisk /dev/sdb

As explained in the introduction, the first partition will be a 512 Mb one and the other one will take the remaining space on the disk.

Creating Basic Disk Layout create-w95-partition

In the “fdisk” utility, you can create a new partition with the “n” option and specify a size of 512 megabytes with “+512M“.

Make sure to change the partition type to W95 FAT32 using the “t” option and specifying “b” as the type.

Awesome, now that you have your first partition, we are going to create the one we are interested in.

Creating Basic Disk Layout create-second-partition

Creating the second partition is even simpler.

In the fdisk utility, use “n” in order to create a new partition and stick with the defaults, meaning that you can press “Enter” on every steps.

When you are done, you can simply press “w” in order to write the changes to disk.

Now, executing the “fdisk” command again will give you a good idea of the changes that you performed on the disk.

$ sudo fdisk -l /dev/sdb

Creating Basic Disk Layout fdisk-command-disk

Great!

Your second partition is ready to be formatted so let’s head to it.

Creating LUKS & LVM partitions on disk

In order to encrypt disks, we are going to use LUKS, short for the Linux Unified Key Setup project.

LUKS is a specification for several backends implemented in some versions of the Linux kernel.

In this case, we are going to use the “dm-crypt” submodule of the Linux storage stack.

As its names states, “dm-crypt” is part of the device mapper module that aims at creating a layer of abstraction between your physical disks and the way you choose to design your storage stack.

Creating LUKS & LVM partitions on disk dm-crypt

This information is quite important because it means that you can encrypt pretty much every device using the “dm-crypt” backend.

In this case, we are going to encrypt a disk, containing a set of LVM partitions, but you may choose to encrypt a USB memory stick or a floppy disk.

In order to interact with the “dm-crypt” module, we are going to use the “cryptsetup” command.

Obviously, you may need to install it on your server if you don’t have it already.

$ sudo apt-get instal cryptsetup

$ which cryptsetup

Creating LUKS & LVM partitions on disk which-cryptsetup

Now that the cryptsetup is available on your computer, you will create your first LUKS-formatted partition.

To create a LUKS partition, you are going to use the “cryptsetup” command followed by the “luksFormat” command that formats the specified partition (or disk).

 $ sudo cryptsetup luksFormat --type luks1 /dev/sdb2
Note : so why are we specifying the LUKS1 formatting type? As of January 2021, GRUB (our bootloader) does not support LUKS2 encryption. Make sure to leave a comment if you notice that LUKS2 is now released for the GRUB bootlader.

Creating LUKS & LVM partitions on disk cryptsetup-luksformat

As you can see, you are notified that this operation will erase all data stored on the disk. Check the disk that you are formatting one last time, and type “YES” when you are ready.

Right after, you are prompted with a passphrase. LUKS uses two authentication methods : a passphrase based one which is essentially a password that you enter on decryption.

LUKS can also use keys. Using keys, you can for example store it on a part of your disk and your system will be able to look after it automatically.

Choose a strong passphrase, enter it again and wait to the disk encryption to complete.

Creating LUKS & LVM partitions on disk cryptsetup-luksformat-2

When you are done, you can check with the “lsblk” command that your partition is now encrypted as a LUKS one.

Awesome! You now have an encrypted partition.

$ lsblk -f

list-encrypted-drives

To check that your partition is correctly formatted, you can use the “cryptsetup” command followed by the “luksDump” option and specify the name of the encrypted device.

$ sudo cryptsetup luksDump /dev/sdb2

cryptsetup-luksdump

Your version should be set to “1” for the “LUKS1” format and you should see below the encrypted passphrase in one of the keyslots.

Creating Encrypted LVM on disk

Now that your LUKS encrypted partition is ready, you can “open” it. “Opening” an encrypted partition simply means that you are going to access data on the disk.

To open your encrypted device, use the “cryptsetup” command followed by “luksOpen”, the name of the encrypted device and a name.

$ sudo cryptsetup luksOpen <encrypted_device> <name>

cryptsetup-luksOpen

In this case, we chose to name the device “cryptlvm“.

As a consequence, using the “lsblk” command again, you can see that a new device was added to the existing device list. The second partition now contains a device named “cryptlvm” which is your decrypted partition.

Now that everything is ready, we can start creating our two LVM : one for our root partition and one for swap.

First of all, we are going to create a physical volume for our new disk using the “pvcreate” command.

# Optional, if you don't have LVM commands : sudo apt-get install lvm2

$ sudo pvcreate /dev/mapper/cryptlvm

create-physical-volume

Now that your physical volume is ready, you can use it to create a volume group named “cryptvg“.

$ sudo vgcreate cryptvg /dev/mapper/cryptlvm

vgcreate-command

Now that your volume group is ready, you can create your two logical volumes.

In this case, the first partition is a 13Gb one and the swap partition will take the remaining space. Make sure to modify those numbers for your specific case.

In order to host our root filesystem, we are going to create an EXT4 filesystem on the logical volume.

$ sudo lvcreate -n lvroot -L 13G cryptvg

$ sudo mkfs.ext4 /dev/mapper/cryptvg-lvroot

create-root-logical-volume

Creating the swap partition can be achieved using the same steps, using the “lvcreate” and the “mkswap” one.

$ sudo lvcreate -n lvswap -l 100%FREE cryptvg

$ sudo mkswap /dev/mapper/cryptvg-lvswap

create-swap-logical-volume

Awesome! Now that your partitions are created, it is time for you to transfer your existing rootfilesystem on the newly created one.

Transfer Entire Filesystem to Encrypted Disk

Before transferring your entire filesystem, it might be a good idea to check that you have enough space on the destination drive.

$ df -h

In order to transfer your entire filesystem to your newly created partition, you are going to use the “rsync” command.

Mount your newly created logical volume and start copying your files and folders recursively to the destination drive.

$ sudo mount /dev/mapper/cryptvg-lvroot /mnt

$ sudo rsync -aAXv / --exclude="mnt" /mnt --progress

This process can take quite some time depending on the amount of data that you have to transfer.

After a while, your entire filesystem should be copied to your encrypted drive. Now that the “/boot” is encrypted, you will need to re-install the stage 1 of the GRUB accordingly.

Install and Configure GRUB Bootloader

So, why would you need to re-install and re-configure your GRUB accordingly?

To answer this question, you need to have a basic idea of the way your system boots up when using a BIOS/MBR conventional booting process.

Install and Configure GRUB Bootloader linux-bios-boot-process

As explained in the introduction, GRUB is split into two (sometimes three) parts : GRUB stage 1 and GRUB stage 2. The stage 1 will only look for the location of the stage 2, often located in the “/boot” folder of your filesystem.

The stage 2 is responsible for many tasks : loading the necessary modules, loading the kernel into memory and starting the the initramfs process.

As you understood, the stage 2 is encrypted here, so we need to tell the stage 1 (located in the first 512 bytes of your disk) that it needs to be decrypted first.

Re-install GRUB Stage 1 & 2

In order to reinstall the first stage of the GRUB, you first need to enable the “cryptomount” that enables access to encrypted devices in the GRUB environment.

To achieve that, you need to edit the “/etc/default/grub” file and add the “GRUB_ENABLE_CRYPTODISK=y” option.

However, you are currently sitting on the system that you are trying to encrypt. As a consequence, you will need to chroot into your new drive in order to execute the commands properly.

Chroot in Encrypted Drive

To chroot into your encrypted drive, you will have to execute the following commands.

$ sudo mount --bind /dev /mnt/dev
$ sudo mount --bind /run /mnt/run

$ sudo chroot /mnt/

$ sudo mount --types=proc proc /proc
$ sudo mount --types=sysfs sys /sys

Chroot in Encrypted Drive lsblk-chroot

Now that you executed those commands, you should now be in the context of your encrypted drive.

$ vi /etc/default/grub

grub-enable-cryptodisk-1

GRUB_ENABLE_CRYPTODISK=y

As stated in the GRUB documentation, this option will configure the GRUB to look for encrypted devices and add additional commands in order to decrypt them.

Now that the stage 1 is configured, you can install it on your MBR using the grub-install command.

$ grub-install --boot-directory=/boot /dev/sdb
Note : be careful, you need to specify “/dev/sdb” and not “/dev/sdb1”.

grub-install-stage-1

As you probably noticed, when providing no options for the GRUB installation, you have by default an “i386-pc” installation (which is designed for a BIOS-based firmware).

Re-install GRUB Stage 2

Using the steps detailed above, the stage 1 has been updated but we also need to tell the stage 2 that it is dealing with an encrypted disk.

To achieve that, head over to the “/etc/default/grub” and add another line for your GRUB stage 2.

GRUB_CMDLINE_LINUX="cryptdevice=UUID=<encrypted_device_uuid> root=UUID=<root_fs_uuid>"

This is an important line because it tells the second stage of the GRUB where the encrypted drive is and where the root partition is located.

To identify the UUIDs needed, you can use the “lsblk” command with the “-f” option.

$ lsblk -f

lsblk-uuids

Using those UUIDs, we would add the following line to the GRUB configuration file.

GRUB_CMDLINE_LINUX="cryptdevice=UUID=1b9a0045-93d5-4560-a6f7-78c07e1e15c4 root=UUID=dd2bfc7f-3da2-4dc8-b4f0-405a758f548e"

To update your current GRUB installation, you can use the “update-grub2” command in your chrooted environment.

$ sudo update-grub2

update-grub2-command

Now that you updated your GRUB installation, your GRUB menu (i.e the stage 2) should be modified and you should see the following content when inspecting the “/boot/grub/grub.cfg” file.

grub-configuration-file

As you can see, the GRUB configuration file was modified and your system is now using “cryptomount” in order to locate the encrypted drive.

For your system to boot properly, you need to check that :

  • You are loading the correct modules such as cryptodisk, luks, lvm and others;
  • The “cryptomount” instruction is correctly set;
  • The kernel is loaded using the “cryptdevice” instruction we just set in the previous section.
  • The UUID specified are correct : the “cryptdevice” one is pointing to the LUKS2 encrypted partition and the “root” one to the ext4 root filesystem.

Modify crypttab and fstab files

One of the first steps of initramfs will be to mount your volumes using the “/etc/crypttab” and “/etc/fstab” files on the filesystem.

As a consequence, and because you creating new volumes, you may have to modify those files in order to put the correct UUID in them.

First of all, head over to the “/etc/crypttab” file (you can create it if it does not exist already) and add the following content

$ nano /etc/crypttab

# <target name>   <source device>        <key file> <options>
  cryptlvm        UUID=<luks_uuid>       none       luks

Modify crypttab and fstab files crypttab-file

If you are not sure about the UUID of your encrypted device, you can use the “blkid” to get the information.

$ blkid | grep -i LUKS

Now that the crypttab file is modified, you only need to modify the fstab accordingly.

$ nano /etc/fstab

# <file system>       <mount point>   <type>  <options>             <dump>    <pass>
UUID=<ext4 uuid>      /               ext4    errors=remount-ro     0         1

Again, if you are not sure about the UUID of your ext4 filesystem, you can use the “blkid” command again.

$ blkid | grep -i ext4

Almost done!

Now that your GRUB and configuration files are correctly configured, we only need to configure the initramfs image.

Re-configure initramfs image

Among all the boot scripts, initramfs will look for the root filesystem you specified in the previous chapter.

However, in order to decrypt the root filesystem, it will need to invoke the correct initramfs modules, namely the “cryptsetup-initramfs” one. In your chrooted environment, you can execute the following command :

$ apt-get install cryptsetup-initramfs

In order to include the cryptsetup modules in your initramfs image, make sure to execute the “update-initramfs” command.

$ update-initramfs -u -k all

That’s it!

You have successfully assembled all the needed pieces in order to create a fully encrypted disk on your system. You can now reboot your computer and have a look at your new boot process.

Boot on Encrypted Device

When booting, the first screen that you will see is the first stage of the GRUB trying to decrypt the second stage of the GRUB.

Boot on Encrypted Device grub-stage-1-encrypted

If you see this password prompt, it means that you don’t have any errors in your stage 1 configuration.

Note : be aware that this screen may not follow your usual keyboard layout. As a consequence, if you have an incorrect password prompt, you should try pretending that you have a US keyboard or an AZERTY one for example.

When providing the correct password, you will be presented with the GRUB menu.

grub-stage-2

If you see this screen, it means that your stage 1 was able to open the stage 2. You can select the “Ubuntu” option and boot on your system.

boot-lock-screen

On the next screen, you are asked to provide the passphrase again.

This is quite normal because your boot partition is encrypted. As a consequence, you need one passphrase in order to unlock the stage 2 and one to unlock the entire root filesystem.

Luckily, there is a way to avoid that : by having a key file embedded in the initramfs image. For that, ArchLinux contributors wrote an excellent tutorial on the subject.

In this case, we are just going to provide the passphrase and press Enter.

After a while, when the init process is done, you should be presented with the lock screen of your user interface!

Congratulations, you successfully encrypted an entire system on Linux!

lock-screen

Encrypting Root Filesystem on Existing Disk

In some cases, you may have to encrypt an existing disk without the capability of removing one of the disks on your computer. This case may happen if you have a disk under warranty for example.

In this case, the process is quite simple :

  • Make a bootable USB (or removable device) containing an ISO of the distribution of your choice;
  • Use the device in order to boot and log into a LiveCD of your distribution;
  • From the LiveCD, identify the hard disk containing your root distribution and make a backup of it;
  • Mount the primary partition on the folder of your choice and follow the instructions of the previous chapter;

So why do you need to use a LiveCD if you want to encrypt a non-removable disk?

If you were to encrypt your main primary disk, you would have to unmount it. However, as it is the root partition of your system, you would not be able to unmount it, as a consequence you have to use a LiveCD.

Encrypting Root Filesystem From Installation Wizard

In some cases, some distributors embed the encryption process right into the installation wizard.

If you are not looking to transfer an existing filesystem from one system to another, you might be tempted to use this option.

Taking Ubuntu 20.04 as an example, the installation process suggests disk encryption in the disk configuration wizard.

Encrypting Root Filesystem From Installation Wizard
If you select this option, you will have a similar setup to the one done in the previous sections. However, most distributions choose not to encrypt the “/boot” folder.

encrypted-system-from-wizard

If you want to encrypt the “/boot” folder, we recommend that you read the first section of this tutorial.

Troubleshooting

As open-source changes constantly, there is a chance that you are not able to boot your system, even if you followed the steps of this tutorial carefully.

However, as error sources are probably infinite and specific to every user, there would be no point enumerating every single issue that you can encouter.

However, most of the time, it is quite important to know on which step of the boot process you are failing.

If you see a screen with a “grub rescue” prompt, it probably means that you are stuck on the stage 1, thus that the bootloader was not able to locate the disk containing the second stage.

If you are in an initramfs prompt, it probably means that something wrong happened during the init process :

  • Are you sure that you specified the filesystems to mount in the crypttab and fstab files?
  • Are you sure that all modules were currently loaded in your initramfs image? Aren’t you missing the cryptsetup or lvm modules for example?

initramfs-screen

Below are some resources that we found interesting during the writing of this tutorial, they may have some answers to your problems :

  • Encrypting an entire system : a similar tutorial for ArchLinux;
  • Manual System Encryption on Ubuntu : steps used in order to chroot in a root filesystem.

Conclusion

In this tutorial, you learnt how you can encrypt an entire root filesystem, with the “/boot” folder, using the LUKS specification.

You also learnt about the Linux boot process and the different steps that your system goes through in order to launch your operating system.

Achieving a full-system encryption is quite lengthy but it is very interesting for users that are willing to dig deeper into the Linux and open source world.

If you are interested in Linux System Administration, make sure to read our other tutorials and to navigate to our dedicated section.

How To Encrypt File on Linux

If you are a conscientious system administrator, you have probably already wondered how you can make your files secure.

Nowadays, as system attacks get more and more frequent, it isn’t probably a bad idea to think about encrypting your files.

On Linux, there are multiple of encrypting files, directories or filesystems : namely using the LUKS disk encryption specification or simple tools such as GnuPG.

In this tutorial, you will learn how you can easily encrypt files and directories on Linux using the GnuPG tool as well as the zip utility.

Encrypt Files using passphase protection

One of the easiest ways of encrypting a file on Linux is to use the “gpg” utility.

“gpg” is a simple utility that is part of the OpenPGP initiative that aims at providing easy methods to securely sign documents.

Files can be decrypted using two different methods : a password or a key file. In this section, we are going to focus on setting up a password protection for your encrypted files.

To encrypt files using a password, use the “gpg” command with the “-c” option specifying that you want to use a symmetric encryption for your file. After that, specify the name of the file that you want to encrypt.

$ gpg -c <file>

The “gpg” command will create a file with a “.gpg” extension which is the encrypted file that you want to store.

Encrypt Files using passphase protection encrypt-file-using-gpg

If you are running a Linux distribution with a graphical environment, you will be prompted with a window in order to specify the passphrase.

passphrase-encrypt-file

Note : make sure not to forget your passphrase. You won’t be able to recover the passphrase in any means.
Special tip : writing down your passphrase and storing it in a physical lock can be a solution.

If you were to inspect the content of the file using a simple “cat “command, you would not be able to see the content.

Encrypt Files using passphase protection encrypted-file

Awesome, you successfully encrypted a file on Linux using “gpg”!

Decrypt Encrypted File on Linux

In order to decrypt an encrypted file on Linux, you have to use the “gpg” command with the “-d” option for “decrypt” and specify the “.gpg” file that you want to decrypt.

$ gpg -d <file>.gpg

Decrypt Encrypted File on Linux decrypt-file-root

Again, you will be probably be prompted with a window (or directly in the terminal) for the passphrase. If you provide the correct one, you will be able to see the content of your file.

Decrypt Encrypted File on Linux decrypt-file-linux

Note : if you were not prompted for the passphrase for the file, it is because the GPG utility will create a set of keys for you in your home directory when you unlock a file (or create it)

Awesome, your file is now decrypted, you can inspect its content easily.

Encrypt Directory using gpg

In some cases, you may be interested in encrypting a whole directory, containing a lot of files.

In order to achieve that, you are going to create an archive first and encrypt it later on.

To create an archive, use the “tar” command along with the “-cvf” options that stand for “create a file in verbose mode”. Now that your archive is created, you can encrypt it using the “gpg” command with the “-c” option.

$ tar -cvf archive.tar <directory>

$ gpg -c archive.tar

Encrypt Directory using gpg encrypt-tar-archive

Again, you might be prompted for a specific passphrase that you will have to remember.

Congratulations, you successfully encrypted a directory using the tar and gpg commands!

Encrypt Directory using zip

In order to encrypt a file using zip, use the “zip” command with the “–encrypt” option and provide the zip name as well as the files to be encrypted.

$ zip -r --encrypt secure.zip <directory>

$ zip --encrypt secure.zip <file>...<file10>

Encrypt Directory using zip secure-zip

Awesome, you have successfully created an encrypted zip archive!

To open your encrypted archive, you can simply use the “unzip” command and provide the password you just used.

Encrypt Directory using zip unzip-encrypted-zip

Encrypt Files using private key

As explained in other tutorials, generating key pairs (a public key and a private key) remain a very efficient way of preventing people from accessing your files.

To encrypt files on Linux using a private key, you have to execute the “gpg” command with the “–full-gen-key” option. You have multiple options for key generation (such as “–quick-generate-key”) but the full one gives you more options.

$ gpg --full-gen-key

Encrypt Files using private key gpg-generate-key

By default, the GPG utility will ask you a couple of questions. First, it wants you to choose an encryption method for your key.

We are going to choose “RSA” as it can be trusted as one of the best encryption methods available.

Encrypt Files using private key rsa-encryption-method

On the next step, you are asked for the size of the key that you want, we are going to remain with the defaults one and press Enter.

Encrypt Files using private key expiration-key

Finally, you are asked if you want to configure an expiration for the key that you are going to create. In this case, we want to use the same key forever, so you can choose the “0” option.

Encrypt Files using private key information-gpg-key

Now that you specified the key parameters, you are going to provide your name, your email address as well as a comment that is describing your key.

If everything is okay, you can press “O” and proceed to choose a passphrase.

passphrase-key-encryption

So why would you need a passphrase? A passphrase is used in order to protect your key from being stolen. Having a key alone is not enough, not that it could be brute-forced, but somebody could steal your key and use it to decrypt your files. A passphrase prevents this operation.

Encrypt Files using private key generated-key-linux

Congratulations, you successfully created your set of keys for encryption, you can now use them in order to encrypt your files.

To encrypt your file using your created key, you have to use the “gpg” command with the “-e” option for “encrypt” and specify the key to be used with the “–recipient” option.

$ gpg -e --recipient <email or name> <file>

In this case, we used the “devconnected” name along with the “devconnected@example.com” email address. To encrypt the file, we are going to execute the following command :

$ gpg -e --recipient devconnected@example.com

encrypt-using-key

Awesome, you have successfully encrypted your file using your key!

Decrypt File using key

In order to decrypt the file you just encrypted using your key, you have to use the “gpg” command with the “-d” option for decrypt.

$ gpg -d <file>.gpg

In this case, you will be prompted with a window that contains many more information, more specifically the key used.

passphrase-2

When providing the correct passphrase, you will be able to decrypt your file, great!

Decrypt File using key decrypt-file-gpg

Encrypt Files using Nautilus GUI

If you are not into using the terminal, you might want to have a beautiful GUI in order to encrypt your files.

To encrypt using a graphical interface, you are going to use the “Nautilus” file manager along with the “seahorse-nautilus” extension. This extension brings GPG features right into your graphical file explorer.

$ sudo apt-get install nautilus

$ sudo apt-get install seahorse-nautilus

Encrypt Files using Nautilus GUI seahorse-nautilus

When you are done, restart Nautilus by using the “nautilus” command with the “-q” option for “quit”.

$ nautilus -q

Open Nautilus again, using the command line or your left vertical bar, and right click on a file to see the “Encrypt” option.
Encrypt Files using Nautilus GUI nautilus-encryption
When clicking on “Encrypt“, you are asked if you want to choose a passphrase or if you want to encrypt the file using a key.
Encrypt Files using Nautilus GUI nautilus-encryption-2-1

In this case, select the key that you created in the steps before, and click on “Ok” when you are done.

That’s it! You now have an encrypted version of your file.

gpg-file

But did you know that you could decrypt your file using a GUI interface also?

Decrypt using GUI Interface

In order to decrypt your file, you can simply double-click or right-click and select the “Open with Decrypt File”.

Decrypt using GUI Interface open-with-decrypt-file

By using this option, you will be asked the name of the file to be created when decrypting the file. In this case we are going to choose file named “custom.txt

custom-file

When clicking on “Save“, you will be asked for the passphrase that you specified when creating your public key. Provide the specified passphrase and your file should be decrypted!

file-decrypted

Conclusion

In this tutorial, you learnt how you can simply encrypt and decrypt a file on Linux using console line commands or GUI tools.

Encryption is a big part of security : if you are storing sensitive information on your computer or server, you should seriously think about encryption for your disks.

If you are interested in disk encryption, maybe you should take a look at the LUKS project that aims at providing a simple API for it.

If you are interested in Linux System Administration, we have a complete section dedicated to it on the website, so make sure to check it out!

How To List Services on Linux

As a system administrator, you are probably dealing with a lot of services every day.

On Linux, services are used for many different purposes.

They may be used in order to start a SSH server on your machine or they can perform some operations on a specific hour or day.

Whether you are using a Debian based distribution or a RedHat one, querying services is very similar.

However, given the distribution you are using, and more specifically the initialization system (init or systemd), you may have to use different commands.

In this tutorial, you will learn how you can, given your system manager, list all services on your Linux machine.

Determine the system manager used

As you probably know, recent distributions use the Systemd system manager.

However, it has not always been the case : in the past, most distributions used the SysVinit system manager.

As a consequence, there are really two ways of managing your services on a Linux system.

Before learning the commands to list services, you have to know the system manager that you are currently using.

To determine your current system manager, the easiest way is to use the “pstree” command and to check the first process ever run on your system.

$ pstree | head -n 5

Determine the system manager used pstree

If you see “systemd“, it obviously means that you are currently using systemd. However, if you see “init“, it means that you are using SysVinit.

On Ubuntu 14.04, that is still using the old init system, your “pstree” may look like this.

Determine the system manager used pstree-init

List Services using systemctl

The easiest way to list services on Linux, when you are on a systemd system, is to use the “systemctl” command followed by “list-units”. You can specify the “–type=service” option in order to restrict the results to services only.

$ systemctl list-units --type=service

List Services using systemctl list-services-linux-systemd

By default, this command will show you only the services that are active or the services that have failed on your system. In the screenshot above, most of the services are active but the logrotate one (highlighted in red) is marked as failed.

Awesome, you learnt how you can easily list your services on a Linux server.

However, as you may have noticed, you did not have access to all services : what about inactive services? What about services that were not loaded by systemd on boot?

List All Services on Linux using list-units

In order to list all services, meaning active and inactive, you have to use the “systemctl list-units” command followed by the “–all” option.

Similarly, you can limit the results to services only by using the type filter.

$ systemctl list-units --type=service --all

List All Services on Linux using list-units list-inactive-services

As you can see, inactives services also listed which might be convenient if you just wrote your service and looking after it in the list.

In this case, only loaded services are listed. On boot, systemd loads unit files and it may choose not to load a specific service if it finds that it won’t be used by the system.

As a consequence, there is a real difference between “loaded” and “installed” services. “Installed” services mean that unit files can be found in the corresponding paths.

Disabling Root Login over SSH ssh-root-login

List Services By State

In some cases, you may only be interested in services that have failed. For that, you can specify the state that you are looking for as an option of the systemctl command.

$ systemctl list-units --state=<state>

$ systemctl list-units --state=<state1>,<state2>

Where “state” can be one of the following values : active, inactive, activating, deactivating, failed, not-found or dead.

For example, if we are only interested in “failed” services, we are going to run the following command

$ systemctl list-units --state=failed

List Services By State failed-service

List All Service Files using list-unit-files

Finally, if you are interested in “loaded“, “installed“, “disabled” as well as “enabled” service files, there is a another command that might be pretty handy.

In order to list all service files available, you have to use the “systemctl” command followed by “list-unit-files”. Optionally, you can specify the type by using the “–type=service” option.

$ systemctl list-unit-files --type=service

List All Service Files using list-unit-files list-installed-services

Alternatively, you can use the “grep” command in order to search for specific paths on your system that may contain service files.

$ ls -l /etc/systemd/system /usr/lib/systemd/service | egrep .service$

List All Service Files using list-unit-files list-files-using-grep

Congratulations, you learnt how you can list services if your system is using systemd!

List Services using service

The easiest way to list services on Linux, when you are on a SystemV init system, is to use the “service” command followed by “–status-all” option. This way, you will be presented with a complete list of services on your system.

$ service --status-all

List Services using service list-services-init-system

As you can see, each service is listed preceded by symbols under brackets. Those symbols mean :

  • + : means that the service is running;
  •  : means that the service is not running at all;
  • ? : means that Ubuntu was not able to tell if the service is running or not.

So why are some services to tell if they are running or not, and some are not able to?

It all comes down to the implementation of the init script. In some scripts, such as the udev script for example, you are able to see that the “status” command is implemented.

udev-status

This is not the case for the “dns-clean” script for example which is the reason why you have a question mark when you query this service.

List SysVinit Services in Folders

Another way of listing the current list of services is to use the “ls” command on the folders containing all scripts on a Linux system, namely “/etc/init.d”.

$ ls -l /etc/init.d/*

List SysVinit Services in Folders initd-folder

Conclusion

In this tutorial, you learnt how you can easily list services on a Linux system whether you are using systemd or SysVinit ones.

If you are interested in creating your own services, we recommend that you have a look at the following resources. They might be really useful in order to correctly achieve that.

  • Writing a startup script for init systems;
  • Starting services at boot using systemd;

If you are interested in Linux System Administration, we have a complete section on this subject on the website, so make sure to check it out.

How To Manage Root Account on Ubuntu 20.04

On Linux, the root account is probably one of the most powerful accounts that there is.

Considered the most privileged account on a Unix system, root can perform any tasks needed for system administration.

Navigating a specific folder, killing any process or deleting a directory, root is so powerful that it has to be managed properly.

In this tutorial, you will learn about the different facets of the root account on Ubuntu 20.04.

You will learn to lock and unlock it, to change its password as well as disabling it when trying to remotely access your machine.

Finally, you will know the difference between the root account and the sudo command that is used quite often.

Prerequisites

For most of the commands used in this tutorial, you will need sudo privileges.

How To Manage Root Account on Ubuntu 20.04 groups

If the sudo group is part of your current groups, it means that you should be able to execute the commands listed below.

If not, make sure to check our guide on how to get sudo rights on Ubuntu 20.04.

Check Lock Status of Root Account

Given your distribution, the root account may or may not be locked by default.

By default, when installing Ubuntu 20.04, you created a user account that got the sudo privileges.

As you can see, by default, the “devconnected” user is in the “sudo” group, which allows it to have temporary root rights if needed.

But what about the actual root account?

To know if your root account is locked or not, you can either check the “/etc/shadow” file or use the passwd command with the “-S” option.

Inspecting the shadow file

On Linux, the shadow file is a very sensitive file : it contains the encrypted passwords for all the users available on your machine.

As a consequence, its content should never be seen or modified by a regular user.

In our case, we are only going to pay attention to the information related to the root account.

In order to know if the root account is locked or not, look for an exclamation mark in the field that should contain the encrypted password. If there is one, that means that the account is locked.

$ sudo getent shadow root

$ sudo cat /etc/shadow | grep root

Inspecting the shadow file root-locked

If you are curious, this point is actually specified in the documentation when reading the page dedicated to “shadow“.

$ man shadow

Inspecting the shadow file encrypted-password

Using the passwd command

Usually, the passwd command is used in order to change a user’s password on Linux.

However, the “-S” option can be used in order to display the account “status” information.

$ sudo passwd -S root

Using the passwd command passwd-command

When using the “-S” option, you want to pay attention to the second column : it actually displays the status of the account (L for “locked” and P for “usable password“).

In this case, the root account is locked while the regular user account has a password.

Locking & Unlocking Root Account

By default, it is recommended to lock the root account and to use dedicated privileged accounts in order to perform critical operations.

In order to lock the root account, you have to use the “usermod” command with the “-L” option for “lock” and specify the root account.

$ sudo usermod -L root

Make sure to verify that the account is correctly locked by using one of the commands we described in the previous section.

Locking & Unlocking Root Account lock-root-account

In order to unlock the root account, you have to use the “usermod” command with the “-U” and specify the root account.

$ sudo usermod -U root

Changing the root password

In order to change the root password, you have to use the “passwd” and specify the root account.

$ sudo passwd root

Changing the root password changing-root-password

After changing your password, the account will be automatically unlocked.

In order to switch to the root account, you can use the well-known “su” command without any arguments (the default account is root).

$ su -

Changing the root password connect-to-root

Disabling Root Login over SSH

In some cases, you want to keep the local root account accessible for administration but disabled for remote access.

If you are accessing your machine over SSH, you should disable root login whenever your server is active.

By default, on recent distributions, root login is set to “prohibit-password”, which means that you can still connect to it using SSH key authentication.

In order to disable it completely, head over to your “/etc/ssh/sshd_config” file and identify the line with “PermitRootLogin”.

#PermitRootLogin

PermitRootLogin no

Disabling Root Login over SSH ssh-root-login

Of course, make sure to restart your SSH server for the modifications to be taken into account.

$ sudo systemctl restart sshd

Conclusion

In this tutorial, you learnt how you can manage the root account on Linux easily.

You learnt that there are many different ways of checking for the lock status of the root account, using the shadow file or the passwd command for example.

If you are interested in Linux System Administration, we have a complete section dedicated to it on the website, so make sure to check it out!

How To Add Swap Space on Ubuntu 20.04

This tutorial focuses on how to create swap space on Ubuntu 20.04 using a swap partition or a swap file.

For system administrators, it is quite common for servers to run out of RAM.

In some cases, you may have launched too many programs or some of the programs are already using too many resources.

In this case, you don’t have many options.

You can either stop some processes in order to gain some RAM, but you may not be able to do that.

Fortunately, you have another solution : adding some swap space.

In this tutorial, you will learn how you can add swap space on Ubuntu 20.04 : via a swap partition or a swap file.

Prerequisites

Before starting, make sure that you have sudo privileges on Ubuntu 20.04.

$ groups

groups

If you see the “sudo” groups in the group list, you should be able to create a swap partition.

Check Existing Swap Partitions

In order to check existing swap partitions on your system, you have to use the “swapon” command.

$ sudo swapon --show

By default, during your Ubuntu installation, it is very common for a swap partition to be created already.

Check Existing Swap Partitions lsblk

As a consequence, you should see the following output on your console.

Check Existing Swap Partitions swapon-show

As you can see, I own a swap partition named “dm-1” of size 980 Mb.

However, my current RAM is sufficient for my server, so it is not used at all.

If no swap spaces are configured on your server, you should see the following output.

Check Existing Swap Partitions empty-swapon

Add Swap Space on Ubuntu 20.04 using a swap partition

The first way to add swap space on Ubuntu is to add a swap partition.

In order to add this partition, we are going to use :

  • the “lvcreate” command if you are on a LVM device (meaning a disk partition formatted as LVM)
  • the “fdisk” command if you are on a “regular” disk.

a – Create Swap Partition on a LVM device

First of all, you need to inspect the existing partitions on your host.

$ sudo fdisk -l

a – Create Swap Partition on a LVM device fdisk-list

As you can see here, I already own three partitions :

  • /dev/sda1 : my bootable partition as I am dealing with a MBR disk here;
  • /dev/sda2 : an extended partition of size 14.5 GBs;
  • /dev/sda5 : my primary LVM partition.

Knowing that, you can either create a swap partition on the extended partition or on your primary LVM partition.

In this case, we choose to create this partition on the LVM one.

As a consequence, we will have to check that we have some space for it.

As a reminder, /dev/sda5 is a disk partition, also called a physical volume, linked to a volume group.

In order to check if we have some remaining space, we need to use the “vgs” command.

If you are not familiar with LVM, I recommend that you read first our dedicated article on the subject.

$ sudo vgs

a – Create Swap Partition on a LVM device vgs

In this case, we have about 980 Mb of remaining space which should be enough for our swap partition.

In order to create a new logical volume on this volume group, we are going to use the “lvcreate” command.

$ sudo lvcreate -L 500M -n lvswap vgubuntu

a – Create Swap Partition on a LVM device lvcreate

Note : you may be prompted to delete a swap signature on a given logical volume. You can press “y”, you are asked this information because there was an existing partition with the same name before.

You can verify that your logical volume was correctly created using the “lvs” command.

$ sudo lvs

a – Create Swap Partition on a LVM device lvs

b – Create Swap Partition on a regular partition

You can skip this section and go to the next one if you already created your partition on a LVM device.

If you are dealing with a “regular” Linux partition, you will have to use the fdisk command.

In our case, our “regular” (Linux type) partition is named “/dev/sda2“.

$ sudo fdisk /dev/sda

Welcome to fdisk (util-linux 2.34).
Changes will remain in memory only, until you decide to write them.
Be careful before using the write command.

Command (m for help): n

To create a new partition, you have to use the “n” option.

Command (m for help): n
Partition type
   p   primary (1 primary, 0 extended, 3 free)
   e   extended (container for logical partitions)
Select (default p) :

You can choose to create a “primary” partition. If you have more than four primary partitions, then you can create a logical one.

Select (default p) : p
Partition number (2-4, default 2):

You can leave the defaults in this case.

On the next prompt, you are asked to specify the first sector, you can also leave it to the defaults.

All space for primary partitions is in use
Adding logical partition 5
First sector (48291898-65062911, default 48291840):

Finally, you are asked to specify the total size of the partition to be created. In our case, we are going to choose a 1GB swap space (or “+1G“).

Last sector, +/-sectors or +/-size{K,M,G,T,P} : +1G

Created a new partition 5 of type 'Linux' and of size 1 GiB.

By default, your partition will be created with a “Linux” type by default.

You want to change that to a swap partition type.

To achieve that, type “t” for “type” and change it to “82” (for swap)

Command (m for help): t
Partition number (1,2,5, default 5): 1
Hex code (type L to list all codes): 82

Hit Enter, and make sure that your partition type was correctly changed.

Changed type of partition 'Linux' to 'Linux swap / Solaris'

Don’t forget to write your changes to the disk using the “w” command.

Command (m for help): w

The partition table has been altered
Syncing disks.

c – Enabling your swap partition

First, make sure to run the mkswap in order for the swap headers to be correctly set for the partition.

# For a regular partition
$ sudo mkswap /dev/sda5

# For a LVM partition
$ sudo mkswap /dev/vgubuntu/lvswap

c – Enabling your swap partition mkswap

Now that headers are set, it is as simple as activating your swap space using “swapon“.

# For a regular partition
$ sudo swapon /dev/sda5

# For a LVM partition
$ sudo swapon /dev/vgubuntu/lvswap

c – Enabling your swap partition swapon-active

Now that your swap is on, make sure to list your swap partitions again with the “–show” option.

$ sudo swapon --show

c – Enabling your swap partition swapon-show-2

Awesome, you successfully created a swap partition on Linux!

d – Make your swap space permanent

As any other partitions, you need to make your partitions permanent.

If you were to restart your server just now, changes would not be persisted.

First of all, you need to get your UUID for the newly created partition.

$ sudo blkid | grep "swap"

d – Make your swap space permanent blkid-swap

Copy the UUID value and edit the fstab file to append the following changes.

$ sudo nano /etc/fstab

UUID=<copied value>   none   swap  defaults   0   0

Save your file, and restart your system to make sure that your changes are permanent.

$ sudo reboot
$ sudo swapon --show

Awesome, your changes are now permanent!

Add Swap Space on Ubuntu 20.04 using a swap file

Another common way of adding space is to create a file dedicated to it.

Many tutorials are not specifying this detail, but swap files cannot contain any holes at all.

It means that you should not use the cp command on your host to create a swap file.

For this, you are going to use the “dd” command that makes sure that you don’t have any holes in your file.

a – Create a swapfile using dd

To add swap space, run the following command

$ sudo dd if=/dev/zero of=swapfile bs=1MB count=$((1*2014))

a – Create a swapfile using dd-command

In this case, you are going to create a 2Gb swap space.

Make sure that your swap file was created by issuing the following command.

$ ls -l swapfile

b – Secure your swapfile with permissions

Swap files are meant to be used for memory optimization purposes.

As a consequence, they should not be edited or modified in any way.

As a consequence, we are going to change its permissions.

$ sudo chmod 600 swapfile

In this case, the file is read-write only for the root account.

c – Enable your swapfile

In order to enable your swap file, you can use the “mkswap” command followed by the “swapon” one.

$ sudo mkswap swapfile
$ sudo swapon swapfile

c – Enable your swapfile mkswap-swap-file

Awesome, you successfully created your swap file!

The last thing that you have to do is to make it permanent using fstab.

d – Make your swap file permanent

To make your swap space permanent, edit the /etc/fstab file and paste the following changes.

$ sudo nano fstab

<path_to_file>/swapfile none swap defaults 0 0

Save your file and restart to make sure that the swap space is still mounted.

$ sudo reboot
$ sudo swapon --show

You have successfully added some swap space on your Ubuntu 20.04!

Troubleshooting

When adding swap space on Ubuntu 20.04, you may run into the following error.

  • swapon: /swapfile: read swap header failed.

This error is happening when you don’t run the mkswap command before running the swapon command.

As a reminder, mkswap sets the header for the file or the partition to be used as swap space.

If you forget to run the mkswap command, Linux won’t be able to assign it as swap space on your host.

  • Failed to find logical volume “vg/lv”

This error happens when you deleted a logical volume that was defined to be loaded in your initramfs configuration.

In order to fix that, you have two choices :

  • Run “update-initramfs -u

initramfs

  • Make sure that no logical volumes were originally mentionned in the “resume” file of your initramfs.

Icons made by Freepik from FlatIcon.

How To Install Grafana on Ubuntu 20.04

This article focuses on installing the latest version of Grafana on an Ubuntu 20.04 server.

Recently, Grafana Labs released a brand new version of Grafana : v7.0

This new version featured a whole set of different features : namely a new panel editor, a new explore function as well as new plugins and tutorials for beginners.

As Grafana evolves a lot since our last tutorial, it is time for us to update the Grafana installation guide for Ubuntu 20.04.

In this tutorial, you will learn how you can install and configure a Grafana instance for your Ubuntu server.

Looking to install Grafana on CentOS/RHEL, we have tutorials for other distributions.

Prerequisites

In order to install Grafana, you will need to have sudo privileges on your instance.

To verify that this is the case, you can run the “groups” command and verify that “sudo” is part of the secondary groups.

$ groups

groups

If you are not sure about the method to get sudo rights on Ubuntu, you can check our dedicated guide on the subject.

Now that you have the correct rights, it is time to link your instance to the Grafana repositories.

1. Add the Grafana repositories to your server

First of all, you need to add the Grafana APT repositories in order to be able to install packages from them.

If you already have Grafana repositories, you can skip this section and go to the next one.

First, install packages that are needed for Grafana to run properly : apt-transport and software-properties-common.

$ sudo apt-get install -y apt-transport-https
$ sudo apt-get install -y software-properties-common wget

apt-get-install

Add the GPG key to the trusted keys

In order to retrieve Grafana packages in a secure way, you need to add the GPG key to your trusted set of keys.

To achieve that, you need to use the apt-key command.

$ wget -q -O - https://packages.grafana.com/gpg.key | sudo apt-key add -

OK

A simple “OK” confirmation should be displayed right after the command.

Add the trusted Grafana repositories

Now that everything is configured, you can add the Grafana repositories to the custom APT repositories of your server.

$ echo "deb https://packages.grafana.com/oss/deb stable main" | sudo tee -a /etc/apt/sources.list.d/grafana.list

deb https://packages.grafana.com/oss/deb stable main

Awesome, now you can update your distribution packages and verify that it links to the Grafana repositories.

packages-grafana

To install Grafana, use the “apt-get install” command.

$ sudo apt-get install grafana

install-grafana

Congratulations, you successfully installed the new Grafana v7.0 on your Ubuntu machine!

However, by default, your Grafana server is not started. You will have to configure it and start it manually, which is the purpose of the following sections.

2. Inspect your grafana-server systemd service

If you are using systemd, Grafana created for you a service called “grafana-server“.

To make sure of it, you can run the following command.

Inspect your grafana-server systemd service

$ sudo ls /usr/lib/systemd/system/grafana-server.service

$ cat /usr/lib/systemd/system/grafana-server.service

[Unit]                                                                                          
Description=Grafana instance                                                                    
Documentation=http://docs.grafana.org                                                           
Wants=network-online.target                                                                     
After=network-online.target                                                                     
After=postgresql.service mariadb.service mysql.service                                          
                                                                                                
[Service]                                                                                       
EnvironmentFile=/etc/default/grafana-server                                                     
User=grafana                                                                                    
Group=grafana                                                                                   
Type=simple                                                                                     
Restart=on-failure                                                                              
WorkingDirectory=/usr/share/grafana                                                             
RuntimeDirectory=grafana                                                                        
RuntimeDirectoryMode=0750                                                                       
ExecStart=/usr/sbin/grafana-server                                                  \           
                            --config=${CONF_FILE}                                   \           
                            --pidfile=${PID_FILE_DIR}/grafana-server.pid            \           
                            --packaging=deb                                         \           
                            cfg:default.paths.logs=${LOG_DIR}                       \           
                            cfg:default.paths.data=${DATA_DIR}                      \           
                            cfg:default.paths.plugins=${PLUGINS_DIR}                \           
                            cfg:default.paths.provisioning=${PROVISIONING_CFG_DIR}              
                                                                                                
                                                                                                
LimitNOFILE=10000                                                                               
TimeoutStopSec=20                                                                               
UMask=0027   
[Install]
WantedBy=multi-user.target

It is quite important for you to inspect this file, as it provides many information about the server that you just installed.

From the file, you understand that :

  • The Grafana server binary is located at /usr/sbin/grafana-server.
  • The file that defines all the environment variables is located at /etc/default/grafana-server
  • The configuration file is given via the CONF_FILE environment variable.
  • The PID of the file is also determined by the PID_FILE_DIR environment variable.
  • Loggingdataplugins and provisioning paths are given by environment variables.

The content of the environment file is the following one :

GRAFANA_USER=grafana

GRAFANA_GROUP=grafana

GRAFANA_HOME=/usr/share/grafana

LOG_DIR=/var/log/grafana

DATA_DIR=/var/lib/grafana

MAX_OPEN_FILES=10000

CONF_DIR=/etc/grafana

CONF_FILE=/etc/grafana/grafana.ini

RESTART_ON_UPGRADE=true

PLUGINS_DIR=/var/lib/grafana/plugins

PROVISIONING_CFG_DIR=/etc/grafana/provisioning

# Only used on systemd systems
PID_FILE_DIR=/var/run/grafana

3. Start your grafana-server service

Now that you have learnt about the Grafana configuration variables and how you can arrange your Grafana server, it is time to launch your service.

In order to start your service, you need to execute the “systemctl start” command on the “grafana-server” service.

$ sudo systemctl start grafana-server
$ sudo systemctl status grafana-server

Start your grafana-server service grafana-server

If your service is set as “Active” and “Loaded” (meaning that it will be started on launch), you should be good to go!

Now that everything is configured, we are going to head over to the Web UI in order to create your first dashboard.

4. Launch Grafana v7 Web UI

To open Grafana, you need to open a web browser and navigate to http://localhost:3000.

As a reminder, Grafana works on port 3000 by default, but it may be different if you are already using this port.

You will be presented with this screen when launching the application for the first time.

Launch Grafana v7 Web UI grafana-default-ui

By default, the login for Grafana is “admin” and the default password is also “admin“.

You will be asked to change your password via a custom chosen password or a strong generated one.

Launch Grafana v7 Web UI grafana-change-password

Choose a password and click on “Submit“.

You should now be presented with the default screen for Grafana v7.0, well different from the v6.2 one!

4. Launch Grafana v7 Web UI grafana-welcome-page

If you are new to Grafana, you should probably follow the tutorial showcased on the “Welcome page“.

Disable new user registrations

The account that you just created will be used as an administrator account for your server.

However, in some cases, you want to be the only one responsible for new user registrations on your server.

That’s why you should think about disabling new user registrations.

By default, user registration is available at http://localhost:3000/signup.

Disable new user registrations grafana-signup

To disable user registration, head back to the configuration file and disable the following section.

Disable new user registrations

$ sudo vi /etc/grafana/grafana.ini

### Content of grafana configuration file

[users]
# disable user signup / registration
;allow_sign_up = true

# Allow non admin users to create organizations
;allow_org_create = true

# Set to true to automatically assign new users to the default organization (id 1)
;auto_assign_org = true

Change the allow_sign_up setting to false, and restart your Grafana server.

;allow_sign_up = false

$ sudo systemctl restart grafana-server

Disable new user registrations allow-sign-up
Now you can test that user registration is correctly disabled on your server.

Note that the page will still be accessible but you will be prompted with an error message when you try to create a new user.

Disable new user registrations user-registration-disabled

Awesome, you successfully disabled user registration on your server!

Start monitoring targets with Grafana

Using Grafana alone is not very useful but you can connect it to many different data sources.

In Grafana, data sources are defined as plugins that one can install in order to connect to it.

On modern architectures, one can connect to cloud datasources like Cloudwatch or Amazon Timestream.

If you are using InfluxDB or Prometheus, note that we wrote tutorials about it on how to setup Grafana with Telegraf and InfluxDB.

The possibilities with those tools are infinite : you can setup a Windows server monitoring or a realtime process monitoring, it is up to you.

Create Your First Dashboard

In order to create all those monitoring dashboards, you will need to create a simple dashboard first.

If you are new to Grafana dashboards, we wrote an extensive guide on how to create Grafana dashboard, so make sure to check it out!

How To Add User To Sudoers On Ubuntu 20.04

This tutorial focuses on adding sudoers rights to a user on Ubuntu 20.04 Focal Fossa.

When managing an Ubuntu 20.04 server, it is actually quite important to know how to add sudoers to it.

The sudo command is a very popular command on Linux.

It allows unauthorized users to perform commands as another user, by default being the root user.

On Ubuntu 20.04, we will focus on three different ways to add a user as sudo : add it to the sudo group, to the sudoers file or using the graphical interface.

Here are the details of the three different methods.

Adding an existing user to the sudo group

On most distributions, it is very likely that the sudo command is available by default.

$ which sudo
Note : the “which” command can be used in order to verify the existence of the sudo command on your host.

Adding an existing user to the sudo group which-sudo

If you notice that this is not the case, you can install sudo by running the following commands.

$ apt-get update
$ apt-get install sudo

In order to add a user to sudoers, you have to use the “usermod” command and the capital G (for secondary groups).

$ sudo usermod -a -G sudo <user>

Adding an existing user to the sudo group usermod-sudo

In order to verify that your user was correctly added to the sudo group, you have to use the “groups” command.

If you see “sudo” as a secondary group for your user, congratulations, you successfully added your user to sudoers!

Adding a user to sudoers using gpasswd

A less popular, yet very powerful way to add a user to sudoers is to use the gpasswd command.

$ sudo gpasswd -a <user> sudo

Adding a user to sudoers using gpasswd

As a quick reminder, gpasswd is used in order to administer the “/etc/group” file on your filesystem.

Adding an existing user to the sudoers file

By default, on Ubuntu 20.04, the sudoers file is located at /etc/sudoers.

Adding an existing user to the sudoers file sudoers

This file contains a set of rules that are applied in order to determine who has sudo rights on your system.

Also, the sudoers file can define privileges such as the commands that can be executed with or without sudo, or if you should be prompted with a password.

By default, you should not modify the sudoers file by yourself (the same logic applies to cron jobs for example).

If you were to corrupt this file, you might would not be able to get sudo rights again.

Instead, you are going to use “visudo” : a tool designed to make sure that you don’t make any mistakes.

$ sudo visudo

sudo-visudo

At the end of the file, add a new line for the user.

john       ALL=(ALL:ALL) ALL

Adding an existing user to the sudoers file sudoers-syntax

By saving and exiting the file, the user “john” will be automatically added to the sudo group.

By default, the account password will be asked every five minutes in order to perform sudo operations.

If you want to remove the password verification, you can simply add the “NOPASSWD” option.

john       ALL=(ALL:ALL) NOPASSWD:ALL
Note : if you add a user to the sudoers file, it does not mean that the user will belong to the sudo group on the system. It will be authorized to perform sudo operations, but it won’t be listed if you use the “groups” command.

Tweaking password verification

If you want to tweak the password verification period, or if you want to increase the verification, you have to modify the “timestamp_timeout” parameter.

# /etc/sudoers
#
# This file MUST be edited with the 'visudo' command as root.
#
# See the man page for details on how to write a sudoers file.
#

Defaults        env_reset
Defaults        mail_badpass
Defaults        secure_path = /sbin:/bin:/usr/sbin:/usr/bin
Defaults        timestamp_timeout=30

In this case, the password will be asked every thirty minutes.

Adding a user to sudoers using the graphical interface

On recent Ubuntu distributions, it is possible to add a user to the sudo group very easily.

First, head over to the “Activities” tab located at the top left corner of your screen and type “Users“.

You should see a screen similar to this one.

Adding a user to sudoers using the graphical interface users

Next, you will have to unlock the panel by clicking on “Unlock”.

Adding a user to sudoers using the graphical interface unlock (1)

You will be asked for your password, note that the account has to be a privileged account in order to perform this operation.

Adding a user to sudoers using the graphical interface authentication-required

Now that the panel is unlocked, you can tick the “Administrator” radio button in order for your user to be part of the administrators!
Adding a user to sudoers using the graphical interface john-sudo
You can even verify that your user is part of the sudo group using the “groups” command.

$ groups john

groups-john

Congratulations, your user is now part of the sudo group!

Adding a group to the sudoers file

In the previous section, we added a user to the sudoers file, but what if you wanted to give those rights to an entire group?

To add a group to the sudoers file, add a “percent” symbol at the beginning of the line, just before the name of the group.

%sysadmins       ALL=(ALL:ALL) NOPASSWD:ALL

Next, make sure that you are part of the designed group and execute your command using “sudo”.

$ groups
user sysadmins

$ sudo passwd

Congratulations, you set “sudo” privileges to an entire group!

Conclusion

In this tutorial, you learnt how you can easily add a user to sudoers using three different methods : using the command-line, the visudo command or using the graphical interface.

If you are interested in Ubuntu 20.04, we wrote a guide on installing and enabling a SSH server.

Also, if you are interested in Linux System Administration, we have an entire section dedicated to it on the website, so make sure to check it out!