
Nowadays, the most widely used and fastest running DevOps techologies in the industry is Docker. Docker has two versions – Docker CE (Community Edition) and Docker EE (Enterprise Edition). In case you are having a small-scale project, or you’re simply learning then use Docker CE.
Docker is a machine that allows you to create, deploy, and manage lightweight, stand-alone packages named containers. This tutorial completely makes you learn How To Install Docker on Ubuntu 18.04 & Debian 10 with detailed steps along with the post-installation instructions.
- Prerequisites
- Ensure you have sudo rights
- Steps to Install Docker using get-docker.sh (fastest)
- a – Install cURL
- b – Download the get-docker.sh script
- c – Add the user to the docker group
- d – Get the current Docker version
- Steps to Install Docker from Official Repository
- a – Update Local Database
- b – Download Dependencies
- c – Add Docker’s GPG Key
- d – Install the Docker Repository
- e – Update Repositories
- f – Install the Latest Version of Docker
- g – Install Specific Version of Docker(Optional)
- Process to Install Docker manually on your Linux system
- a – Remove old installed Docker versions
- b – Set up the Docker repositories
- c – Add the official Docker GPG keys
- d – Verify the key fingerprint
- e – Install Docker CE on your instance
- Post Installation Docker instructions
- a – Install docker-machine on Linux
- b – Install docker-compose on Linux
- c – Create your first container on Docker
- Conclusion
Prerequisites
To learn & understand this tutorial, you will need the following requirements:
- One Ubuntu 18.04 server set up by following the Ubuntu 18.04 initial server setup guide, including a sudo non-root user and a firewall.
- Ubuntu 18.04 64-bit operating system
- A user account with sudo privileges
- Command-line/terminal (CTRL-ALT-T or Applications menu > Accessories > Terminal)
- Docker software repositories (optional)
Also Check: How To Install Docker on Windows 7/8/10 Home and Pro
Ensure you have sudo rights
First of all, you want to make sure that you have sudo (administrative) rights on your Linux instance.
Without sudo rights, you won’t be able to install the Docker packages.
To check sudo rights, run the following command :
$ sudo -l
User devconnected may run the following commands on debian-10:
   (ALL : ALL) ALL
Now that you have sudo rights, let’s install Docker.
- How To List Docker Images | What is Docker Image | docker image ls command
- How to Install Eclipse IDE on Ubuntu 18.04
- How To Install Prometheus with Docker on Ubuntu 18.04
Steps to Install Docker using get-docker.sh (fastest)
This has to be the quickest way to install Docker on Ubuntu and Debian, yet not many tutorials describe this step.
Docker created an entire script that detects your Linux distribution, the package management system you are using (APT, YUM) in order to install Docker properly.
a – Install cURL
You will need cURL in order to download the installation script.
To install cURL on Linux, run the following command :
$ sudo apt-get update
$ sudo apt-get install curl
$ curl --version
curl 7.64.0 (x86_64-pc-linux-gnu)
b – Download the get-docker.sh script
Here is the script available. As you can see, this is a plain text script, running many commands on your system to install Docker.
By default, the “stable” version of Docker is installed.
If you want another version (nightly or test), make sure to modify the parameter in the script.
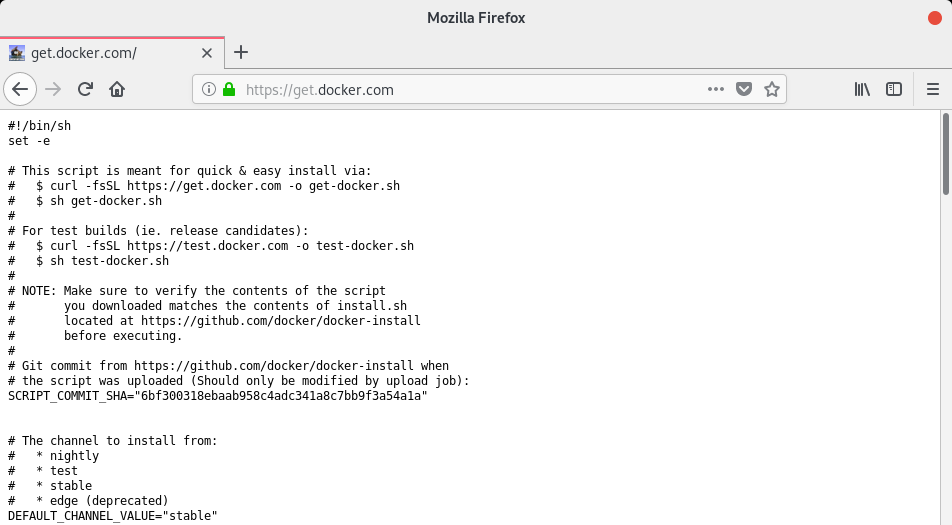
To download the get-docker.sh script, run the following commands.
$ curl -fsSL https://get.docker.com -o get-docker.sh
$ sh get-docker.sh
The Docker installation process should start.
Docker will automatically grab the packages it needs to install (like the apt-transport-https package or ca-certificates).
When it is done, this is what you should see on your screen.
Awesome, Docker is now installed on your Linux system.
c – Add the user to the docker group
In order to execute docker commands, you will need sudo rights.
However, you can add users to the docker group to avoid prefixing commands with the sudo command.
To add a user to the docker group, run the following command.
$ sudo groupadd docker
$ sudo usermod -aG docker devconnected
$ sudo reboot
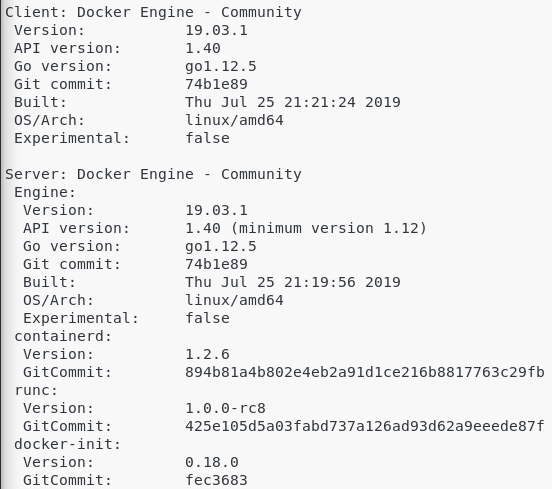
d – Get the current Docker version
To verify that everything was installed correctly, you can check your current Docker version.
$ docker -v
Docker version 19.03.1, build 74b1e89
Great!
You successfully installed Docker on Ubuntu and Debian.
Make sure to read the post-installation steps in order to customize your environment for Docker.
Steps to Install Docker from Official Repository
Here are the detailed steps that should be followed by the developer while installing docker from the official repository. Just follow them carefully:
a – Update Local Database
Firstly, you should update the local database with the following command:
sudo apt-get update
b – Download Dependencies
In the next step, you’ll need to run these commands to enable your operating system to access the Docker repositories over HTTPS.
In the terminal window, type:
sudo apt-get install apt-transport-https ca-certificates curl software-properties-common
For more explanation, here’s a brief breakdown of each command:
- apt-transport-https: Allows the package manager to transfer files and data over https
- ca-certificates: Allows the system (and web browser) to check security certificates
- curl: This is a tool for transferring data
- software-properties-common: Adds scripts for managing software
c – Add Docker’s GPG Key
The GPG key is a security feature.
To ensure that the software you’re installing is authentic, enter:
curl -fsSL https://download.docker.com/linux/ubuntu/gpg | sudo apt-key add –

d – Install the Docker Repository
Just enter the following command for installation of Docker repository:
sudo add-apt-repository "deb [arch=amd64] https://download.docker.com/linux/ubuntu $(lsb_release -cs) stable"
The command “$(lsb_release –cs)” scans and returns the codename of your Ubuntu installation – in this case, Bionic. Moreover, the final word of the command – stable– is the type of Docker release.
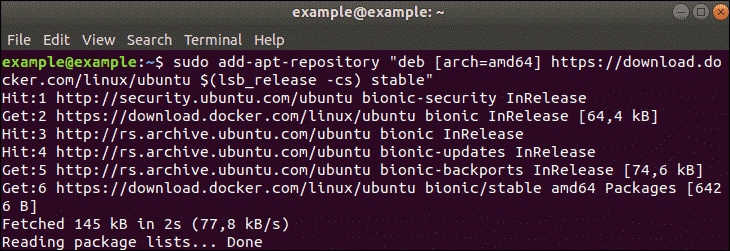
A stable release is tested and confirmed to work, but updates are released less frequently. You may substitute edge if you’d like more frequent updates, at the cost of potential instability. There are other repositories, but they are riskier.
e – Update Repositories
Update the repositories you just added:
sudo apt-get update
f – Install the Latest Version of Docker
Make use of the given command to install the latest version of docker:
sudo apt-get install docker-ce
g – Install Specific Version of Docker(Optional)
List the available versions of Docker by entering the following in a terminal window:
apt-cache madison docker-ce
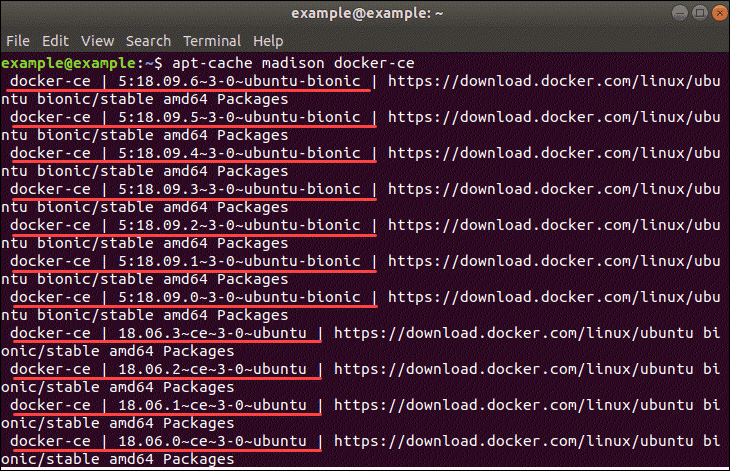
The system needs to return a list of available versions as in the image above.
At this point, type the command:
sudo apt-get install docker-ce=[version]
However, substitute [version] for the version you want to install (pulled from the list you just generated).
For instance:

Process to Install Docker manually on your Linux system
If you are reluctant to use the get-docker script to install Docker automatically, you can still install the packages by yourself.
Here are the steps to install Docker manually.
a – Remove old installed Docker versions
First, you need to make sure that you are not running any old versions of Docker locally.
$ sudo apt remove -y docker docker-engine docker.io contained runc
b – Set up the Docker repositories
Next, you are going to need to setup the Docker repositories, and make sure that you are downloading packages from secure and official Docker repos.
To do that, install the following packages.
$ sudo apt-get install apt-transport-https ca-certificates curl gnupg2 software-properties-common
c – Add the official Docker GPG keys
To add the official Docker GPG keys, run the following command.
$ curl -fsSL https://download.docker.com/linux/debian/gpg | sudo apt-key add -
If the command is successful, the terminal should return OK.
![]()
d – Verify the key fingerprint
In order to make sure that you grabbed the official and secure Docker key, you have to search for the fingerprint in your key.
Run the following command:
$ sudo apt-key fingerprint 0EBFCD88

pub   4096R/0EBFCD88 2017-02-22
      Key fingerprint = 9DC8 5822 9FC7 DD38 854A  E2D8 8D81 803C 0EBF CD88
uid                  Docker Release (CE deb) <docker@docker.com>
sub   4096R/F273FCD8 2017-02-22
Great! As you can see you got the key from the official Docker repositories.
e – Install Docker CE on your instance
In order to get the stable repository from Docker, you will need to run the following command.
$ sudo add-apt-repository "deb [arch=amd64] https://download.docker.com/linux/debian $(lsb_release -cs) stable"
The command $(lsb_release -cs) will return the name of the distribution.
![]()
Now that you are done, simply install docker-ce on your computer.
$ sudo apt-get update
$ sudo apt-get install docker-ce
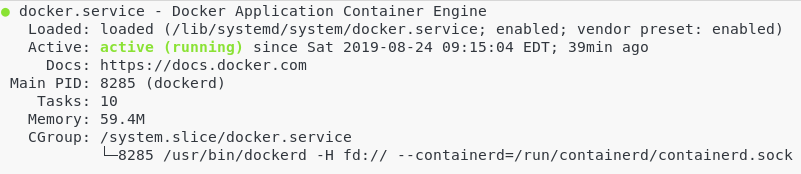
This should install Docker as a service. To verify it, run the following command:
$ sudo systemctl status docker
Again, add the user to the docker group in order for the user to execute docker commands without sudo.
$ sudo groupadd docker
$ sudo usermod -aG docker devconnected
$ sudo reboot
And finally, check your Docker version.
$ docker -v
Docker version 19.03.1, build 74b1e89
You now have Docker installed on your instance.
Post Installation Docker instructions
In order to have a complete and functional Docker installation on your Linux system, you will need to complete a few more steps.
On Linux, docker-machine and docker-compose don’t come automatically with your docker-ce installation.
This is a problem that you won’t have for Windows and macOS as they come bundled with the Docker Community Edition binary.
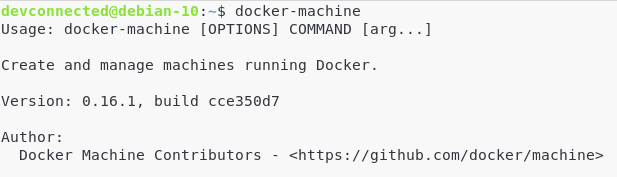
a – Install docker-machine on Linux
A Docker machine is a tool that gives you the ability to manage your Docker containers with provisioning features.
It is the utility that will handle getting the binaries from the official repositories, install them on your container and run them.
Docker CE on the other hand is a client-server architecture that allows clients to communicate with Docker servers via the Docker CLI.
To install docker-machine, run the following command.
$ sudo - i

$ curl -L https://github.com/docker/machine/releases/download/v0.16.1/docker-machine-`uname -s`-`uname -m` >/tmp/docker-machine &&
    chmod +x /tmp/docker-machine &&
    sudo cp /tmp/docker-machine /usr/local/bin/docker-machine

$ sudo +x /usr/local/bin/docker-machine
$ exit
Want another version? All the docker-machine versions are available here.
Make sure that the docker-machine utility is correctly installed on your computer.
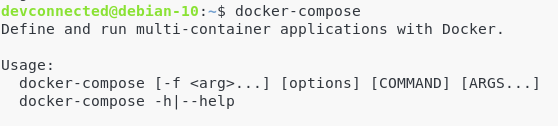
b – Install docker-compose on Linux
Again, docker-compose is not shipped by default with Docker Community Edition.
Docker-compose is a tool that lets you “compose” Docker containers – i.e running multiple containers in the same isolated environment.
To install docker-compose, run the following commands:
$ sudo - i

$ curl -L https://github.com/docker/compose/releases/download/1.24.1/docker-compose-`uname -s`-`uname -m` -o /usr/local/bin/docker-compose

$ sudo +x /usr/local/bin/docker-compose
$ exit
Make sure that the docker-compose tool is correctly installed on your computer.
Awesome! Now that everything is ready, let’s start our first container.
c – Create your first container on Docker
For this tutorial, I am going to create a Debian 8 Jessie container running on my Debian 10 Buster instance.
Head over to https://hub.docker.com/ which is the place where most Docker container images are stored.

Search for Debian 8 in the search text field and click on the verified Debian option in the suggestions dropdown.
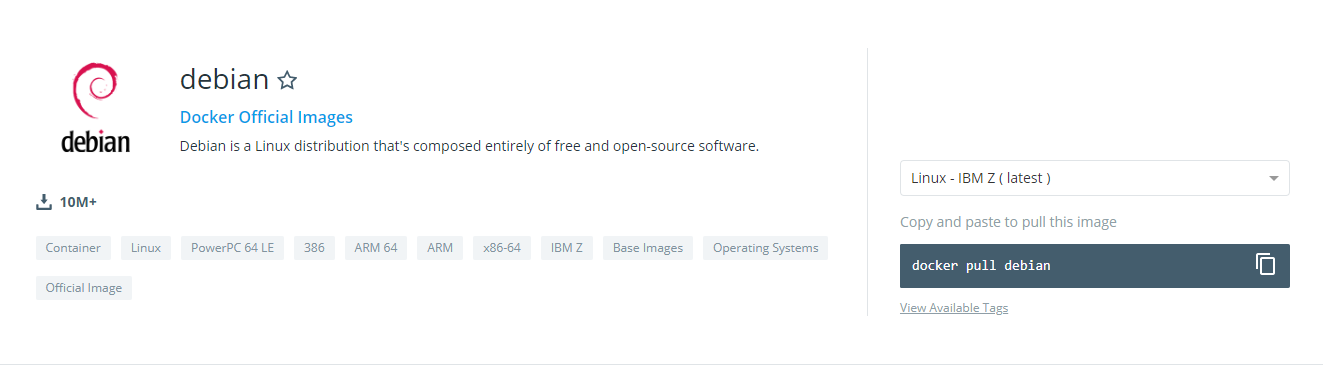
By scrolling a bit, you should see all the Debian distributions available (Buster, Jessie, Wheezy etc..). For this tutorial, we are going to take a look at the Jessie distribution.
To grab the Jessie image, run the following command :
$ docker container run debian:jessie

The docker image was successfully downloaded from the Docker Hub repositories.
You can check it by running a simple docker images command.

The container was also successfully created by the run command, but it is inactive by default.
To see all your containers, run the following command:
$ docker container ls -a

We did not choose a name for our container when downloading it, so Docker assigned a name by default to the host (vigorous_kirch).
Time to go into our Jessie container. This is how to do it:
$ docker container start 61f66b78e140
61f66b78e140

$ docker exec -it 61f66b78e140 /bin/bash
root@61f66b78e140:/#
root@61f66b78e140:/# cat /etc/issue
Debian GNU/Linux 8
Awesome! We have a Jessie distribution running on a Debian 10 Buster one.
Conclusion
Today, we hope you have seen & learned how to install and configure Docker for Ubuntu and Debian distributions. Also, studied the post-installation steps that you must do to perform a complete Docker installation.
If you need more information, make sure to read the official Docker documentation. They provide great information about how to run commands and how to maintain your containers.