Apparently, managing various branches in your Git Repository when working on a project is difficult. So, switching from one branch to another branch or else to the master branch should be done frequently for better performance. In Git, changing branches can be performed by checkout command whereas to switch branches in old versions.
Now, we have the Git Switch command to easily switch branches on Git also various Git Commands can support you in performing Git tasks. In this tutorial, you will learn how to switch branches on Git using Checkout & Switch command along with How do you switch between local Git branches?
- What is Git Switch?
- Switch Branch using git checkout
- How to switch to a non-existing branch in Git?
- Switch branch using git switch
- How do you switch between local Git branches?
- Checkout Remote Branch on Git
- Checkout New Branch from Specific Commit
What is Git Switch?
A simple alternative to ‘checkout’ is the “switch” command in git. It lets you switch your current HEAD branch. It was added newly in Git v2.23. Before the switch, the amending branches had to be done with the checkout command.
By using the checkout command you can not only use it to switch branches, but also to discard changes, restore files, and much more. Git switch has a very clear and limited purpose like switching and creating branches!
Switch Branch using git checkout
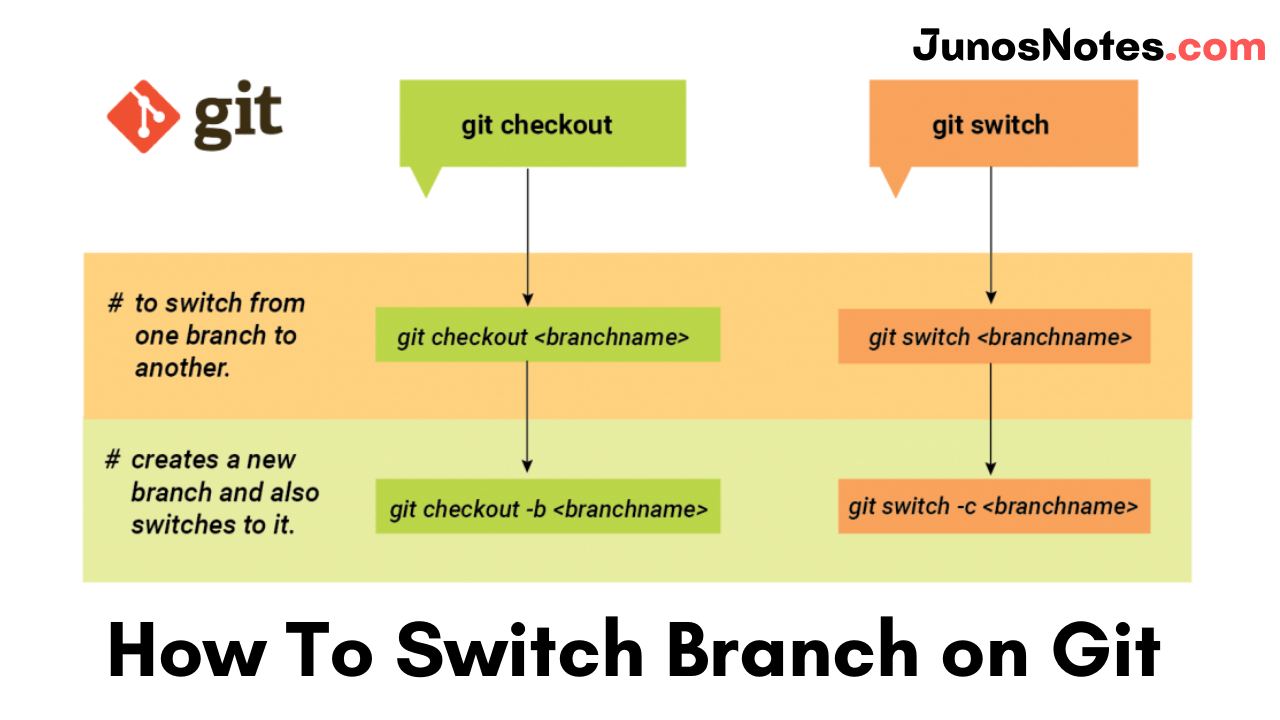
The simplest way to switch branches on Git is to use the “git checkout” command and specify the name of the branch you want to switch to.
If the destination branch does not exist, you have to append the “-b” option, otherwise, you won’t be able to switch to that branch.
$ git checkout <existing_branch>

$ git checkout -b <new_branch>
As an example, let’s say that you want to switch from the master branch to another branch named “feature” in your repository.
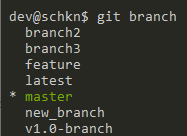
First, make sure that the target branch exists by running the “git branch” command.
$ git branch
Now that you made sure that your branch exists, you can switch from the master branch to the “feature” branch by executing the “git checkout” command.
$ git checkout feature
That’s it!
You have successfully switched to your “feature” branch with the checkout command.
Do Check: How To Create a Git Branch
How to switch to a non-existing branch in Git?
On the other hand, if you try to switch to a non-existing branch, you will the following error message
$ git checkout non-existing-branch

error: pathspec 'non-existing-branch' did not match any file(s) known to git
To solve this error, you will have to append the “-b” (for “new branch”) option to the checkout command.
$ git checkout -b non-existing-branch

Switched to a new branch 'non-existing'
Now that you know more about the “checkout” command, let’s see another useful command to change branches using Git.
- How To Create a Git Branch | Learn Git Create New Branch from Current Branch
- How To Set Upstream Branch on Git | What is a Git Upstream Branch? | Git Set Upstream Branch without Push
- How To Change Branch Name on Git | How To Rename a Local and Remote Git Branch
Switch branch using git switch
A quick way of switching branches on Git is to use the “git switch” command and specify the name of the branch you want to switch to.
If the destination branch does not exist, you have to specify the “-c” option (for “create branch“), otherwise, you will get an error message when switching to that branch.
$ git switch <existing_branch>

$ git switch -c <non_existing_branch>
Again, as an example, let’s say that you want to switch to the “feature” branch from the “master” branch.
In order to switch from the “master” branch to the “feature” branch, use the “git switch” command and specify the destination branch (which is “feature” in this case)
$ git switch feature
On the other hand, if you try to switch to a nonexisting branch, you will get the following error message
$ git switch non-existing-branch

fatal: invalid reference: non-existing-branch
To solve this error, make sure to append the “-c” option to the “git switch” command to specify that you want to switch to a new branch.
$ git switch -c non-existing-branch

Switched to a new branch 'non-existing-branch'
Congratulations, you have now successfully switched to another branch and you can start working on it.
How do you switch between local Git branches?
First, you need to begin with running the git branch command to view a list of your local branches so that you understand which branches you have to work with and which branch you currently have checked out.
Later, you will utilize the git checkout command to checkout, or switch to, a different local branch. It should look something like this:
$ git checkout <name-of-branch-you-want-to-switch-to>
Checkout Remote Branch on Git
In some cases, you may be interested in checking out remote branches from your distant repository.
In order to switch to a remote branch, make sure to fetch your remote branch with “git fetch” first. You can then switch to it by executing “git checkout” with the “-t” option and the name of the branch.
$ git fetch

$ git checkout -t <remote_name>/<branch_name>
The “-t” option in checkout stands for “track” and it is used to create your branch and setting up the upstream branch automatically to the remote branch.
As an example, let’s say that you have a branch named “remote-branch” on the “origin” remote.
In order to check out the remote branch, you will need to execute the checkout command and specify the information specified above.
$ git checkout -t origin/remote-branch

Branch 'remote-branch' set up to track remote branch 'remote-branch' from 'origin'.
Switched to a new branch 'remote-branch'
As you can see, the remote tracking information was set automatically: as a consequence, if you commit any modifications, you will automatically push them to the upstream branch.
Checkout New Branch from Specific Commit
In some cases, you may need to switch to a new branch, but you want it to start from a specific commit on the branch.
In order to checkout a new branch from a specific start point, you have to execute the “git checkout” command and specify the “-B” option, as well as the branch and its start point.
$ git checkout -B <branch> <start_point>
In order to checkout to a specific start point, you will have to list the commits done in your repository using the “git log” command.
$ git log --oneline --graph

* 98a14be Version 2 commit (master, HEAD)
* 53a7dcf Version 1.0 commit
* 0a9e448 added files
* bd6903f first commit
As you can see, the HEAD of the master branch is at 98a14be but we want to checkout to the commit just before HEAD (which is 53a7dcf).
In order to switch to the master branch, on this specific commit, we are going to execute the “git checkout” command and specify the “master” branch as well as the commit SHA.
$ git checkout -B master 53a7dcf

Switched to and reset branch 'master'
In order to check that you are correct on a specific commit, you can use the “git log” command again.
$ git log --oneline --graph
Awesome, you have successfully switched to another branch on a specific commit.
Conclusion
In this tutorial, you learned how you can easily switch to a branch on Git using the checkout command or the switch command.
You also learned that you can switch to a branch that does not exist yet by specifying the “-b” option or the “-c” option.
Finally, you have discovered advanced tips related to switching branches: checking out a remote branch and checking out a branch from a specific starting point.


