
Once you clone a Git repository or build new features via branches, you should have an idea about how set-upstream branches and work properly.
This tutorial helps you all in learning what are upstreams, what is git upstream branch, how to set up a Git upstream branch, how to change it, and how to have an overview of which Git branch is tracking which upstream branch.
Do Refer: Git Commands
However, while creating a new branch, or when working with existing branches, it can be pretty useful to know how to set upstream branch in Git.
- What are Upstreams?
- What is a Git Upstream Branch?
- Prerequisites
- Why are upstream branches so useful in Git?
- How to Set Upstream Branch in Git?
- Set upstream branch using git push
- Set upstream branch using an alias
- Set upstream branch for an existing remote branch
- Set tracking branches for new local branches
- Set tracking branches for existing local branches
- Inspecting tracking branches configuration
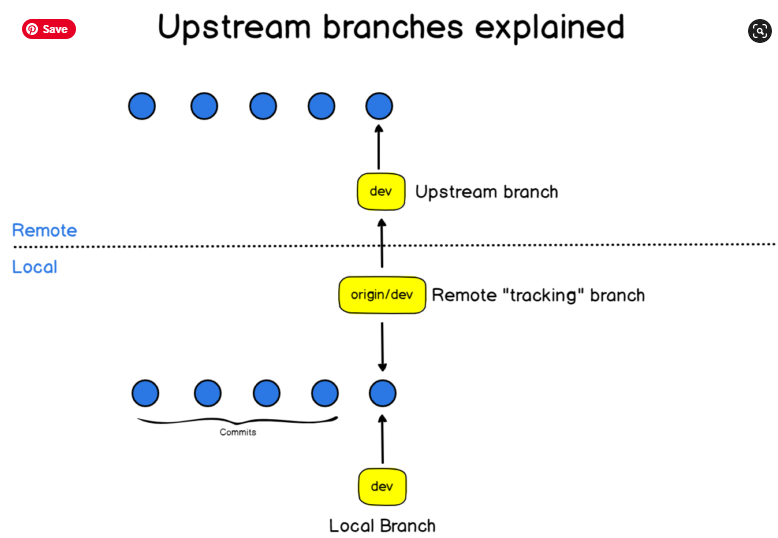
What are Upstreams?
Upstream branches specify the branch tracked on the remote repository via your local remote branch (known as a remote-tracking branch). It is also closely connected with remote branches. Usually, upstream is from where you clone the repository.
What is a Git Upstream Branch?
Using a river analogy to explain the flow of data, upstream is transmitting your data back to where the river stream is originating from. When you transfer something upstream, you are transferring it back to the original authors of the repository.
By git set-upstream, you can determine where your current local branch will flow. It lets you change the default remote branch.
Prerequisites
- Git installed and configured
- A cloned Git repository or your own Git project set up locally
Also Read: How To Install Git On Debian 10 Buster
Why are upstream branches so useful in Git?
Upstream branches are beneficial because:
- You get references to your remote repositories and you essentially know if you are ahead of them or not.
When performing a “git fetch” command, you can bring the new commits from your remote repository and you can choose to merge them at will.
- You can perform pull and push easily
When you set your upstream (or tracking) branches, you can simply execute pulls and pushes without having to specify the target branch.
Git automatically knows that it has to fetch the new commits to the remote-tracking branch. Similarly, Git already knows that it has to push new commits to the upstream branch.
But where does Git keep a reference of the upstream branches associated with local branches?
Git keeps references to upstream branches via its config file in the “.git” directory.
- How To Switch Branch on Git | What is Git Switch? | Git Switch vs Checkout
- How To Clean Up Git Branches | Git Clean Up Local and Remote Branches
- How To Change Branch Name on Git | How To Rename a Local and Remote Git Branch
How to Set Upstream Branch in Git?
Mainly, you can see two methods to set an upstream branch on git. They are as follows:
- With
git push: This is the fastest way to set a single upstream branch - With a short alias command: It makes a lot of sense if you frequently change the flow of your current branch.
Set upstream branch using git push
The most straightforward & fastest way to set the upstream branch is to use the “git push” command with the “-u” option for an upstream branch.
$ git push -u <remote> <branch>
Alternatively, you can use the “–set-upstream” option that is equivalent to the “-u” option.
$ git push --set-upstream <remote> <branch>
As an example, let’s say that you created a branch named “branch” using the checkout command.
$ git checkout -b branch
Switched to a new branch 'branch'
You can check tracking branches by running the “git branch” command with the “-vv” option.
$ git branch -vv
* branch  808b598 Initial commit
 master  808b598 [origin/master] Initial commit
As you can see, compared to master, the branch “branch” has no tracking branches yet (and no upstream branches as a consequence)
We can set the upstream branch using the “git push” command.
$ git push -u origin branch
Total 0 (delta 0), reused 0 (delta 0)
 * [new branch]      branch -> branch
Branch 'branch' set up to track remote branch 'branch' from 'origin'.
Let’s have a look at the tracking branches again with the branch command.
$ git branch -vv
* branch  808b598 [origin/branch] Initial commit
master  808b598 [origin/master] Initial commit
Great!
We have successfully set the upstream branch for our newly created branch.
Set upstream branch using an alias
Another way to set the upstream branch is to define an alias for your “git push” command.
In fact, pushing to HEAD is equivalent to pushing to a remote branch having the same name as your current branch.
$ git push -u origin HEAD
In order to avoid having to define the upstream every time you create a new branch, define an alias for the command we just wrote.
For aliases, you have two choices, you can either create a git alias or a bash alias.
Using a git alias
In order to create a new git alias, use the “git config” command and define a new alias named “pushd”
$ git config --global alias.pushd "push -u origin HEAD"
When you are done adding and committing fiels to your repository, set the upstream branch using your newly defined alias.
$ git pushd
Total 0 (delta 0), reused 0 (delta 0)
 * [new branch]      HEAD -> branch
Branch 'branch' set up to track remote branch 'branch' from 'origin'.
Using a bash alias
Alternatively, you can use a bash alias if you don’t want to modify your existing git commands.
Define a new bash alias using the “alias” command and define a name for it.
$ alias gp='git push -u origin HEAD'
Let’s create a new branch and use our alias in order to push our code and create the upstream branch easily.
$ git checkout -b branch2
Total 0 (delta 0), reused 0 (delta 0)
 * [new branch]      HEAD -> branch2
Branch 'branch2' set up to track remote branch 'branch2' from 'origin'.
Set upstream branch for an existing remote branch
In some cases, you may choose to link your local branches to existing remote branches that you just pulled or cloned from the main repository.
Let’s say for example that you pulled the “dev” branch located on the “origin” remote.
As a consequence, the tracking branch is named “origin/dev”.
Set tracking branches for new local branches
In order to switch to the local “dev” branch, and to set the “origin/dev” as the tracking branch (or upstream branch), use the “–track” option.
$ git checkout --track origin/dev

Branch 'dev' set up to track remote branch 'dev' from 'origin'.
Switched to a new branch 'dev'
To verify that you linked dev to the tracking branch “origin/dev” (which upstream branch is the remote dev), use the “git branch” command.
$ git branch -vv
* dev 808b598 [origin/dev] Initial commit
Set tracking branches for existing local branches
On the other hand, you may have chosen to work on a local branch and to set the upstream branch (or the remote tracking branch later on).
It is perfectly fine, but you will have to use the “git branch” in order to set the existing branch upstream branch.
$ git branch -u <remote>/<branch>
Let’s take the example of the “feature” branch that you just created to start working.
$ git checkout -b feature
Switched to a new branch 'feature'
You created some commits in your branch, you want to set the tracking branch to be master.
$ git branch -u origin/master
Branch 'feature' set up to track remote branch 'master' from 'origin'.
Great! You successfully set the upstream branch for your existing local branch.
Inspecting tracking branches configuration
In order to inspect your current Git configuration, list the hidden files and directories in your current working Git directory.
$ ls -al

total 16
drwxrwxr-x 3 schkn schkn 4096 Nov  5 16:10 .
drwxrwxr-x 7 schkn schkn 4096 Nov  5 16:10 ..
drwxrwxr-x 8 schkn schkn 4096 Nov  6 10:27 .git
Now, inspect the content of the “config” file located in the .git directory.
$ cat .git/config

[core]
        repositoryformatversion = 0
        filemode = true
        bare = false
        logallrefupdates = true
[remote "origin"]
        url = <repo_url>
        fetch = +refs/heads/*:refs/remotes/origin/*
[branch "master"]
        remote = origin
        merge = refs/heads/master
As you can see, Git keeps a reference between your local branch, the name of the remote, and the branch it has to merge with.
Conclusion
In this tutorial, you learned more about upstream branches and how they are related to remote-tracking branches in Git.
You learned different techniques in order to set remote-tracking branches using a command or an alias to set it.
You also learned how you can link your current local branches to existing remote-tracking branches easily with the branch command.
If you are interested in Software Engineering, we have a complete section dedicated to it on the website so make sure to have a look.