In one of our previous articles, we learnt how you can encrypt your entire root filesystem on Linux easily.
However, in some cases, you may want to encrypt one simple partition that may store some of your important files.
As you already know, encrypting your disks is crucial. If your laptop were to be stolen, you would probably lose all your personal information.
However, there are some ways for you to cope with this problem : by encrypting your disk partitions.
In this tutorial, you will learn about all the steps necessary to encrypt an entire disk partition, secure it with a passphrase or with a keyfile.
For the example, the article will be illustrated on a RHEL 8 operating system, but there should not be any differences if you use another one.
- Fdisk Command in Linux (Create Disk Partitions)
- Understanding Processes on Linux | Types of Process in Linux | Creating, Listing, Monitoring, Changing Linux Processes
- The Definitive Guide to Centralized Logging with Syslog on Linux
Prerequisites
In order to execute most of the commands provided in this article, you need to have administrator rights.
To check whether this is the case or not, you can execute the “groups” command and verify that you belong to the “sudo” group for Debian-based distributions or “wheel” for RedHat based ones.
$ groups
If you don’t have such rights, you can read one of our articles on the subject about getting sudo rights for Ubuntu or CentOS distributions.
Encrypt Partition using cryptsetup
As specified in the previous articles, encrypting a partition involves formatting the entire disk.
As a consequence, if you plan on encrypting a disk with existing data, you should now that your data will be erased in the process. To avoid losing anything, you should make a backup of your data on an external disk or in an online cloud.
Create New Partition on disk
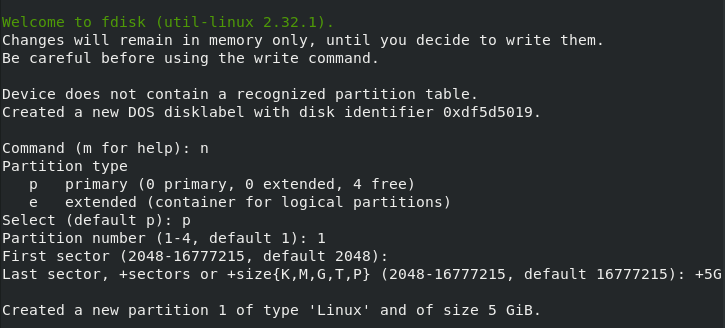
In order to encrypt a partition, we are going first to create a new one using the “fdisk” utility. For the example, we are going to create a new partition named “sdb1” on the “sdb” disk.
$ sudo fdisk /dev/sdb
In the fdisk utility, you can create a new partition using the “n” keyword and specify that you want a partition with a size of 5 GBs for example.
If you are not sure about how to use “fdisk” or how to create partitions, we have a dedicated article about this subject.
At the end of the process, you need to use the “w” keyword in order to write the changes to the disk.
Awesome, now that your partition is created, we are going to format it as a LUKS partition.
Format Disk Partition as LUKS
To encrypt the partition, we are going to use a command related to the LUKS project.
The LUKS project, short for Linux Unified Key System, is a specification used in order to encrypt all storage devices using special cryptographic protocols. As described, LUKS is only a specification, you will need a program that implements it.
In this case, we are going to use the “cryptsetup” utility. As explained in the manual section, cryptsetup aims at creating encrypted spaces for dm-crypt.
First of all, make sure that you have the “cryptsetup” command using the “which” command.
$ which cryptsetup
If the cryptsetup cannot be found on your server, make sure to install it using one of the following commands
$ sudo apt-get install cryptsetup                     (for Debian distributions)

$ sudo yum install cryptsetup                         (for RHEL/CentOS distributions)
To create your LUKS partition, you need to execute the “cryptsetup” followed by “luksFormat” and the name of the partition to be formatted.
$ sudo cryptsetup luksFormat /dev/sdb1
First of all, you are reminded that encrypting your disk will actually format it in the process.
After typing “YES” in capital letters, you will have to choose a passphrase in order to secure your device.
LUKS supports two ways of protecting your media : using a passphrase (the one that we currently use) and using keys. For now, you can choose a safe password and your partition should be formatted automatically.
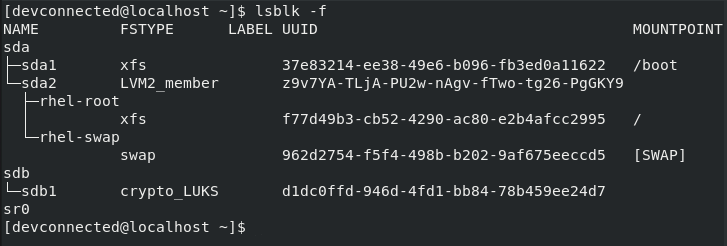
Now that your partition is created, you can inspect it using the “lsblk” command : the partition should be marked as “crypto_luks“.
$ lsblk -f
Awesome! Now that the volume is formatted, we can open it and create a simple ext4 filesystem on it.
Create ext4 Filesystem on Partition
By default, your encrypted volume is closed meaning that you cannot access data that is available on it.
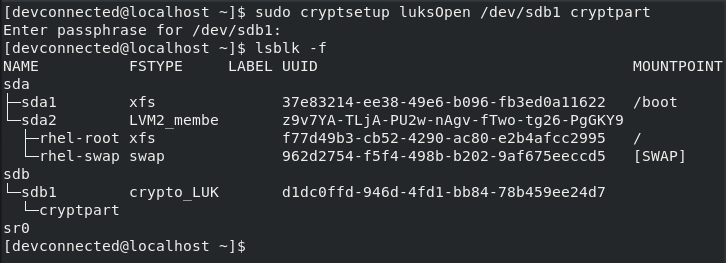
In order to “open”, meaning “unlocking” your volume, you have to use the “cryptsetup” command again followed by “luksOpen” and the name of the volume.
At the end of the command, provide a name for your open volume, in this case we are going to choose “cryptpart“.
$ sudo cryptsetup luksOpen /dev/sdb1 cryptpart
As you can guess, you are asked to provide the passphrase that you chose in the previous section.
Running the “lsblk” command again, you probably noticed that one volume was created under the “sdb1” encrypted volume named “cryptpart“. The “device mapper”, which is one of the frameworks of the Linux Kernel, did that for you.
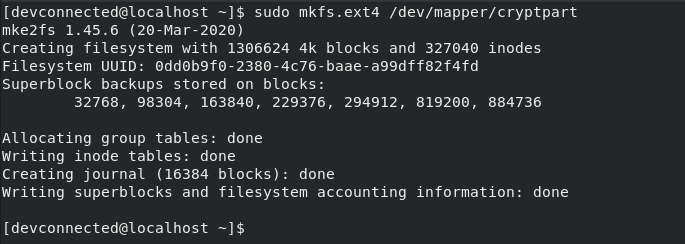
Now that your volume is unlocked, it is time for you to create a new ext4 filesystem on it.
To create a new filesystem on your partition, use the “mkfs” command followed by the filesystem format, in this case “ext4”.
$ sudo mkfs.ext4 /dev/mapper/cryptpart
Awesome, the filesystem was created.
You can now mount it and add new files to it. Files created on this volume will automatically be encrypted.
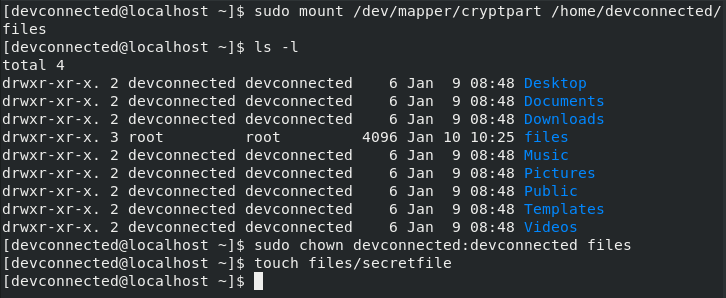
$ mkdir -p /home/devconnected/files

$ sudo mount /dev/mapper/cryptpart /home/devconnected/files

$ sudo chown devconnected:devconnected /home/devconnected/files
Awesome, now that your data is safe on an encrypted partition, let’s see how you can mount the encryption partition on boot.
Modify crypttab and fstab files
Many system administrators know the existence of the fstab file that is used by your init process to mount drives.
However, when dealing with encrypted partitions, there is another file that comes into play : /etc/crypttab.
Similarly to the fstab file, crypttab is read by your init process when booting. Given the information provided in it, it will ask you to unlock the partition or it will read a key file in order to do it automatically.
Note : the /etc/crypttab may not exist on your system. If it is not the case, you may have to create it.
The columns of the crypttab are described above :
- Device name : you can give your decrypted device any name that you want. Furthermore, it will be automatically created by the device mapper under the “/dev/mapper” path. In the previous section, we chose “cryptpart” for this column;
- Encrypted device UUID : in order to find which partition contains the encrypted data, your system needs to have its UUID meaning its unique identifier;
- Method of authentication : as explained, you can choose “none” for the passphrase or you can specify a path to the key. The key method will be explained in the last chapter of this article;
- Mount options : using this column, you can specify the number of tries for a passphrase, the cipher, the encryption method and many other parameters. The complete list of options is available in the “crypttab” manual page.
$ sudo nano /etc/crypttab

# Content of the crypttab file
cryptpart    UUID=<partition_uuid>    none    luks
If you have doubts about the UUID of your encrypted partition, you can use the “blkid” command with a simple “grep” pipe.
$ sudo blkid | grep -i luks
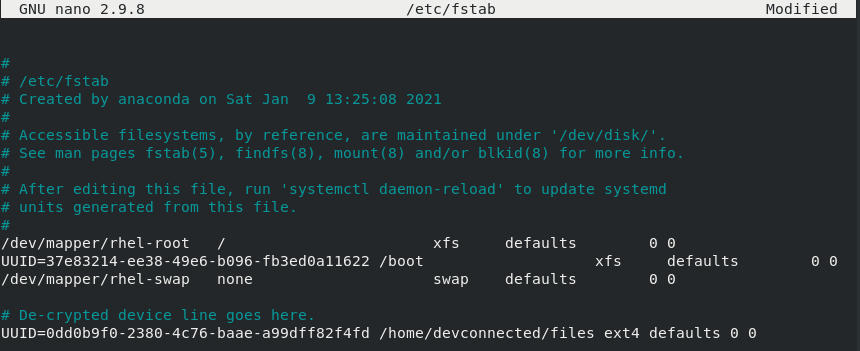
Now that the “/etc/crypttab” file is modified, you will have to modify the “fstab” file to specify the mountpoint.
$ sudo blkid | grep -i ext4

$ sudo nano /etc/fstab
In the fstab columns, you have to specify :
- The decrypted device UUID : in order to find it, you can use the “blkid” command but make sure that you opened the device before proceeding. If the device is closed, you won’t be able to find your UUID;
- The mount point : where the decrypted device is going to be mounted. If the path does not exist, it is going to be created automatically;
- The filesystem type : in this case, we chose to use “ext4” but it may be different on your system;
- Dump and pass options : we don’t want the filesystem to be checked on boot-time, so we can keep it to the default values.
When you are done, save your file and you should be good to go.
Given the steps you just performed, your device is ready and it should automatically be mounted on boot.
Verify encrypted device mounting on boot
In order to verify that the device is correctly mounted, we can restart our server and wait for the initramfs module to open the encrypted device.
$ sudo reboot
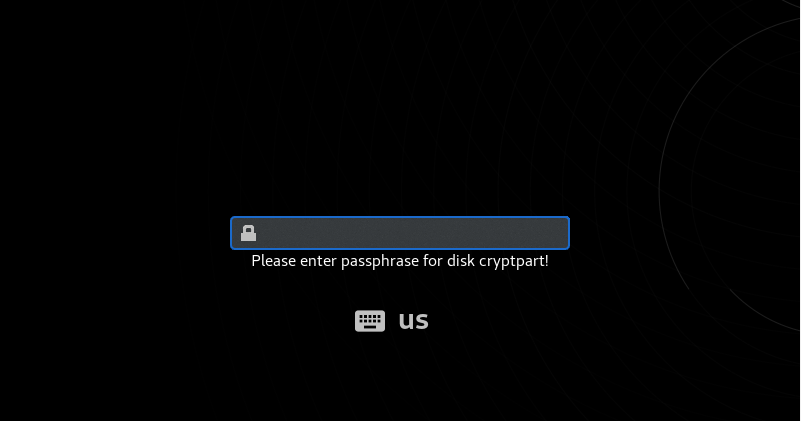
This is the screen that you should see, at least on RHEL8, when starting your server. If you provide the passphrase, your machine should be able to unlock it and mount it for you.
Once you are logged in your server, you can check that the encrypted partition was correctly mounted using the “lsblk” once again.
$ lsblk -f | grep sdb1 -A 2
Congratulations, you successfully encrypted a partition on Linux using LUKS!
Create Keys For Encrypted Partition
As explained before, LUKS handles two authentication methods, namely passphrases and key files.
In the previous section, we used passphrases but it can be quite handy for you to also have a authentication key.
First of all, create a key file and store it somewhere safe (in directories that regular users cannot navigate to, like “/boot” or “/root“).
$ echo "supersecretpass" > volume-key

$ sudo mv volume-key /boot/
As you can see, by default, the file was created using the user credentials and it has too many permissions.
Using the “chown” and “chmod” commands, we can set “root” as the owner of the file and change its permissions to read-only.
$ sudo chown root:root /boot/volume-key

$ sudo chmod 0400 /boot/volume-key
Now that the file is set to read-only, we can add it as a key in one of the slots of our LUKS volume.
Add Key to LUKS Volume
In order to add a key to your LUKS volume, you need to execute the “cryptsetup” command followed by the “luksAddKey”, the name of the encrypted volume and the path to the key.
$ sudo cryptsetup luksAddKey <encrypted_device> <path_to_key>

$ sudo cryptsetup luksAddKey /dev/sdb1 /boot/volume-key
In order to perform this operation, you will be prompted for your passphrase. When provided, the key will be automatically added to your keyslots.
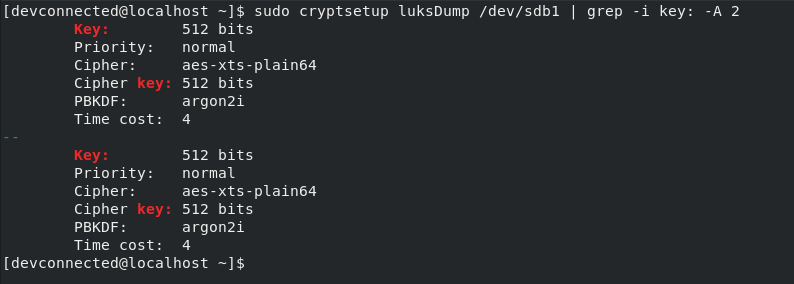
To verify that the key was correctly added, you can inspect your keyslots using the “luksDump” command.
$ sudo cryptsetup luksDump /dev/sdb1
Now that the key is added, you only need to modify the “/etc/crypttab” in order for your system to find it on boot.
$ sudo nano /etc/crypttab

# Content of the crypttab file
cryptpart    UUID=<partition_uuid>    /boot/volume-key    luks
When rebooting, your encrypted partition will be mounted automatically!
Conclusion
In this article, you learnt how you can easily encrypt your partition on Linux using the LUKS project and its implementation named cryptsetup.
You can saw that you can use a “key file” in order for your partition to be unlocked automatically.
If you are interested in a full system encryption, we recently wrote an article on the subject.
Also, if you want to read more about Linux System Administration, make sure to have a look at our dedicated section on the website.


