
Are you finding an ultimate guide to provide complete knowledge about Understanding Processes on Linux? This could be the right page for all developers & administrators.
Right from what is processes in Linux to how they are managed on Linux are explained here in a detailed way with simple examples for better understanding. If you are working as a system administrator, then I must say that you would have associated with the processes in Linux in many diverse ways.
Actually, Processes are at the center of the Linux OS designed by the Kernel itself, they represent running operations currently happening on your Linux host. You can perform everything with processes like starting them, interrupt them, resume them, or stop them.
In today’s tutorial, we are going to take a deep look at Linux Processes, what they are, what commands are associated with processes, how they are used on our operating system, what signals are, and how we can select more computational resources to our present processes.
- What You Will Learn
- Linux Processes Basics
- Process Initialization on Linux
- Creation of a Processes in Linux
- Identifying & Listing Running Processes on Linux
- How to Control Processes in Linux?
- Types of Processes
- Background and foreground processes
- Interacting with processes using signals
- Signals categories explained
- Signals and Processes States
- Manipulating Process with pgrep and pkill
- Changing Linux Process Priority using nice and renice
- Niceness and permissions
- Monitoring processes on Linux using top and htop
- Conclusion
What You Will Learn
By reading this tutorial until the end, you will learn about the following concepts
- What processes are and how they are created on a Linux system?
- How processes can be identified on a Linux system?
- What background and foreground processes are?
- What signals are and how they can be used to interact with processes?
- How to use the pgrep as well as the pkill command effectively
- How to adjust process priority using nice and renice
- How to see process activity in real-time on Linux
That’s quite a long program, so without further ado, let’s start with a brief description of what processes are.
- Complete Node Exporter Mastery with Prometheus | Monitoring Linux Host Metrics WITH THE NODE EXPORTER
- Monitoring Linux Logs with Kibana and Rsyslog | Using Kibana and Rsyslog to monitor Linux logs
- Syslog: The Complete System Administrator Guide
Linux Processes Basics
In short, processes are running programs on your Linux host that perform operations such as writing to a disk, writing to a file, or running a web server for example.
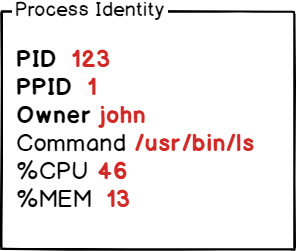
The process has an owner and they are identified by a process ID (also called PID)
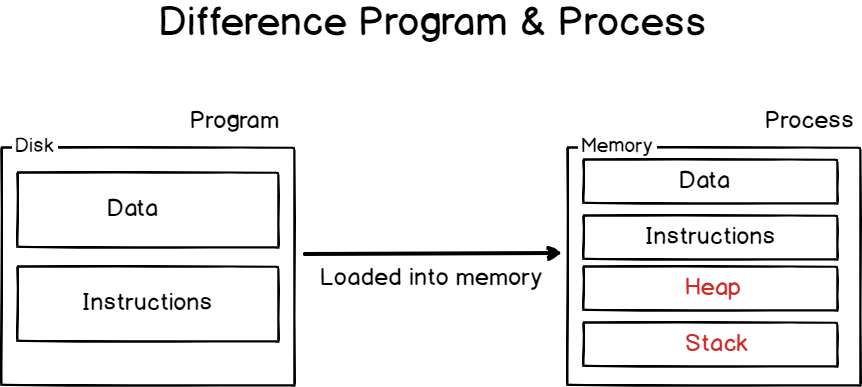
On the other hand, programs are lines, or code or lines of machine instructions stored on a persistent data storage.
They can just sit on your data storage, or they can be in execution, i.e running as processes.
In order to perform the operations they are assigned to, processes need resources: CPU time, memory (such as RAM or disk space), but also virtual memory such as swap space in case your process gets too greedy.
Obviously, processes can be started, stopped, interrupted, and even killed.
Before issuing any commands, let’s see how processes are created and managed by the kernel itself.
Process Initialization on Linux
As we already stated, processes are managed by the Kernel on Linux.
However, there is a core concept that you need to understand in order to know how Linux creates processes.
By default, when you boot a Linux system, your Linux kernel is loaded into memory, it is given a virtual filesystem in the RAM (also called initramfs) and the initial commands are executed.
One of those commands starts the very first process on Linux.
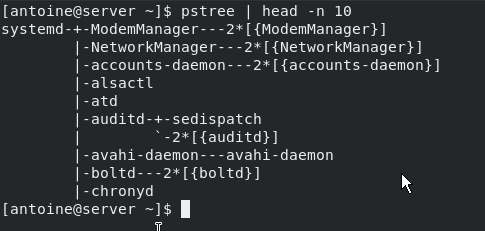
Historically, this process was called the init process but it got replaced by the systemd initialization process on many recent Linux distributions.
To prove it, run the following command on your host
$ ps -aux | head -n 2

As you can see, the systemd process has a PID of 1.
If you were to print all processes on your system, using a tree display, you would find that all processes are children of the systemd one.
$ pstree
It is noteworthy to underline the fact that all those initialization steps (except for the launch of the initial process) are done in a reserved space called the kernel space.
The kernel space is a space reserved to the Kernel in order for it to run essential system tools properly and to make sure that your entire host is running in a consistent way.
On the other hand, user space is reserved for processes launched by the user and managed by the kernel itself.
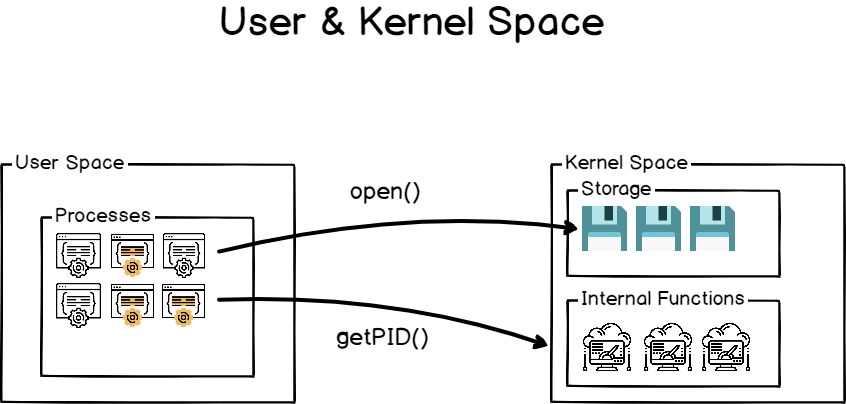
As a consequence, the systemd process is the very first process launched in the userspace.
Creation of a Processes in Linux
A new process is normally created when an existing process makes an exact copy of itself in memory. The child process will have the same environment as its parent, but only the process ID number is different.
In order to create a new process in Linux, we can use two conventional ways. They are as such:
- With The System() Function – this method is relatively simple, however, it’s inefficient and has significantly certain security risks.
- With fork() and exec() Function – this technique is a little advanced but offers greater flexibility, speed, together with security.
Process Creation using Fork and Exec
When you are creating and running a program on Linux, it generally involves two main steps: fork and execute.
Fork operation
A fork is a clone operation, it takes the current process, also called the parent process, and it clones it in a new process with a brand new process ID.
When forking, everything is copied from the parent process: the stack, the heap, but also the file descriptors meaning the standard input, the standard output, and the standard error.
It means that if my parent process was writing to the current shell console, the child process will also write to the shell console.
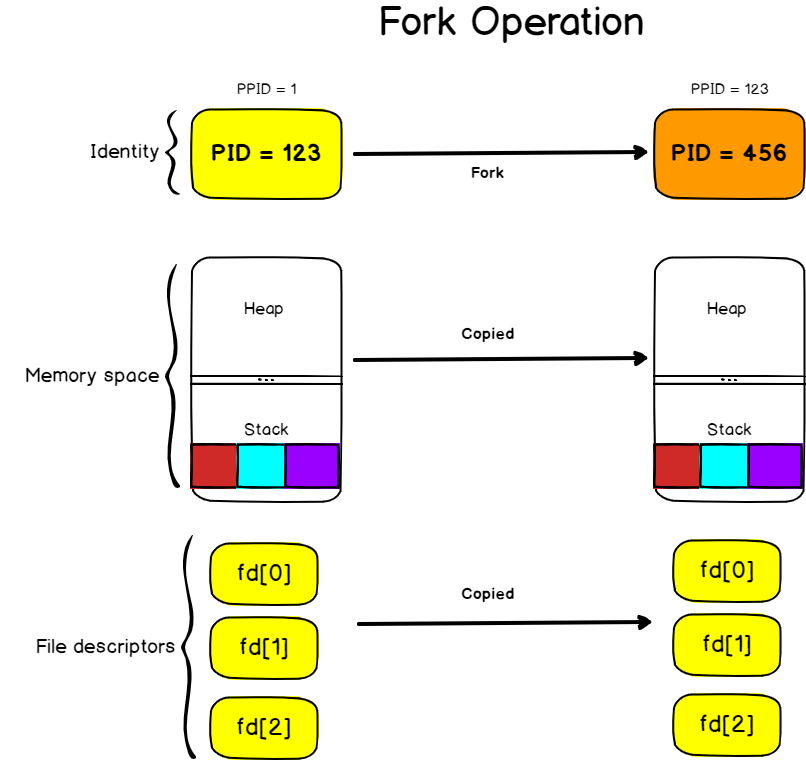
The execution of the cloned process will also start at the same instruction as the parent process.
Execute operation
The execute operation is used on Linux to replace the current process image with the image from another process.
On the previous diagram, we saw that the stack of the parent process contained three instructions left.
As a consequence, the instructions were copied to the new process but they are not relevant to what we want to execute.
The exec operation will replace the process image (i.e the set of instructions that need to be executed) with another one.
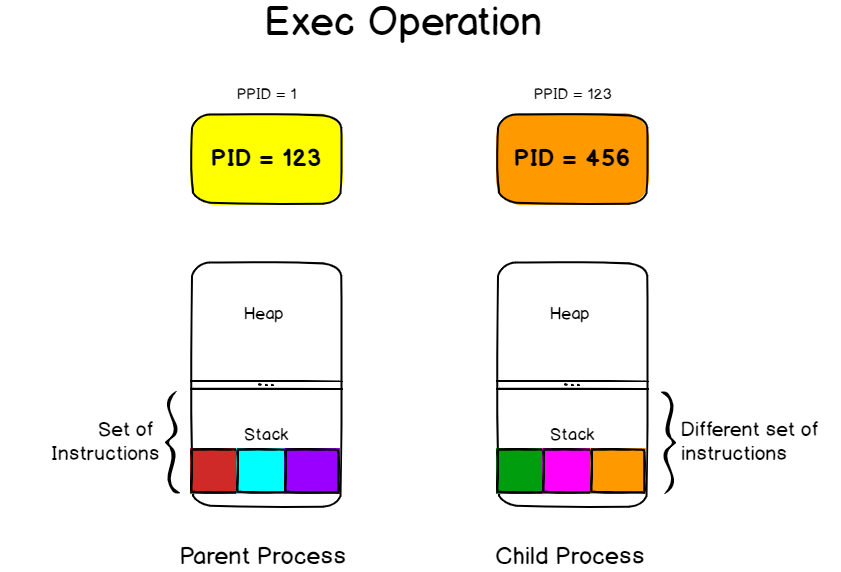
If you were for example to execute the exec command in your bash terminal, your shell would terminate as soon as the command is completed as your current process image (your bash interpreter) would be replaced with the context of the command you are trying to launch.
$ exec ls -l
If you were to trace the system calls done when creating a process, you would find that the first C command called is the exec one.

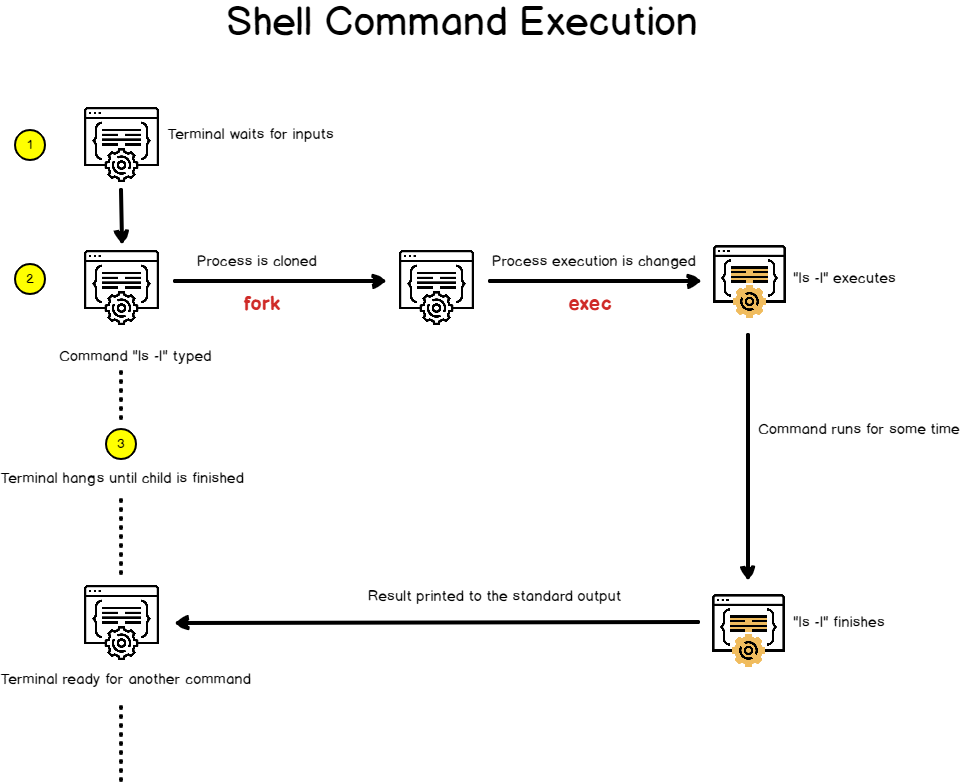
Creating processes from a shell environment
When you are launching a shell console, the exact same principles apply when you are launching a command.
A shell console is a process that waits for input from the user.
It also launches a bash interpreter when you hit Enter and it provides an environment for your commands to run.
But the shell follows the steps we described earlier.
When you hit enter, the shell is forked to a child process that will be responsible for running your command. The shell will wait patiently until the execution of the child process finishes.
On the other hand, the child process is linked to the same file descriptors and it may share variables that were declared on a global scope.
The child process executes the “exec” command in order to replace the current process image (which is the shell process image) in the process image of the command you are trying to run.
The child process will eventually finish and it will print its result to the standard output it inherited from the parent process, in this case, the shell console itself.
Now that you have some basics about how processes are created in your Linux environment, let’s see some details about processes and how they can be identified easily.
Identifying & Listing Running Processes on Linux
The easiest way to identify running processes on Linux is to run the ps command.
$ ps
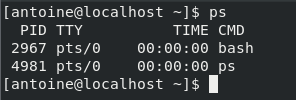
By default, the ps command will show you the list of the currently running processes owned by the current user.
In this case, only two processes are running for my user: the bash interpreter and the ps command I have run into it.
The important part here is that processes have owners, most of the time the user who runs them in the first place.
To illustrate this, let’s have a listing of the first ten processes on your Linux operating system, with a different display format.
$ ps -ef | head -n 10
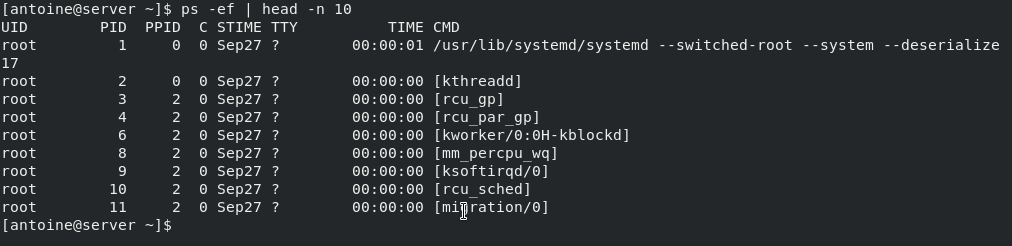
As you can see here, the top ten processes are owned by the user “root“.
This information will be particularly important when it comes to interacting with processes with signals.
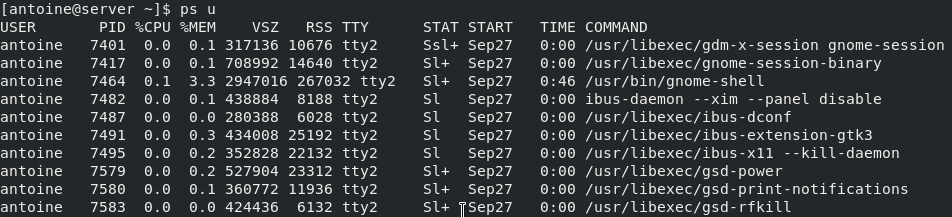
To display the processes that are owned and executed by the current connected user, run the following command
$ ps u
There are plenty of different options for the ps command, and they can be seen by running the manual command.
$ man ps
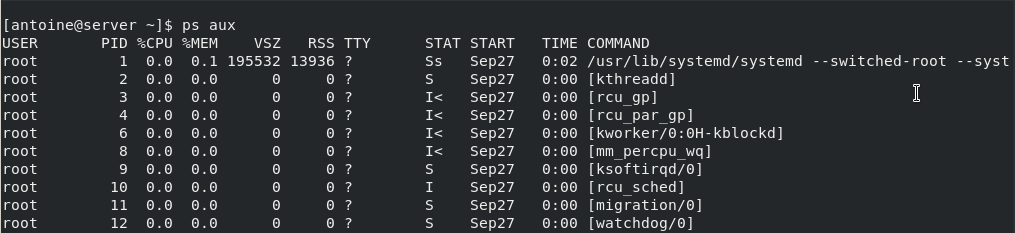
From experience, the two most important commands in order to see running processes are
ps aux

USER PID %CPU %MEM VSZ RSS TTY STAT START TIME COMMAND
That corresponds to a BSD-style process listing, where the following command
ps -ef

UID  PID  PPID C STIME TTY  TIME CMD
Corresponds to a POSIX-style process listing.
They are both representing current running processes on a system, but the first one has the “u” option for “user oriented” which makes it easier to read process metrics.
Now that you have seen what processes are and how they can be listed, let’s see what background and foreground processes are on your host.
Here is the description of all the fields displayed by ps -f command:
| Sr.No. | Column & Description |
|---|---|
| 1 | UID: User ID that this process belongs to (the person running it) |
| 2 | PID: Process ID |
| 3 | PPID: Parent process ID (the ID of the process that started it) |
| 4 | C: CPU utilization of process |
| 5 | STIME: Process start time |
| 6 | TTY: Terminal type associated with the process |
| 7 | TIME: CPU time taken by the process |
| 8 | CMD: The command that started this process |
Also, there are other options that can be used along with ps command:
| Sr.No. | Option & Description |
|---|---|
| 1 | -a: Shows information about all users |
| 2 | -x: Shows information about processes without terminals |
| 3 | -u: Shows additional information like -f option |
| 4 | -e: Displays extended information |
How to Control Processes in Linux?
In Linux, there are some commands for controlling processes like kill, pkill, pgrep, and killall, here are a few key examples of how to use them:
$ pgrep -u tecmint top
$ kill 2308
$ pgrep -u tecmint top
$ pgrep -u tecmint glances
$ pkill glances
$ pgrep -u tecmint glances
Types of Processes
Basically, there are two types of processes in Linux:
- Foreground processes (also referred to as interactive processes) – these are initialized and controlled through a terminal session. In other words, there has to be a user connected to the system to start such processes; they haven’t started automatically as part of the system functions/services.
- Background processes (also referred to as non-interactive/automatic processes) – these are processes not connected to a terminal; they don’t expect any user input.
Background and foreground processes
The definition of background and foreground processes is pretty self-explanatory.
Jobs and processes in the current shell
A background process on Linux is a process that runs in the background, meaning that it is not actively managed by a user through a shell for example.
On the opposite side, a foreground process is a process that can be interacted with via direct user input.
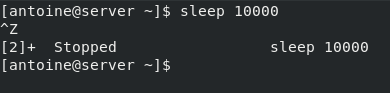
Let’s say for example that you have opened a shell terminal and that you typed the following command in your console.
$ sleep 10000
As you probably noticed, your terminal will hang until the termination of the sleep process. As a consequence, the process is not executed in the background, it is executed in the foreground.
I am able to interact with it. If I press Ctrl + Z, it will directly send a stop signal to the process for example.
However, there is a way to execute the process in the background.
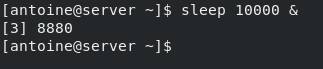
To execute a process in the background, simply put a “&” sign at the end of your command.
$ sleep 10000 &
As you can see, the control was directly given back to the user and the process started executing in the background
To see your process running, in the context of the current shell, you can execute the jobs command
$ jobs
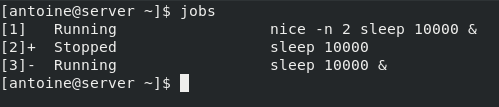
Jobs are a list of processes that were started in the context of the current shell and that may still be running in the background.
As you can see in the example above, I have two processes currently running in the background.
The different columns from left to right represent the job ID, the process state (that you will discover in the next section), and the command executed.
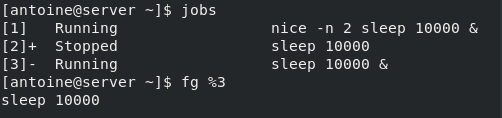
Using the bg and fg commands
In order to interact with jobs, you have two commands available: bg and fg.
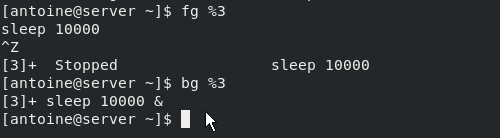
The bg command is used on Linux in order to send a process to the background and the syntax is as follows
$ bg %<job_id>
Similarly, in order to send a process to the foreground, you can use the fg in the same fashion
$ fg %<job_id>
If we go back to the list of jobs of our previous example, if I want to bring job 3 to the foreground, meaning to the current shell window, I would execute the following command
$ fg %3
By issuing a Ctrl + Z command, I am able to stop the process. I can link it with a bg command in order to send it to the background.
Now that you have a better idea of what background and foreground processes are, let’s see how it is possible for you to interact with the process using signals.
Interacting with processes using signals
On Linux, signals are a form of interprocess communication (also called IPC) that creates and sends asynchronous notifications to running processes about the occurrence of a specific event.
Signals are often used in order to send a kill or a termination command to a process in order to shut it down (also called kill signal).
In order to send a signal to a process, you have to use the kill command.
$ kill -<signal number> <pid>|<process_name>
For example, in order to force an HTTPD process (PID = 123) to terminate (without a clean shutdown), you would run the following command
$ kill -9 123
Signals categories explained
As explained, there are many signals that one can send in order to notify a specific process.
Here is the list of the most commonly used ones:
- SIGINT: short for the signal interrupt is a signal used in order to interrupt a running process. It is also the signal that is being sent when a user pressed Ctrl + C on a terminal;
- SIGHUP: short for signal hangup is the signal sent by your terminal when it is closed. Similarly to a SIGINT, the process terminates;
- SIGKILL: signal used in order to force a process to stop whether it can be gracefully stopped or not. This signal can not be ignored except for the init process (or the systemd one on recent distributions);
- SIGQUIT: a specific signal sent when a user wants to quit or to exit the current process. It can be invoked by pressing Ctrl + D and it is often used in terminal shells or in SSH sessions;
- SIGUSR1, SIGUSR2: those signals are used purely for communication purposes and they can be used in programs in order to implement custom handlers;
- SIGSTOP: instructs the process to stop its execution without terminating the process. The process is then waiting to be continued or to be killed completely;
- SIGCONT: if the process is marked as stopped, it instructs the process to start its execution again.
In order to see the full list of all signals available, you can run the following command
$ kill -l

 1) SIGHUP       2) SIGINT       3) SIGQUIT      4) SIGILL
 5) SIGTRAP      6) SIGABRT      7) SIGBUS       8) SIGFPE
 9) SIGKILL     10) SIGUSR1     11) SIGSEGV     12) SIGUSR2
13) SIGPIPE     14) SIGALRM     15) SIGTERM     16) SIGSTKFLT
17) SIGCHLD     18) SIGCONT     19) SIGSTOP     20) SIGTSTP
21) SIGTTIN     22) SIGTTOU     23) SIGURG      24) SIGXCPU
25) SIGXFSZ     26) SIGVTALRM   27) SIGPROF     28) SIGWINCH
29) SIGIO       30) SIGPWR      31) SIGSYS      34) SIGRTMIN
35) SIGRTMIN+1  36) SIGRTMIN+2  37) SIGRTMIN+3  38) SIGRTMIN+4
39) SIGRTMIN+5  40) SIGRTMIN+6  41) SIGRTMIN+7  42) SIGRTMIN+8
43) SIGRTMIN+9  44) SIGRTMIN+10 45) SIGRTMIN+11 46) SIGRTMIN+12
47) SIGRTMIN+13 48) SIGRTMIN+14 49) SIGRTMIN+15 50) SIGRTMAX-14
51) SIGRTMAX-13 52) SIGRTMAX-12 53) SIGRTMAX-11 54) SIGRTMAX-10
55) SIGRTMAX-9  56) SIGRTMAX-8  57) SIGRTMAX-7  58) SIGRTMAX-6
59) SIGRTMAX-5  60) SIGRTMAX-4  61) SIGRTMAX-3  62) SIGRTMAX-2
63) SIGRTMAX-1  64) SIGRTMAX
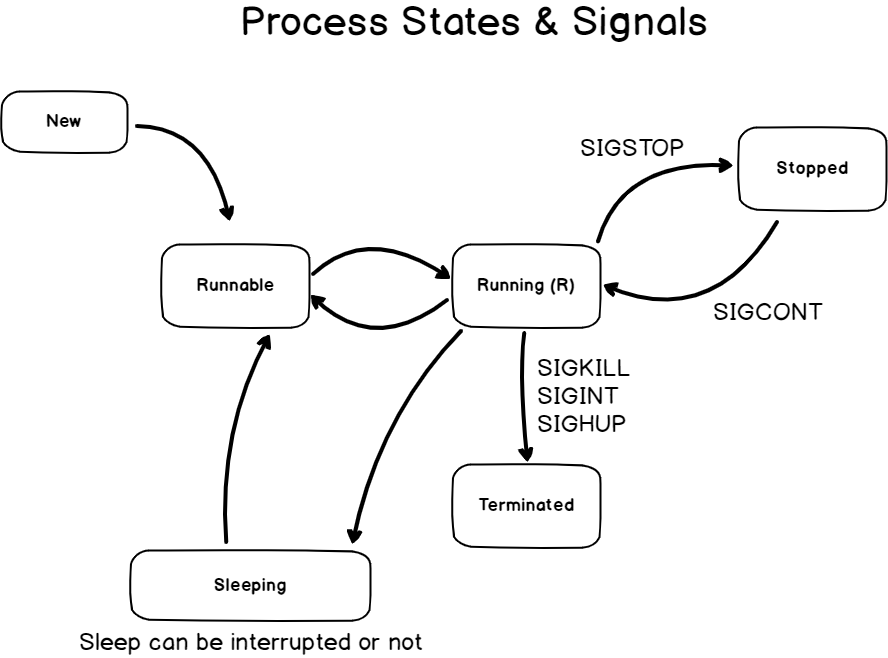
Signals and Processes States
Now that you know that it is possible to interrupt, kill or stop processes, it is time for you to learn about processes states.
States of a Process in Linux
Processes have many different states, they can be :
- Running: processes running are the ones using some computational power (such as CPU time) in the current time. A process can also be called “runnable” if all running conditions are met, and it is waiting for some CPU time by the CPU scheduler.
- Stopped: a signal that is stopped is linked to the SIGSTOP signal or to the Ctrl + Z keyboard shortcut. The process execution is suspended and it is either waiting for a SIGCONT or for a SIGKILL.
- Sleeping: a sleeping process is a process of waiting for some event or for a resource (like a disk) to be available.
Here is a diagram that represents the different process states linked to the signals you may send to them.
Now that you know a bit more about process states, let’s have a look at the pgrep and pkill commands.
Manipulating Process with pgrep and pkill
On Linux, there is already a lot that you can do by simply using the ps command.
You can narrow down your search to one particular process, and you can use the PID in order to kill it completely.
However, there are two commands that were designed in order for your commands to be even shorter: pgrep and pkill
Using the pgrep command
The pgrep command is a shortcut for using the ps command piped with the grep command.
The pgrep command will search for all the occurrences for a specific process using a name or a defined pattern.
The syntax of the pgrep command is the following one
$ pgrep <options> <pattern>
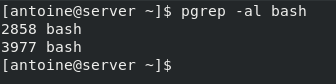
For example, if you were to search for all processes named “bash” on your host, you would run the following command
$ pgrep bash<
The pgrep command is not restricted to the processes owned by the current user by default.
If another user was to run the bash command, it would appear in the output of the pgrep command.
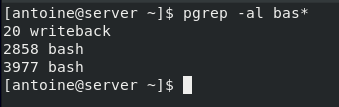
It is also possible to search for processes using globbing characters.
Using the pkill command
On the other hand, the pkill command is also a shortcut for the ps command used with the kill command.
The pkill command is used in order to send signals to processes based on their IDs or their names.
The syntax of the pkill command is as follows
$ pkill <options> <pattern>
For example, if you want to kill all Firefox windows on your host, you would run the following command
$ pkill firefox
Similar to the pgrep command, you have the option to narrow down your results by specifying a user with the -u option.
To kill all processes starting with “fire” and owned by the current user and root, you would run the following command
$ pkill user,root fire*
If you don’t have the right to stop a process, you will get a permission denied error message to your standard output.

You also have the option to send specific signals by specifying the signal number in the pkill command
For example, in order to stop Firefox with a SIGSTOP signal, you would run the following command
$ pkill -19 firefox<
Changing Linux Process Priority using nice and renice
On Linux, not all processes are given the same priority when it comes to CPU time.
Some processes, such as very important processes run by root, are given a higher priority in order for the operating system to work on tasks that truly matter to the system.
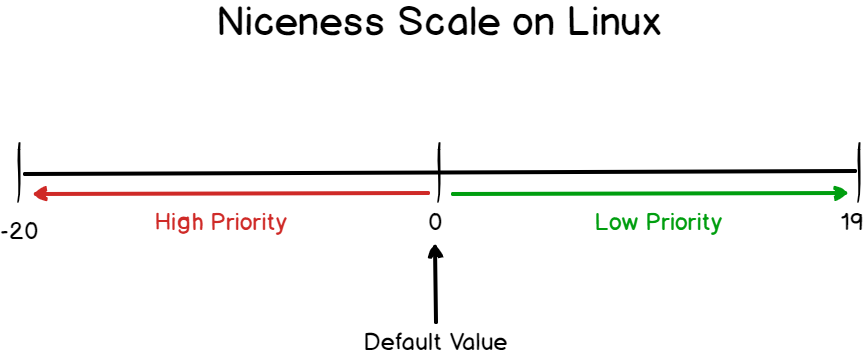
Process priority on Linux is called the nice level.
The nice level is a priority scale going from -20 to 19.
The lower you go on the niceness scale, the higher the priority will be.
Similarly, the higher you are on the niceness scale, the lower your priority will be.
In order to remember it, you can remember the fact that “the nicer you are, the more you are willing to share resources with others”.
In order to start a certain program or process with a given nice level, you will run the following command
$ nice -n <level> <command>
For example, in order to run the tar command with a custom tar level, you would run the following command
$ nice -n 19 tar -cvf test.tar file
Similarly, you can use the renice command in order to set the nice level of a running process to a given value.
$ renice -n <priority> <pid>
For example, if I have a running process with the PID 123, I can use the renice command in order to set its priority to a given value.
$ renice -n 18 123
Niceness and permissions
If you are not a member of the sudo group (or a member of the wheel group on Red Hat-based distributions), there are some restrictions when it comes to what you can do with the nice command.
To illustrate it, try to run the following command as a non-sudo user
$ nice -n -1 tar -cvf test.tar file

nice: cannot set niceness: Permission denied

When it comes to niceness, there is one rule that you need to know:
As a non-root (or sudo) user, you won’t be able to set a nice level lower than the default assigned one (which is zero), and you won’t be able to renice a running process to a lower level than the current one.
To illustrate the last point, launch a sleep command in the background with a nice value of 2.
$ nice -n 2 sleep 10000 &
Next, identify the process ID of the process you just created.

Now, try to set the nice level of your process to a value lower to the one you specified in the first place.
$ renice -n 1 8363

As you probably noticed, you won’t be able to set the niceness level to 1, but only to a value higher than the one you specified.
Now if you choose to execute the command as sudo, you will be able to set the nice level to a lower value.

Now that you have a clear idea of the nice and renice commands, let’s see how you can monitor your processes in real-time on Linux.
Monitoring processes on Linux using top and htop
In a previous article, we discussed how it is possible to build a complete monitoring pipeline in order to monitor Linux processes in real-time.
Using top on Linux
The top is an interactive command that any user can run in order to have a complete and ordered listing of all processes running on a Linux host.
To run top, simply execute it without any arguments.
The top will run in interactive mode.
$ top
If you want to run top for a custom number of iterations, run the following command
$ top -n <number><
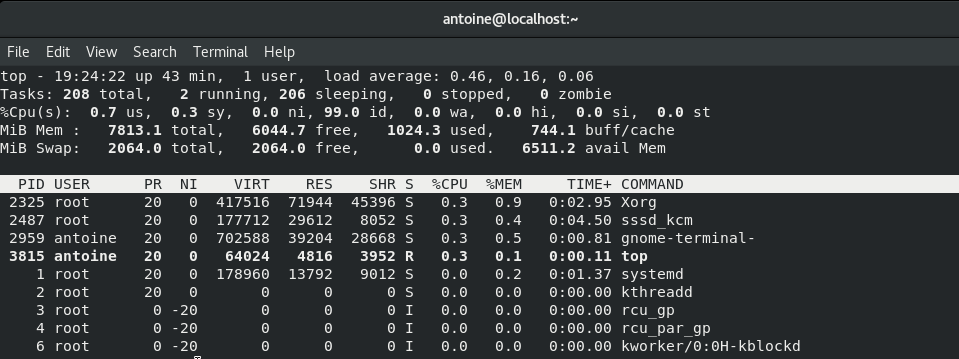
The top command will first show recap statistics about your system at the top, for example, the number of tasks running, the percentage of CPU used, or the memory consumption.
Right below it, you have access to a live list of all processes running or sleeping on your host.
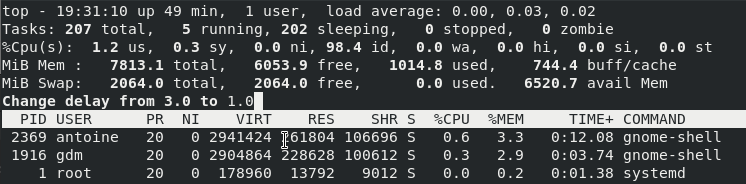
This view will refresh every three seconds, but you can obviously tweak this parameter.
To increase the refresh rate in the top command, press the “d” command and choose a new refresh rate
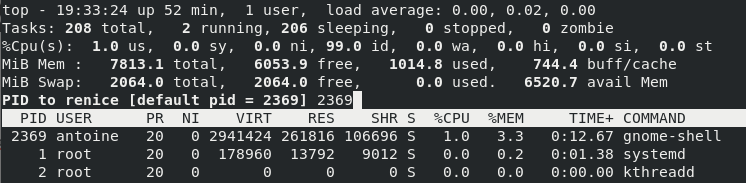
Similarly, you can change the nice value of a running process live by pressing the “r” key on your keyboard.
The same permissions rules apply if you want to modify processes to a value lower to the one they are already assigned.
As a consequence, you may need to run the command as sudo.
Using htop on Linux
Alternatively, if you are looking for a nicer way to visualize processes on your Linux host, you can use the htop command.
By default, the htop command is not available on most distributions, so you will need to install it with the following instructions.
$ sudo apt-get update
$ sudo apt-get install htop
If you are running a Red Hat based distribution, run the following commands.
$ sudo yum -y install epel-release
$ sudo yum -y update
$ sudo yum -y install htop
Finally, to run the htop command, simply run it without any arguments.
$ htop
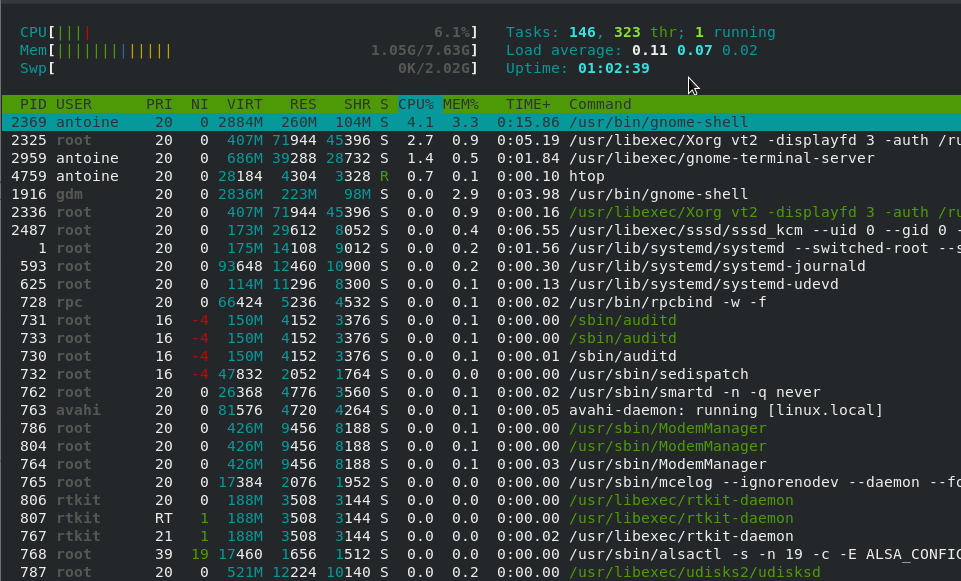
As you can see, the output is very similar except that it showcases information in a more human-friendly output.
Conclusion
In this tutorial, you learned many concepts about processes: how they are created, how they can be managed, and how they can be monitored effectively.
If you are looking for more tutorials related to Linux system administration, we have a complete section dedicated to it on the website, so make sure to check it out.
Until then, have fun, as always.