How To Zip Folder on Linux

From all the compression methods available, Zip is probably one of the most popular ones.

Released in 1989 by Philip Katz, Zip is widely used by system administrators in order to reduce the size of bulky files and directories on your system.

Nowadays, Zip is available on all operating systems on the market : whether it is Windows, Linux or MacOS.

With zip, you can easily transfer files between operating systems and save space on your disks.

In this tutorial, we are going to see how you can easily zip folders and directories on Linux using the zip command.

Zip Folder using zip

The easiest way to zip a folder on Linux is to use the “zip” command with the “-r” option and specify the file of your archive as well as the folders to be added to your zip file.

You can also specify multiple folders if you want to have multiple directories compressed in your zip file.

$ zip -r <output_file> <folder_1> <folder_2> ... <folder_n>

For example, let’s say that you want to archive a folder named “Documents” in a zip file named “temp.zip”.

In order to achieve that, you would run the following command

$ zip -r temp.zip Documents

In order to check if your zip file was created, you can run the “ls” command and look for your archive file.

$ ls -l | grep .zip

Alternatively, if you are not sure where you stored your zip files before, you can search for files using the find command

$ find / -name *.zip 2> /dev/null

Zip Folder using find

Another great way of creating a zip file for your folders is to use the “find” command on Linux. You have to link it to the “exec” option in order to execute the “zip” command that creates an archive.

If you want to zip folders in the current working directory, you would run the following command

$ find . -maxdepth 1 -type d -exec zip archive.zip {} +

Zip Folder using find create-zip

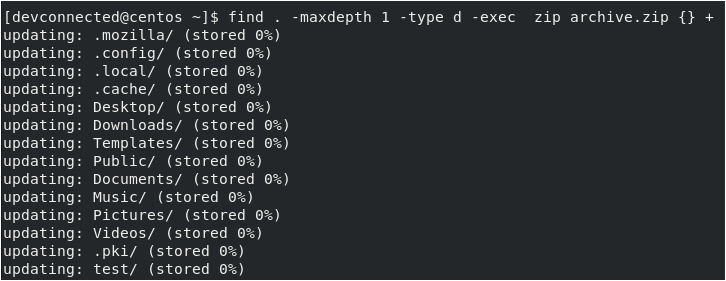
Using this technique is quite useful : you can choose to archive folders recursively or to have only a certain level of folders zipped in your archive.

Zip Folder using Desktop Interface

If you are using GNOME or KDE, there’s also an option for you to zip your folders easily.

Compress Folders using KDE Dolphin

If you are using the KDE Graphical Interface, you will be able to navigate your folders using the Dolphin File Manager.

In order to open Dolphin, click on your the “Application Launcher” button at the bottom left of your screen and type “Dolphin“.

Compress Folders using KDE Dolphin dolphin

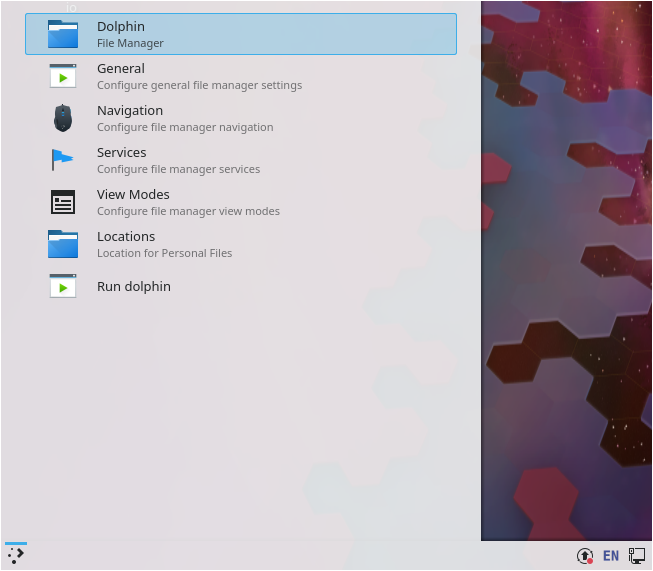
Click on the “Dolphin – File Manager” option.

Now that Dolphin is open, select the folders to be zipped by holding the “Control” key and left-clicking on the folders to be compressed together.
Compress Folders using KDE Dolphin step-1

Now that folders are selected, right-click wherever you want and select the “Compress” option.

When hovering your mouse cursor over the “Compress” option and select the “Here (as ZIP)” option in the menu.

If you want to zip folders in another location, you will have to select the “Compress to” option, specify the location and the compression mode (as ZIP).

Zip Folder using Desktop Interface compress-zip-1

After a quick time, depending on the size of your archive, your zip should be created with all the folders you have selected in it.

Compress Folders using KDE Dolphin created

Congratulations, you successfully created a zip for your folders on Linux!

Compress Folders on GNOME

If you are using GNOME, on Debian 10 or on CentOS 8 for example, you will also be able to compress your files directly from the user interface.

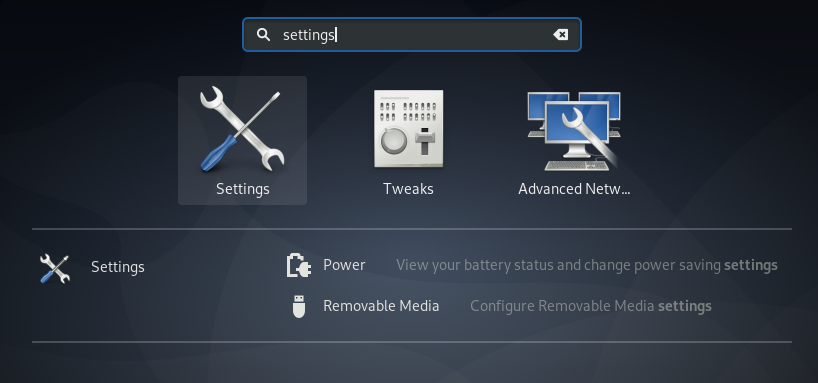
Select the “Applications” menu at the top left corner of your Desktop, and search for “Files

Compress Folders on GNOME gnome

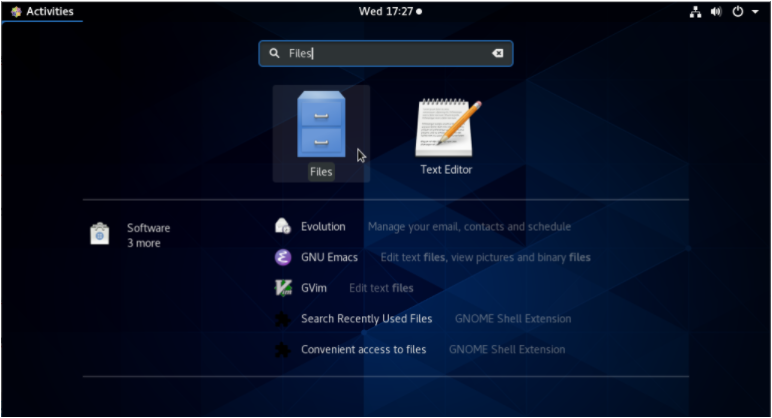
Select the “Files” option : your file explorer should start automatically.

Now that you are in your file explorer, select multiple folders by holding the “Control” key and left-clicking on all the folders to be zipped.

When you are done, right-click and select the “Compress” option.

Compress Folders on GNOME compress

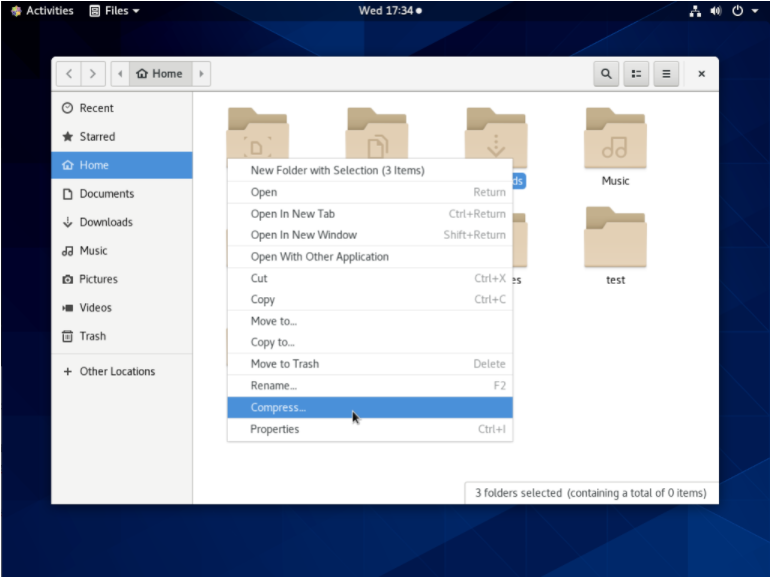
Now that the “Compress” option is selected, a popup window should appear asking for the filename of your zip as well as the extension to be used.

Compress Folders on GNOME archive

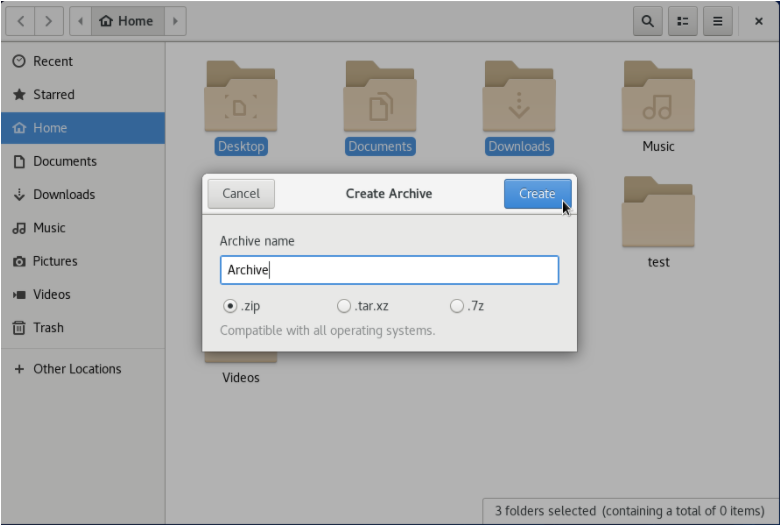
When you are done, simply click the “Create” option for your zip file to be created.
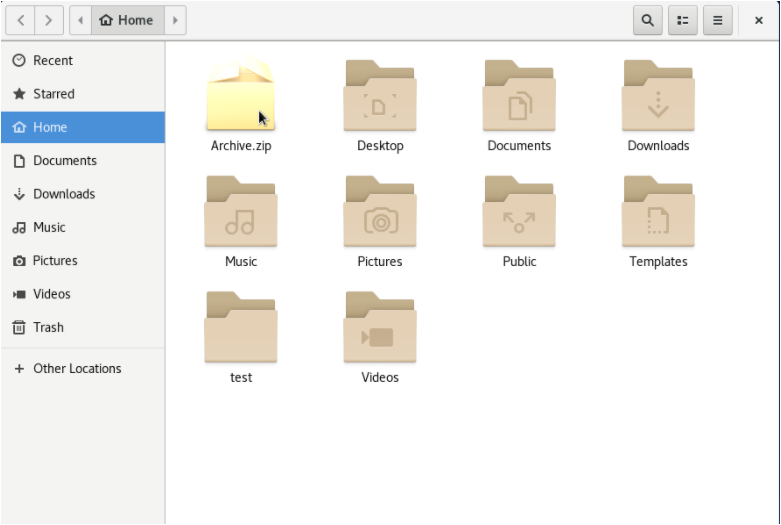
Compress Folders on GNOME archive2

That’s it!

Your folders should now be zipped in an archive file : you can start sending the archive or extracting the files that are contained in it.

Zipping Directories using Bash

In some cases, you may not have a graphical interface directly installed on your server.

As a consequence, you may want to zip folders directly from the command-line, using the Bash programming language.

If you are not sure about Bash, here’s a Bash beginners guide and another one for more advanced Bash scripting.

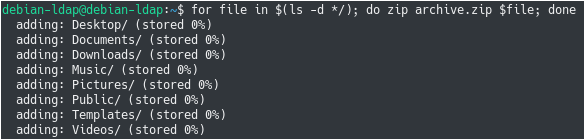
In order to zip folders using Bash, use the “for” loop and iterate over the directories of the current working directory

$ for file in $(ls -d */); do zip archive.zip $file; done

Zipping Directories using Bash for-files

Using bash, you can actually get specific when it comes to the folders to be zipped.

For example, if you want to zip folders beginning with the letter D, you can write the following command

$ for file in $(ls -d */ | grep D); do zip archive.zip $file; done

Zipping Directories using Bash list-directories-2

Congratulations, you successfully created a zip for your folders in the current working directory!

Conclusion

In this tutorial, you learnt how you can easily create zip files for your folders on Linux.

You learnt that it is either possible to do it using the command-line and commands such as zip, find or the Bash programming language.

If you are using a graphical interface (such as KDE or GNOME), you can also zip folders by navigating the file explorer and right-clicking on the folders you are interested in.

If you are interested in Linux System Administration and quick tips, we have a complete section dedicated to it on the website, so make sure to check it out!

Logical Volume Management Explained on Linux

On Linux, it can be quite hard to manage storage and filesystems and it often needs a lot of different commands to move data.

Traditional storage is usually made of three different layers : the physical disk (whether it is a HDD or a SSD), the logical partitions created on it and the filesystem formatted on the partition.

However, those three layers are usually tighly coupled : it can be quite hard to shrink existing partitions to create a new one.

Similarly, it is quite hard to extend a filesystem if you add a new disk to your system : you would have to move data from one disk to another, sometimes leading to data loss.

Luckily for you, there is a tool, or an abstraction that you can use on Linux to manage storages : LVM.

LVM, short for Logical Volume Management, comes as a set of tools that allows you to extend, shrink existing volumes as well as replacing existing disks while the system is running.

In this tutorial, we are going to learn about LVM and how you can easily implement them on your system.

LVM Layers Explained

Before starting, it is important that you can get a strong understanding of how LVM are designed on your system.

If you have been dealing with regular storage devices before, you already know the relationship between disks and filesystems.

LVM Layers Explained regular-storage-management

On Linux, you have physical disks that automatically detected and managed by udev when first inserted.

On those disks, you can create partitions using one of the popular utilities available (fdisk, parted or gparted).

Finally, you format filesystems on those partitions in order to store your files.

Using LVM, the storage design is a bit different.
LVM Layers Explained lvm-layers

Between partitions and filesystems, you have three additional layers : physical volumes, volume groups and logical volumes.

Physical Volume

When using LVM, physical volumes are meant to represent partitions already existing on your hard drives.

When system administrators refer to “physical volumes”, they often mean the actual physical device storing data on our system.

Physical volumes are named in the same way than physical partitions : /dev/sda1 for the first partition of your first hard drive, /dev/sdb1 for the first partition of your second drive and so on.

Volume Group

Right over physical volumes, volumes group can be seen as multiple physical volumes grouped together to form one single volume.

Metaphorically, volume groups can be seen as storage buckets : they are a pool of different physical volumes that can be used to extend existing logical volumes or to create new ones.

Volume groups have no name convention, however it is common accepted that they are preceded with the “vg” prefix (“vg-storage“, “vg-drives” for example)

Logical Volumes

Finally, logical volumes are meant to be direct links between the volume groups and the filesystems formatted on your devices.

They have a one-to-one relationship with filesystems and they essentially represent a partition of your volume group.

Even if logical volumes are named in the same way mount points are, they are two different concepts and the logical volume is a very different entity from your filesystem.

Note : expanding your logical volume does not mean that you will automatically expand your filesystem for example.

Advantages of LVM over standard disk management

Logical Volume Management was built in the first place to fix most of the shortcomings associated with regular disk management on Linux.

One major advantage of LVM is the fact that you are able to reassemble your space while your system is running.

Modifying storage live

As you probably noticed in the past, your storage on a host is tightly coupled to the partitions written on your disks.

As a consequence, reformatting a partition or reassembling a filesystem over another partition forced any system administrator to restart the system.

This is mainly due to the fact that the Kernel cannot read the partition table live and it needs a full reboot in order to be able to probe the different partitions of your system.

This can obviously be a major issue if you are dealing with a production server : if your website is running on this server, you won’t be able to restart it without the website being down.

Advantages of LVM over standard disk management lvm-layers

If your website is down, it means that you probably won’t be able to serve your customer needs, leading to a money loss.

LVM solves this issue by building an abstraction layer on top of regular partitions : if you are not dealing with regular partitions, you don’t need to re-read the partition table anymore, you just need to update your device mapping.

With this design choice, storage management becomes a software-to-software problematic and it is not tied to hardware anymore, at least not directly.

Spreading space over multiple disks

Another great aspect of LVM is the fact that you can easily spread data over multiple disks.

If you look at the diagram shown before, you will see that there is a strong coupling between filesystems and partitions : as a consequence, it is quite hard to have data stored over multiple disks.

LVM comes as a great solution for this problem : your logical volumes belong to a central volume group.

Even if the volume group is made of multiple disks, you don’t have to manage them by yourself, the device mapper does it for you.

This is true for expanding filesystems but also for shrinking them as well as transferring data from one physical device to another.

Managing LVM Physical Volumes

In this section, we are going to use commands in order to display, create or remove physical volumes on your system.

Display existing physical volumes

In order to display existing storage devices on Linux, you have to use the “lvmdiskscan” command.

$ sudo lvmdiskscan
Note : if LVM utilities are not installed on your host, having a “command not found” error for example, you have to install LVM programs by running “apt-get install lvm2” as root.

Display existing physical volumes lvmdiskscan

When running the “lvmdiskscan”, you are presented with the different disks available on your host.

On those disks, you also see partitions if they are already created on those disks.

Finally, probably the most important information, you see how many LVM physical volumes are created on your system.

Note : this is an important point of LVM flexibility : you can create physical volumes out of whole disks or partitions of those disks.

In this case, we are starting with a brand new server with no LVM physical volumes created.

To display existing physical volumes existing on your host, you can also use the “pvs” command.

$ pvs

Create new physical volumes

Creating new physical volumes on Linux is pretty straightforward : you have to execute the “pvcreate” and specify the underlying physical devices to be created.

$ pvcreate <device_1> <device_2> ... <device_n>

In our case, let’s say that we want to create a physical volume for the second disk plugged on our host, which is “sdb”.

$ pvcreate /dev/sdb
Note : you won’t be able to create physical volumes out of devices that are already mounted on your system. As a consequence, “sda1” (that usually stores the root partition) can not be easily transitioned to LVM.

Create new physical volumes pvcreate

Running the “lvmdiskscan” command again shows a very different output compared to the first section.

$ lvmdiskscan

lvmdiskscan3

As you can see, our host automatically detects that one whole disk is formatted as a LVM physical volume and that it is ready to be added to a volume group.

Similarly, the “pvs” command has now a different output : our new disk has been added to the list of physical volumes available on our host.

$ pvs

Create new physical volumes pvs

Now that you have successfully created your first volume group, it is time to create your first volume group.

Managing LVM Volume Groups

Unless your system was preconfigured with LVM volumes, you should not have any volume groups created on your system.

To list existing volume groups on your host, you have to use the “vgs” command with no arguments.

$ vgs

Create Volume Group using vgcreate

The easiest way to create a volume group is to use the “vgcreate”, to specify the name of the volume group to be created and the physical volumes to be included in it.

$ vgcreate <volume_name> <physical_volume_1> <physical_volume_2> ... <physical_volume_n>

In our case, we only have one physical volume on our host (which is /dev/sdb) that is going to be used in order to create the “vg_1” volume group.

$ vgcreate vg_1 /dev/sdb

Create Volume Group using vgcreate

List and Display Existing Volume Groups

Listing the existing volume groups on your system using “vgs” should now display the “vg_1” volume group you just created.

$ vgs

List and Display Existing Volume Groups vgs

With no arguments, you are presented with seven different columns :

  • VG : describing the volume group name on the host;
  • #PV : displaying the number of physical volumes available in the volume group;
  • #LV : similarly, the number of logical volumes created out of the volume group;
  • #SN : number of snapshots created out of the logical volumes;
  • Attr : describing the attributes of the volume group (w for writable, z for resizable and n for “normal”);
  • VSize : the volume size in GBs of the volume group;
  • VFree : the space available on the volume group

If you want to get more information on your existing volume groups, you can use the “vgdisplay” command.

$ vgdisplay

$ vgdisplay <volume_group>

List and Display Existing Volume Groups vgdisplay

As you probably noticed, “vgdisplay” displays way more information than the simple “vgs” command.

Near the end of the output, you can see two columns named “PE Size” and “Total PE” short for “Physical Extents Size” and “Total Physical Extents”.

Under the hood, LVM manages physical extents which are chunks of data very similar to the concept of block size on partitions.
List and Display Existing Volume Groups physical-extents

In this case, LVM manages for this volume group physical extents that are 4.00 MiB big and the volume group has 511 different physical extents. The computation obviously leads to a 2.00 GiB space in size (4*511 = 2.044 MiB or 2.00 GiB).

Practically, you should not have to worry about physical extents too much : LVM always makes sure that the mapping between physical extents and the logical volumes is preserved.

Now that you have created your first volume group, it is time to create your first logical volume to store data.

Managing LVM Logical Volumes

In order to create a logical volume in a volume group, you have to use the “lvcreate” command, specify the name of the logical volume and the volume group that it belongs to.

In order to specify the space to be taken, you have to use the “-L” option and specify a size (composed of a number and its unit)

$ lvcreate -L <size> <volume_group>

If you want to give your logical volume a name, you can use the “-n” option.

$ lvcreate -n <name> -L <size> <volume_group>

Managing LVM Logical Volumes lvcreate

Again, you can list your newly created logical volume by running the “lvs” command as sudo.

$ lvs

Managing LVM Logical Volumes lvs

By running the “lvs” command, you are presented with many different columns :

  • LV : displaying the name of the logical volume;
  • VG : describing the volume group your logical volume belongs to;
  • Attr : listing the attributes of your logical volume (“w” for writable, “i” for inherited and “a” for allocated);
  • LSize : self explanatory, describing the size of your logical volume in GiB;

Other columns are describing advanced usage of LVM such as setting up mirrored spaces or striped ones. For this basic tutorial, we won’t describe them and they will be described in more advanced tutorials.

When you created your logical volume, some actions were taken by the kernel without you noticing it :

  • A virtual device was created under /dev : in a folder named after your volume group name (“vg_1”), a virtual logical device was created named after the name of the logical volume (“lv_1”)
  • The virtual device is a soft-link to the “dm-0” device available in /dev : “dm-0” is a virtual device that holds a mapping between your logical volumes and your real hard disks. (/dev/sda, /dev/sdb and so on)

Formatting and Mounting LVM Logical Volumes

The last step in order for you to start using your newly created space is to format and mount your logical volumes.

In order to format a logical volume, you have to use the “mkfs” command and specify the filesystem to be used.

$ mkfs -t <filesystem_type> <logical_volume>

In our case, let’s pretend that we want to format our logical volume as an “ext4” filesystem, we would run the following command

$ mkfs -t ext4 /dev/vg_1/lv_1

Formatting and Mounting LVM Logical Volumes mkfs

Now that the logical volume is formatted, you simply have to mount it on one folder on your system.

In order to mount a LVM logical volume, you have to use the “mount” command, specify the logical volume name and the mount point to be used.

$ mount <logical_volume> <mount_point>

For the example, let’s pretend that we are going to mount the filesystem on the “/mnt” directory of the root directory.

$ mount /dev/vg_1/lv_1 /mnt

If you now run the “lsblk” command, you should be able to see that your logical volume is now mounted.

$ lsblk
Formatting and Mounting LVM Logical Volumes lsblk

Congratulations, you can now start using your newly created volume!

Expanding Existing Filesystems using LVM

As a use-case of LVM, let’s see how easy it can be to increase the size of a filesystem by adding another disk to your host. If you add another disk to your host, udev will automatically pick it and it will assign a name to it. To have the name of the disk device on your system, make sure to execute the “lsblk” command.

$ lsblk

Expanding Existing Filesystems using LVM sdc

In our case, we added a new hard disk on the SATA connector which is named “sdc”.

To add this new disk to our LVM layers, we have to configure each layer of the LVM storage stack.

First, let’s mark this new disk as a physical volume on our host with the “pvcreate” command.

$ pvcreate /dev/sdc

Physical volume "/dev/sdc" successfully created

Then, you need to add your newly created physical volume to the volume group.

To add a physical volume to an existing volume group, you need to use the “vgextend” command, specify the volume group and the physical volumes to be added.

$ vgextend vg_1 /dev/sdc

Volume group "vg_1" successfully extended

With the “vgs” command, you can verify your volume group was successfully extended.

$ vgs<

Expanding Existing Filesystems using LVM vgs2

As you can see, compared to the first section, the output slightly changed : you now have two physical volumes. Also, the space increased from 2 GiB to almost 3 GiB.

Your logical volume is not bigger yet, you will need to increase its size to take some space available in the pool.

To increase the size of your logical volume, you have to use the “lvextend”, specify the logical volume as well as the size to be taken with the “-L” option.

$ lvextend -L +1G dev/vg_1/lv_1

Expanding Existing Filesystems using LVM lvextend

As you can see, the logical volume size changed as well as the number of physical extents dedicated to your logical volume.

Increasing your logical volume does not mean that your filesystem will automatically increase to match the size of your logical volume.

To increase the size of your filesystem, you have to use the “resize2fs” command and specify the logical volume to be expanded (in this case “/dev/vg_1/lv_1”)

$ resize2fs /dev/vg_1/lv_1

You can now inspect the size of your filesystem : it has been expanded to match the size of your logical volume, congratulations!

$ df -h

Expanding Existing Filesystems using LVM df-h-1

As you probably noticed, you increased the size of your filesystem by adding another disk, yet you did not have to restart your system or to unmount any filesystems in the process.

Shrinking Existing Filesystems using LVM

Now that you have seen how you can easily expand existing filesystems, let’s see how you can shrink them in order to reduce their space.

Before shrinking any logical volume, make sure that you see have some space available on the logical volume with the “df” command.

$ df -h

Using the logical volume from the previous section, we still have nearly 2 GiB available.

As a consequence, we can remove 1GiB from the logical volume.

To reduce the size of a logical volume, you have to execute the “lvreduce” command, specify the size with the “-L” option as well as the logical volume name.

$ lvreduce -L <size> <logical_volume>

In our case, this would lead to the following command (to remove 1GiB of space available)

$ lvreduce -L 1G /dev/vg_1/lv_1

Shrinking Existing Filesystems using LVM lvreduce

Note : note that this operation is not without any risks, you might delete some of your existing data if you choose to reduce your logical volume.

Consequently, the space was allocated back to the volume group and it is now ready to be used by another logical volume on the system.

$ vgs

Shrinking Existing Filesystems using LVM vgs3

Conclusion

In this tutorial, you learnt about LVM, short for Logical Volume Management, and how it is used in order to easily configure adaptable space on your host.

You learnt what physical volumesvolume groups and logical volumes are and how they can be used together in order to easily grow or shrink filesystems.

If you are interested in Linux System administration, we have a complete section dedicated to it on the website, so make sure to check it out!

How To Setup OpenLDAP Server on Debian 10

As a system administrator, you are probably already familiar with the LDAP protocol.

If you are working in a medium to large company, you can be sure that your company already owns a LDAP server, whether it is on Linux or Windows.

Invented in the early 80s, the LDAP protocol (for Lightweight Directory Access Protocol) was created in order to store data that should be accessed over a network.

The LDAP protocol was defined as part of the RFC 4511 specification and it was implemented by many different vendors.

In this tutorial, we are taking a look at one of the implementations of the LDAP protocol : OpenLDAP.

OpenLDAP is a free and open-source implementation of LDAP that provides a server (called slapd) as well as utilities and libraries for developers.

Using this tutorial, you will be able to setup a complete OpenLDAP server and configure it in order to use it for central authentication.

What You Will Learn

If you follow this tutorial until the end, you will be able to learn about the following topics :

  • How to install an OpenLDAP server on Debian 10;
  • How to configure OpenLDAP and what the configuration actually means;
  • How to use LDIF and LDAP utilities to modify your LDAP database;
  • How to add users in your OpenLDAP server for central authentication;
  • How to setup clients and how central authentication works on Linux;

That’s quite a long article so without further ado, let’s start by install a simple OpenLDAP server on Debian 10.

Install OpenLDAP server on Debian 10

Before starting, you should make sure that you have administrator rights on your system : you will need them to install new packages.

To check if you have sudo rights, execute the “sudo” command with the “-v” option.

$ sudo -v

If you are not sure on how to provide sudo rights for users on Debian 10 or CentOS 8, make sure to read our dedicated guides about it.

Also, make sure that your packages are correctly updated in order to get the latest package version from the repositories.

$ sudo apt-get update

On Linux, the OpenLDAP server is called “slapd“.

It is a simple and configurable stand-alone server that is used in order to read, modify and delete from a LDAP directory.

The slapd daemon also comes with many different utilities that can be used in order to create new entries easily, or to modify entries easily : slapadd or slappasswd just to name a few.

$ sudo apt-get install slapd

When installing this new package, you will be ask to configure the slapd daemon at the end of the installation.

Configuring slapd on Debian 10

The slapd configuration comes as text-based interfaces that you need to fill in order to setup the server properly.

First, you are asked to provide an administrator password for the LDAP server.

Configuring slapd on Debian 10 pass

Choose a secured password because the administrator entry in the LDAP directory has all the rights on the entire tree : add, delete and modify all the entries as well as reading all the LDAP attributes.

On the next screen, you are asked to confirm the password : simply type what you typed in the previous screen.

Configuring slapd on Debian 10 pass123-2

From there, your LDAP server should be initialized.

When installing the slapd server, the installation also :

  • Created a user named “openldap” on your server;
  • Created an initial configuration that is available at /etc/ldap
  • Created an initial and empty database that is ready to accept new entries.

Configuring slapd on Debian 10 configuration

By default, the OpenLDAP server will create a first database entry that reflects your current domain name.

However, if you did not configure your domain name properly (during the installation for example), there is a chance that your OpenLDAP server is badly configured.

To take a first look at the initial configuration of your OpenLDAP server, use the “slapcat” command and watch for the distinguished names created by slapd.

$ sudo slapcat

$ sudo slapcat | grep dn

slapcat

Usually, your OpenLDAP top DNs should match the DNS names of your domain.

It means that if you are currently working in the “devconnected.com” domain, your OpenLDAP server should have the “dc=devconnected,dc=com” top distinguished names.

As you can see, this is not the case for now but luckily for us there is a way to reconfigure the slapd daemon.

Reconfiguring slapd using dpkg-reconfigure

In order to reconfigure the slapd daemon, execute the “dpkg-reconfigure” command on the “slapd” daemon. Again, you need sudo privileges to reconfigure slapd.

$ sudo dpkg-reconfigure slapd

Reconfiguring slapd using dpkg-reconfigure slapd-1

First, you are asked if you want to omit the OpenLDAP server configuration.

We obviously want to press “No” on this option because we want the initial configuration of the database to be created for us.

On the next step, you are asked to provide the base distinguished name of your LDAP server.

Reconfiguring slapd using dpkg-reconfigure slap-dns

As you can see, the slapd daemon describes that the DNS domain name is used to build the base DN of your OpenLDAP directory.

In this case, we are choosing to have “dc=devconnected,dc=com” : note that you have to modify this entry to match your current DNS settings.

If you are not sure about the domain that you belong to, simply use the “domainname” command in your terminal.

$ domainname
devconnected.com

Next, you are asked to provide the name of your organization. This is exactly the same step as the one done before, simply type your organization name and hit “Ok”.

Reconfiguring slapd using dpkg-reconfigure slapd-3

Finally, similarly to the first slapd configuration, you are asked to provide admin credentials for your LDAP server.

Again, choose a strong password as it can be used in order to read and modify every single entry in the LDAP directory.

Reconfiguring slapd using dpkg-reconfigure pass-1

On the next screen, you are asked to provide the back-end to be used by LDAP.

For this step, you want to keep the default values (meaning a MDB for MariaDB back-end) unless you have a reason to choose another storage backend.
Reconfiguring slapd using dpkg-reconfigure mariadb

Next, you are asked if you want the database to be removed when slapd is purged.

In this case, we will choose “No” : there are many situations where you simply want to update your slapd package or switch to a different LDAP server.

If you choose yes, your database will be removed which can be a real problem if you don’t have any backups of your LDAP directory.

purge

Finally, you are prompted with a warning : there are already some files sitting in the “/var/lib” directory of your server.

In this directory, you currently have your old database stored. As you are trying to reconfigure your OpenLDAP server, you will overwrite the content of this folder.

By choosing “Yes”, the slapd utility will backup the content of your existing database to the “/var/backups” folder.

moveold

Done!

Your slapd server is now configured properly to match your current DNS settings.

To have a first look at the content of your LDAP database, simply execute the “slapcat” (with sudo privileges if you are not currently logged as root)

$ sudo slapcat

slapcat-2

With this initial setup :

  • Your configuration files are stored in “/etc/ldap” : they are storing the ldap configuration file, the schemas that you can add to slapd, as well as the slapd.d directory used for server customization;
  • Your database is stored at “/var/lib/ldap” under the “data.mdb” database : you should probably setup backups of this file in order to make sure that you won’t lose everything.

Configuring firewall rules for LDAP

If you are using a firewall, it is very likely that you will need to accept inbound requests to your LDAP server.

As a quick reminder, OpenLDAP runs on port 389.

To make sure that it is running correctly, run the “systemctl status” command on the “slapd” server.

$ sudo systemctl status slapd

slapd-service

If you are using recent distributions of Debian, you are probably using UFW as the default firewall.

To enable OpenLDAP on UFW, execute the “ufw allow” command on the port 389 of your server. You can accept TCP and UDP connections all together.

$ sudo ufw allow 389

Rule added
Rule added (v6)

You can then verify that the rule was correctly created using the status command.

firewall-status

In the next section, we are going to see how you can easily add new entries to your LDAP server using LDIF files.

Add OpenLDAP entries using LDIF files

When adding new entries to your OpenLDAP server, you could use the “slapadd” utility in order to add a new LDIF file.

However, this is not the utility that we are going to use, instead we are going to use “ldapadd”.

Difference between slapadd and ldapadd

Before adding new entries, it is important for you to know the difference between slap utilities and ldap utilities.

Both utilities take LDIF formatted files as an argument and they had the content to the database.

However, when using slapadd, you will have to restart your LDAP server for the changes to be applied.

This is not the case when using ldap utilities such as “ldapadd” : modifications are directly performed on the directory tree.

In order to be able to use “ldapadd”, “ldapsearch” and other LDAP utilities, you need to install the “ldap-utils” package on your system.

$ sudo apt-get install ldap-utils

Creating your first LDIF file

As explained earlier, if you are using the console line, you will need to create LDIF files and add them to your current LDAP configuration or database.

The LDIF format is a format used in order to add or modify existing entries in a LDAP directory.

Using LDIF, you specify the distinguished name of the node that you want to modify and you describe the modifications to be performed.

As an example, let’s say that you want to create a new node in your LDAP directory named “users”.

Adding a users group

To achieve that, create a new LDIF file named “users.ldif” and add the following content in it.

$ sudo touch /etc/ldap/users.ldif

# Content of the users file

dn: ou=People,dc=devconnected,dc=com
objectClass: organizationalUnit
ou: People

As you can see, we are provided the complete DN of the node to be added, we specify the object class and the name of the node to be created.

In order to add this entry to your LDAP directory, you have to use the “ldapadd” command and specify the LDIF file to be used.

$ sudo ldapadd -D "cn=admin,dc=devconnected,dc=com" -W -H ldapi:/// -f users.ldif

Enter LDAP Password:
added new entry "ou=People,dc=devconnected,dc=com"

If you are not familiar with ldap utility options, here is a description of the options provided :

  • -D : used to specify a node to bind to. When adding new entries to a LDAP server, you can choose your authentication mechanism but you usually want to bind to the admin node in order to gain all privileges on the tree;
  • -W : used in order to specify that we want the password to be prompted when connecting;
  • -H : used in order to specify the LDAP server to connect to. In this case, we are connecting to a LDAP server available at localhost;
  • -f : to specify the LDIF file to be added to the LDAP server.

Note that you can not use an external authentication in order to add new entries to LDAP by default : ACL are not configured to do that.

Now that your node is added to your tree, you can try to find it using the “ldapsearch” command.

$ sudo ldapsearch -x -b "dc=devconnected,dc=com" ou

ldapsearch

Great!

Now that the “People” organizational unit was added, let’s add some users to your LDAP tree.

Adding new users to LDAP

In order to add new users, we are going to follow the same logic : creating a LDIF file containing individual entries for users.

As described before, OpenLDAP uses schemas in order to define “objects” that can be added to the directory.

In this case, we are going to use the “posixAccount” schema which is already added to your database configuration by default.

The “posixAccount” object has several fields that can be used to describe a Linux user account such as the username, the surname but most importantly the user password.

Create a new LDIF file and add the following content in it :

$ sudo touch /etc/ldap/new_users.ldif

# Content of new_users LDIF file

dn: cn=john,ou=People,dc=devconnected,dc=com
objectClass: top
objectClass: account
objectClass: posixAccount
objectClass: shadowAccount
cn: john
uid: john
uidNumber: 10001
gidNumber: 10001
homeDirectory: /home/john
userPassword: <password>
loginShell: /bin/bash

When you are done, save your file and use the ldapadd command in order to add your entry to the LDAP directory tree.

$ sudo ldapadd -D "cn=admin,dc=devconnected,dc=com" -W -H ldapi:/// -f new_users.ldif

Enter LDAP Password:
added new entry "cn=john,ou=People,dc=devconnected,dc=com"

Congratulations, you now have your first user stored in OpenLDAP.

You can read the user information by issuing a LDAP search command. Note that you won’t be able to read the user password as you are restricted by ACLs.

$ sudo ldapsearch -x -b "ou=People,dc=devconnected,dc=com"

new-users

Awesome, now that your LDAP server is configured, let’s configure a client in order to configure central authentication.

Configuring LDAP clients for centralized authentication

In the last section of this OpenLDAP server setup, we are going to see how you can configure LDAP clients (i.e your host machines) in order for them to connect using LDAP information.

How LDAP client authentication works

Before issuing any commands, it is important for you to have a global understanding of what we are actually building.

Before LDAP (and NIS), if you wanted to configure users and group permissions over multiple computers of a network, you would have to connect to them one by one and change their settings.

LDAP comes as a great solution for this : LDAP will centralize user information in one single place on your network.

central

When a client connects to any machine of your domain, the host will first contact the LDAP server and verify that the user password provided is correct.

The client library will bind (or authenticate) to the remote LDAP server using the admin account and retrieve the information associated with the user trying to connect.

Next, it will retrieve the password associated with the account and compare it with the password you typed when you logged in.

If the passwords match, you will be logged in your account, otherwise you will be denied.

hosts-openldap

Setup Client LDAP authentication on Debian

In order to setup client LDAP authentication, you will need to install the “libnss-ldap” package on your client.

$ sudo apt-get install libnss-ldap

When installing this package, you will be prompted with many different questions in order to configure client centralized authentication.

First, you are asked to provide the URL of your LDAP server : it is recommended to setup an IP address (configured as static obviously) in order to avoid problems in DNS resolutions.

On the server, identify your IP address with the ip command and fill the corresponding field on the client.

# On the server

$ ip a

client-12

Note : make sure that you are using the LDAP protocol and not the LDAPI protocol. For some reason, your server won’t be reachable if you use the LDAPI protocol.

Next, you are asked to provide the root distinguished name of your LDAP server. If you are not sure, you should run a ldapsearch command on the server to get this information.

client-2

On the next screen, you are asked the LDAP version that you want to use : choose the LDAP version 3 for now.

client-3

Next, you are asked if you want to make the local root the database admin.

You want to type “Yes” to this option as you want to change the user password directly from the host machine.

With this option, you will be able to run the “passwd” and have the password modified directly in the LDAP directory, which is pretty useful.

client-4

By default, the LDAP database does not require a login, so you can type “No” on this option.

Note : the LDAP database has no login but you have an admin account at the top of your LDAP directory. Those are two different concepts that are very different one from another.

client-5

Next, type the LDAP administrator account to be used for bindinds.

As a reminder, this is the account that will be used in order to get the user password information from the server.

client-6

Finally, type the password associated with the admin account on the LDAP server.

client-7

Done, you should now be able to query your LDAP server.

Linking client information to LDAP

In order to link your client information (such as username and password) to the LDAP directory, you need to modify the nsswitch file.

As a reminder, the nsswitch file is used in order to link some information on your system (such as users, groups or hosts) to various different sources (local, LDAP, NIS or others).

Edit the /etc/nsswitch.conf file and add a “ldap” entry to the first four sections : passwd, group, shadow, gshadow.

$ sudo nano /etc/nsswitch.conf

Linking client information to LDAP client-8

Save your file and you should now be able to list users from the LDAP server.

$ getent passwd
Note : if you are not familiar with the getent command, here are all the commands used to list users on Linux.

client-9

Awesome!

Now that your user can be retrieved via LDAP, you will be able to log to this account by using the user password you have specified in the LDAP directory.

$ su - john

<Type password specified in LDAP>

john@client:/home/john

Conclusion

In this tutorial, you learnt how you can easily setup a simple OpenLDAP server on Debian 10 using the slapd utility.

You also learnt about the LDAP utilities that you can use in order to add and search entries in your LDAP directory.

Finally, you have seen how you can configure client machines in order to use LDAP authentication to connect to your machines.

This is an architecture that can be used in most company IT architecture : note that you will have to setup TLS encryption in order to passwords not to be transmitted over the network in clear text.

If you are interested in Linux System administration, we have a complete section dedicated to it on the website, so make sure to check it out!

Network Manager on Linux with Examples

If you are an experienced system administrator, and if you focus on network management, you have probably already heard about the Network Manager.

Released in 2004 and developed by Red Hat, the Network Manager is a set of different tools, mostly interfaces, designed to facilitate network management on your system.

If you want to turn on a network adapter, you will probably use the Network Manager in order to achieve that.

Similarly, if you want to edit an existing network card in order to change the IP address assigned to it, you would use the Network Manager again.

In this tutorial, we are going to describe how you can use the various tools in the Network Manager suite in order to manage your networks easily.

After listing the tools embedded in the suite (nmcli, nmtui, nm-applet), we will go through a list of practical use cases for network administrators.

Network Manager Architecture

Before diving into the capabilities of the Network Manager, let’s first describe its architecture and how it can communicate with Kernel related modules.

Network Manager API

The first concept to understand is that the Network Manager stands as an API in order to configure the network interfaces on your host.

However, the Network Manager does not work alone : it is part of a process from receiving a network message on an endpoint called a network socket.

A network socket is physically represented by an Ethernet NIC connected to an Ethernet Cable in order to start sharing data over a network.

When an Ethernet cable is plugged, it is first recognized by the udev module which will send a signal to the Network Manager in order to notify that a new cable has been plugged in.

This way, the Network Manager is able to maintain connections but it is also able to expose network availability to other applications.

If you are using Firefox, and if Firefox needs to know the status of a network connection, it can query the Network Manager through DBus in order to get this information.

Network Manager is really a network API that will offer details about network cards, wired or wireless networks available.

It will also provide an easy way to configure your network cards and interfaces with dedicated configuration files.

Network Manager vs ifupdown

Historically, Linux operating systems use to manage network interfaces in a different way, mainly using configuration files located at /etc/network.

In this directory, a file can be used in order to configure network interfaces : the interfaces file.

Network Manager vs ifupdown interfaces

However, on recent distributions, the “interfaces” file used by ifup and ifdown utilities is not used.

By default, Network Manager is the one managing your network interfaces but the way network is managed can be changed in the Network Manager configuration file.

Precisely, the “managed” parameter in the “ifupdown” section of the NetworkManager.conf file describes if Network Manager is used on your system or not.
Network Manager vs ifupdown config

Note : “false” means that Network Manager manages your connections and devices, “true” means that you prefer to do it the old way using ifup and ifdown.

About systemd-networkd

On newer systems, systemd is set to handle pretty much everything and network is no exception to the rule.

In some cases, your system may rely on the systemd-network daemon in order to manage interfaces.

Note that, in order to avoid configuration conflicts related to networks, only one networking service should be enabled at one time : whether it is ifupdown, systemd-networkd or Network Manager.

If you are used to manage your networks using the “interfaces” file, you might want to keep doing that, otherwise it is recommended to switch to the Network Manager.

Network Manager Tools

Now that you have a greater understanding of the Network Manager, let’s start enumerating the tools that are provided in this suite.

The Network Manager provides the following tools :

  • nmcli : the dedicated command line tool used in order to configure, add, edit and remove connections using the Network Manager;
  • nmtui : a graphical user interface that provides just a subset of features compated to nmcli. Using nmtui, you can edit a connection, activate a connection or change the hostname of your computer;
  • nm-applet : available in GNOME desktop environments, this applet is used as an interface overlay which can be used in order to connect or disconnect from networks.

Network Manager Tools nmtui

Note that some distributions may have Network Manager “shortcuts” for the tools described above : nmtui-connect, nmtui-edit or nmtui-hostname.

Most of the time, those utilities are actually simple soft links to the main nmtui utility.

Network Manager Tools nmtui-2

In the following sections, we are going to see how you can use the different tools cited above in order to configure your networks properly.

Network Configuration using nmcli

As described in the previous section, nmcli is a command line utility that can be used in order to monitor your network connectivity, but also to add, edit, delete connections as well as having detailed information about devices on your system.

You can interact with nmcli using the following syntax

$ nmcli <options> <section> <action>

The nmcli has a set of eight sections :

  • help : used in order to get general help about the nmcli usage;
  • general : used in order to get the status and the global configuration of the Network Manager itself;
  • networking : exposes methods in order to shut down the Network Manager or to bring it up again;
  • radio : used in order to manage wireless transmissions protocols such as the WIFI or the WAN;
  • connection : as its name indicates, this section is used in order to bring interfaces up and down and to add and delete existing connections;
  • device : mostly used in order to modify parameters associated with a given device (the interface name for example) or to connect a device using an existing connection;
  • agent & monitor : those sections are used to respectively handle secrets and to watch network changes.

Each section described has a set of predefined actions that can be found reading the nmcli documentation (show, add, delete, modify, load and so on)

As an example, if you were to list all connections that are currently active, you would execute “nmcli” with the “connection” section and the “show” action.

$ nmcli connection show

Network Configuration using nmcli-connection-show

In this case, my host has a wired Ethernet connection on a network adapter named “eth0”.

In the following sections, we are going to see how you can interact with network cards and connections in order to properly configure your system.

Connection Management

When using Network Manager, a connection can be seen as a “network configuration“.

As a consequence, a “connection” has all the information related to the layers 2 (data-link layer) and layers 3 (likely related to IP addressing).

When a connection is used by a device, namely a network adapter on your host, it is set to be “active” or to be “up”.

On the other hand, a connection can be “idle” and now used by any network interface at all : in this case it is set to be “inactive” or “down”

The first key point here is that whenever we are configuring networking on a Linux host, we are essentially configuring connections, that will be bound to devices later on.

Listing Network Connections

In order to list network connections available on your host, you can run the “show” action of the “connection” section.

$ nmcli connection show

Listing Network Connections connection-show

Optionally, you can provide the “–active” flag in order to restrict the result to active connections (i.e used by network adapters)

nmcli connection show --active

Adding Network Connections

In some cases, it might be handy to have multiple connections configured.

Say that you are working at two different places : one that uses DHCP in order to assign your IP address (dynamic IP addressing) and one that assigns a static IP to your computer.

In order to achieve that, you can create additional network connections that can be switched on depending on your location.

To add new network connections using Network Manager, you can :

  • Add your configuration file to the system-connections directory located at /etc/NetworkManager;
  • Add the “nmcli connection” command with the “add” option;
  • Use the nm-connection-editor utility that provides a GUI in order to add, modify and delete existing connections.

Using the nmcli command line, you can create a new connection by running the following command

$ sudo nmcli connection add type ethernet ifname eth2

Adding Network Connections eth2

Using nmcli, a new UUID connection will be assigned to your newly created connection and you will be able to start using it to connect to Internet for example.

Modifying connection parameters

One great feature of the nmcli utility is to modify the parameters of your existing connections.

If you want to modify your IP address and switch from DHCP to manual IP addressing, you would also use the nmcli utility to change those parameters.

In order to modify existing connection parameters, you would use the following syntax

$ nmcli connection modify <connection_id> <parameter> <value>

As an example, let’s say that you want your IP address to static and set to the value ‘192.168.1.19’

To achieve that, you would run the following command

$ nmcli connection modify <uuid> ipv4.method manual

$ nmcli connection modify <uuid> ipv4.address 192.168.1.19/24
Note : when changing the IP address, do not forget to set the subnet mask (here /24), otherwise you might get a default mask assigned which will be wrong in most cases.

In order for your changes to be effective, you need to restart your connection by using the “up” and “down” actions of the “connection” section.

$ nmcli connection down <uuid>

$ nmcli connection up <uuid>

Now that your interfaces are restarted, your IP change should be effective.

$ hostname -I

192.168.1.19

Device Management

Device” is one of the sections of the nmcli utility and it can be used in order to manage network adapters on your host.

Listing Network Adapters

In order to have a listing of the network adapter on your host, you can run the “show” action on the “device” section.

$ nmcli device show

Device Management device-show

This command describes extensively your network adapter, it lists :

  • The device name : assigned by udev when the device was plugged to your computer (eth0 in this case);
  • Your device MAC address, referred here as the hardware address;
  • The device state : whether it is connected to the network or not;
  • The IPv4 address using a CIDR notation (192.168.1.16/24)
  • The IPv4 of your subnet gateway (192.168.1.1);
  • The IPv4 of your main DNS (192.168.1.1)
Note : here, the gateway is acting as the main DNS but you might have dedicated name servers in your company.

Those characteristics are quite useful if you want to list network cards available on your host and determine whether they are connect or not.

Changing device configuration

In some cases, it might be useful to change device configuration directly.

However, there is a crucial point that you need to remember : you can change your device live, but if you want your changes to be persisted, you need to modify your connection configuration instead.

In short, device configuration changes are temporary.

In order to change your device configuration, you need to execute the “nmcli device” command with the “modify” option and specify the parameter to be changed.

$ nmcli device modify <interface_name> <parameter> <value>

$ nmcli dev mod <interface_name> <parameter> <value>

For example, let’s say that you want to change the IP address of your “eth0” network interface. You also want IP attribution to be static instead of dynamic.

In order to achieve that, you would execute the following command

$ nmcli device modify eth0 ipv4.method manual

Connection successfully reapplied to 'eth0'

$ nmcli dev mod eth0 ipv4.address 192.168.1.19/24

Connection successfully reapplied to 'eth0'

Reapplying parameters

Just to showcase that changes are temporary, if you were to “reapply” parameters to your interface, all your changes would be lost.

Instead, parameters defined in your connection configuration file (in /etc/NetworkManager/system-connections) would be reapplied.

$ nmcli dev reapply eth0

Connection successfully reapplied to 'eth0'

Reinspecting the IP address would give you another IP address from the one you statically assigned in the previous section.

$ hostname -I

192.168.1.18/24

Network Manager Graphical Tools

In this section, we are going to take a look at graphical tools included in the Network Manager suite : nmtui and nm-applet.

Nmtui utility

The nmtui is, as its name describes, a text user interface built in order to facilitate network operations with an easy-to-use user interface.

In order to start with nmtui, simply execute “nmtui” in a terminal shell.

$ nmtui

Network Manager Graphical Tools nmtui

In this graphical menu, you have three options :

  • Edit a connection : where you are able to select network interfaces and modify parameters assigned to them (such as the DNS, the IP address or the gateway address);
  • Activate a connection : but also desactivate existing connections. As a reminder, connections are only active or enabled whenever they are assigned to a specific device;
  • Set system hostname : like the “hostnamectl” or the “hostname”, you can set the PC name over a network.

Navigating in the nmtui tool is pretty straightforward : you can use keyboard keys to navigate, the ‘Enter’ key in order to confirm your selection and the ‘Escape’ key in order to cancel and go back to the previous screen.

Nm-applet on GNOME

The last application related to the Network Manager is nm-applet : a GUI applet available for GNOME user-interfaces.

The nm-applet tool is an overlay user interface that is available in the top-right corner of your desktop menu.

Nm-applet on GNOME nm-applet

Using the nm-applet, you can : see existing connections, add, edit and remove them at will.

You can see detailed information about the settings of your wired connections and edit them in order tochange your IP address or change the IP attribution method (from DHCP to manual for example)

Nm-applet on GNOME nm-applet-2

Conclusion

In this tutorial, you learnt about the Network Manager : a tool on modern distributions that is used in order to create, modify and manage network connections.

You have discovered the tools associated with the Network Manager (namely nmcli, nmtui and nm-applet) and you have learnt how you can use those tools in order to modify your existing connections.

If you are interested in networking or in Linux System Administration, we have a complete section dedicated to it on the website, so make sure to check it out!

How To Run a Bash Script

As a system administrator, it is quite likely that you have written some Bash scripts in order to automate your work.

For example, you may want to run Bash scripts in order to backup your work or to log some events happening on your server.

Bash scripts, like scripts written in other programming languages, can be run in a wide variety of ways.

In this tutorial, we are going to focus on all the ways to run a Bash script on Linux.

Prerequisites

Before being able to run your script, you need your script to be executable.

In order to make a script executable on Linux, use the “chmod” command and assign “execute” permissions to the file.

You can either use the binary or the symbolic notation in order to make it executable.

$ chmod u+x script

$ chmod 744 script

If you don’t own the file, you will have to make sure that you belong to the correct group or that permissions are given to the “other” group on your system.

Some distributions will highlight your file in a different color when your file is executable.

Prerequisites script

Now that your file is executable, let’s see how you can run your Bash script easily.

Run Bash Script from script path

In order to run a Bash script on Linux, simply specify the full path to the script and provide arguments that may needed in order to run your Bash script.

$ /path/to/script <arg1> <arg2> ... <argn>

As an example, let’s say that you have a Bash script located in your home directory.

In order to execute this script, you can specify the full path to the script that you want to run.

# Absolute path

$ /home/user/script 

# Absolute path with arguments

$ /home/user/script "john" "jack" "jim"

Alternatively, you can specify the relative path to the Bash script that you want to run.

# Relative path

$ ./script

# Relative path with arguments

$ ./script "john" "jack" "jim"

Awesome, you learnt how you can easily run a Bash script on your system.

Run Bash Script using bash

In order to run a Bash script on your system, you have to use the “bash” command and specify the script name that you want to execute, with optional arguments.

$ bash <script>

Alternatively, you can use “sh” if your distribution has the sh utility installed.

As an example, let’s say that you want to run a Bash script named “script”.

In order to execute it using the “bash” utility, you would run the following command

$ bash script

This is the output from your script!

Execute Bash script using sh, zsh, dash

Depending on your distribution, you may have other shell utilities installed on your system.

“Bash” is the shell interpreter installed by default, but you may want to execute your script using other interpreters.

In order to verify if a shell interpreter is installed on your system, use the “which” command and specify the interpreter you are looking for.

$ which sh

/usr/bin/sh

$ which dash

/usr/bin/dash

Whenever you have identified the shell interpreter that you want to use, simply call it in order to run your script easily.

Run Bash script from anywhere

In some cases, you may want to run Bash scripts wherever you are on your system.

In order to run a Bash script from anywhere on your system, you need to add your script to your PATH environment variable.

$ export PATH="<path_to_script>:$PATH"

Now that the path to the script is added to PATH, you can call it from where you want on your system.

$ script

This is the output from script!

Alternatively, you can modify the PATH environment variable in your .bashrc file and use the “source” command in order to refresh your current Bash environment.

$ sudo nano ~/.bashrc

export PATH="<path_to_script>:$PATH"

Exit the file and source your bashrc file for the changes to be applied.

$ source ~/.bashrc

$ echo $PATH

/home/user/bin:/usr/local/sbin:/usr/local/bin:/usr/sbin:/usr/bin:/sbin:/bin:/usr/games

Great! Now your script can be executed from where you want on your system.

Run Bash Scripts from the graphical interface

The last way to execute Bash scripts is to use the graphical interface, in this case the GNOME interface.

In order to run your scripts using GNOME, you have to set the behaviour of the File Explorer to “Ask what to do” for executable files.

To achieve that, in “Files“, click on the top right line icon and select “Preferences“.

Run Bash Scripts from the graphical interface preferences

In the menu, click on “Behavior” and select “Ask what to do” under the “Executable Files” section.

Run Bash Scripts from the graphical interface ask-what-to-do

Close this window and double-click on the script file that you want to execute.

When double-clicking, you are prompted with various options : you can either choose to run your script (in a terminal or not) or to simply display the content of the file.

In this case, we are interested in running this script in the terminal, so click on this option.

Run Bash Scripts from the graphical interface run-script

Success! Your script has been successfully executed within a new shell instance.

Conclusion

In this tutorial, you learnt how you can easily run Bash scripts on your system, either by specifying the path to the script or the interpreters available on your host.

You learnt that you can make it even easier by adding your script path to your PATH environment variable or using existing features in the GNOME user interface.

If you are interested in Bash or Linux system administration, we have a complete section dedicated to it on the website, so make sure to check it out!

Single User Mode Secure Boot on Ubuntu & Debian

On Ubuntu and Debian hosts, the single user mode, also referred as the rescue mode, is used to perform critical operations.

The single-user mode can be used to reset the root password or to perform file systems checks and repairs if your system is unable to mount them.

In this tutorial, we are going to see how you can boot on single user mode on Debian and Ubuntu hosts and how to reset the root password.

We are also configure our target units (rescue and emergency) to prompt for a password on single-user mode boot.

Note: in order to boot into rescue or emergency targets, you are need physical access to the machine to interrupt the default GRUB boot process.

Rescue & Emergency Targets on Debian

On recent Debian distributions, systemd is responsible for booting your Linux host using a default target.

If you want to check the default target run by systemd, you can run the following command

$ systemctl get-default

Rescue & Emergency Targets on Debian get-default

As you can see, my system is set to boot on graphical target by default.

As I don’t own any desktop environment like GNOME or KDE, it is going to boot in a simple shell.

However, the graphical target is not the only target available on Linux, you can boot in the following modes:

  • poweroff : used to shutdown your host and power off the system;
  • rescue : a mode used to boot your system with a rescue shell;
  • emergency : similar to the rescue mode except that no services are launched and no filesystems are mounted;
  • multi-user : the default mode on Linux systemd systems, used to boot your host in a non-graphical system (without a desktop environment);
  • graphical : includes the multi-user target and a graphical environment such a KDE or GNOME for example;
  • reboot : shutdowns the system and reboot it immediately

As their names reflect it, those modes are used in order to perform maintenance operations on a Linux system, but they need to be done securely to avoid any security leaks.

In this article, we are going to focus on the rescue and emergency modes and see how we can securely on them.

We are also going to see how booting in single user mode can be used to change the root password or to perform simple filesystems checks.

Configuring the Root Account on Debian

By default, when entering single user mode, you are going to be given a root prompt with complete privileges.

As a consequence, in order to boot in single-user mode (or rescue mode), your root account needs to be unlocked and it needs to have a password.

Checking Root Account Lock Status

On Ubuntu, root accounts are disabled by default as a security measure, and you can choose to have it disabled on Debian 10 also (if you don’t specify a root password when installing Debian)

In order to check if your root account is locked, run the following command

$ sudo -s
$ cat /etc/shadow | grep root

Checking Root Account Lock Status locked-account

As you can see, there is an exclamation mark on the space reserved for the password : it means that the root is locked.

Setting a Root Account Password

In order to set a password for the root account, run the following command

$ sudo passwd

Setting a Root Account Password passwd-root

If you go back to check the content of your shadow file, you should now see that the content has been modified and that no exclamation mark are presented.

Awesome, now we can start booting into single user mode from the GRUB bootloader screen.

Booting in Rescue Mode from GRUB

In order to boot into single user mode, or rescue mode, you are going to interrupt the default boot process when starting your machine.

Reset your machine and interrupt the boot process by pressing a key arrow in the GNU GRUB menu.

If you are running a Debian based distribution, this is what you should see on your screen

Booting in Rescue Mode from GRUB-menu

As described in the bottom description panel, press ‘e’ in order to edit the boot commands

You should now see the following window on your screen

Booting in Rescue Mode from GRUB-2

Using the directional arrows, navigate to the Linux kernel booting line and put the following string at the end of the line.

systemd.unit=rescue.target

You can also simply type “1”, it is equivalent to booting in single user mode on Debian.

Booting in Rescue Mode from GRUB boot-rescue

As described below the boot script, press F10 to boot into rescue target.

Your Linux Kernel will be loaded and your initial virtual filesystem will be loaded.

Before having the access, you will be prompt with the root password that you just changed before.

Booting in Rescue Mode from GRUB rescue-mode

Type the password you defined before, and you should now have a root shell directly into your host.

root-rescue

Awesome! Now that you have a root shell into the host, you can start by changing the root password or by checking your filesystems.

Security Recommendations for Single User Mode

When it comes to the single user mode, or the rescue target, it is important that this mode is password-protected on your system.

As you can see, it is the case by default on Debian 10, but you have to make sure on other distributions that it is the case.

If any intruder has physical access to your machine, in a data-center for example, it could be as easy as rebooting the machine, interrupting the boot process and launching a non-protected single user mode.

From there, every file can be deleted, copied or transferred to a non secure server.

Malicious programs can also be installed to track the host activity and to steal personal information.

Sulogin login shell

Luckily for you, standard Debian distributions are configured to ask for the root password when booting in single user mode.

It can be seen by inspecting the rescue and emergency services on your host (located at /usr/lib/systemd/system)

$ cat /usr/lib/systemd/system/rescue.service

Sulogin login shell rescue-service

By default, when starting, your system is going to launch the systemd-sulogin-shell in rescue mode, which is safe from unauthorized access.

However, you have to make sure that this file was not altered and that the system is not instructed to launch a simple shell (like /bin/sh for example).

This would result in having an unsafe single user mode, essentially having a major security breach if anyone has physical access to the machine.

Conclusion

In this tutorial, you learnt about the single user mode on Debian-based distributions and how it is related to the rescue and emergency targets on Linux.

You learnt that this mode needs to be password protected as it offers a root shell for users who were to log into it.

You also had a look at how you can instruct the GRUB to boot into this mode, and how it can be used to perform maintenance operations on your system.

If you are curious about Linux system administration, we have a complete section dedicated to it on the website.

Network File System (NFS) Administration on Linux

Network File Systems, also shortened NFS, are file systems that can be accessed over the network.

Compared to filesystems that may be local to your machine, network file systems are stored on distant machines that are accessed via a specific network protocol : the NFS protocol.

NFS belongs to the large family of file sharing protocols, among with SMB, FTP, HTTP and many other file sharing protocols.

NFS has its own way of accessing and securing distant filesystems, as well as different ways of securing access to remote filesystems.

In this tutorial, we are going to setup a NFS server on a remote machine and install a NFS client in order to access it.

We are going to configure the NFS server depending on the resource that we want to share, and we are going to see the little gotchas that there is to know about NFS.

What You Will Learn

If you follow this tutorial until the end, you are going to learn about the following concepts :

  • How you can setup a NFSv4 server, create a shared folder and export it to remote clients;
  • How to install a NFS client and how to bind it to your NFS server;
  • How user authentication works on NFS and why NFS authentications is considered weak;
  • What is squashing and why you should always enable root_squashing;
  • How NFS handles concurrent editing compared to other file sharing protocols.

That’s quite a long program, so without further ado, let’s start by seeing on you can setup your own NFSv4 server.

Setting up a NFSv4 Server

For this tutorial, we are going to use a standard Kubuntu distribution, but the rest of this tutorial should work the same if you are using another distribution.

$ uname -a

Linux kubuntu 5.3.0-18-generic #19-Ubuntu GNU/Linux

Before installing any packages, make sure that your system is properly configured with the apt command.

sudo apt-get update

Now that your system is updated, you will have to install several packages for your NFS server.

Installing NFSv4 Server

In order to install a NFS server on Linux, you have to install the “nfs-kernel-server” with apt.

$ sudo apt-get install nfs-kernel-server

Installing NFSv4 Server nfs-server

As you can see from the screenshot above, the nfs-kernel-server comes with some configuration files that you will need to tweak :

  • exports : used as a configuration file to set the directories to be exported through NFS;
  • nfs-kernel-server : that can be used if you want to setup authentication or modify RPC-related parameters of your NFS server.

For this tutorial, we are only configure to modify the exports file in order to export our directories.

Exporting directories with exports

As stated above, we are going to modify the exports file located in the etc directory in order to share directories.

Exporting directories with exports

The syntax for the exports file is pretty straightforward.

The exports file is a column-separated file made of the following fields :

  • Local directory : the directory to be exported on the local filesystem;
  • IP or hostname of the machine that you want to grant access to;
  • NFS options such as rw (for read-write), sync (meaning that changes done are directly flushed to disk)

First, you need to create a directory that will be exported on your system. You obviously don’t have to create it if the directory already exists on your machine.

$ sudo mkdir -p /var/share

For now, you can let root as the owner and as the group owning the file, but we will modify it later on depending on the permissions we want for this shared folder.

Exporting directories with exports share-folder

Now that your shared folder is created, you will need to add it to the exports file in order to be exported.

Head back to your /etc/exports file and add the information we specified in the bullet-list above.

Exporting directories with exports exporting

In the first column, you need to specify the folder to be exported which is the share folder we just created.

Next, you have to specify the IP or hostnames that can mount this directory locally.

In this case, we chose to have a network IP set in the exports file, but it might be different for you.

In order to export all directories specified in the “exports” file, you need to use the “exportfs” command with the “-a” option for “all”.

$ sudo exportfs -a

Next, you can verify that your folders were correctly exported by running the “exportfs” command with the “-v” option for “verbose”.

$ sudo exportfs -v

Exporting directories with exports exported

As you probably noticed, some options that were not specified in the exports file were set by the NFS server by default :

  • rw : read and write operations are authorized on the volume (this option was originally specified in the file);
  • wdelay : the NFS server will induce a small write delay if it suspects that multiple write operations are currently performed at the same time;
  • root_squash : the “root” account will be “squashed” to the anonymous user by default. If you don’t what squashing is, you can read about it in the next sections;
  • no_subtree_check : by default, the NFS server will check that the operation requested is part of the filesystem exported on the server;
  • sec=sys : by default, NFS will use the credentials set on the server. If your system uses local authentication, those credentials will be used, but if NIS is used, it will be used as the authentication system;
  • secure : this option verifies that requests originate from a port lower than 1024 (as a reminder, NFS client requests originate from port 111);
  • no_all_squash : except for the “root” account, other users are not squashed when interacting with the NFS server.

Customize Firewall Rules for NFS

In order for our clients to connect to our NFS server, you will need to make sure that the firewall is configured to accept NFS connections.

As a quick reminder, NFS runs on port 2049 on the server.

For Debian and Ubuntu, you are probably running an UFW firewall (you can verify it with the “ufw status” command)

To allow NFS connections to your server, run the”ufw” command as root and allow connections on port 2049.

$ sudo ufw allow 2049

Customize Firewall Rules for NFS ufw-status

On the other hand, if you are running a Red Hat or a CentOS distribution, you will have to tweak the “firewalld” built-in firewall.

$ sudo firewall-cmd --add-port=2049/tcp

Customize Firewall Rules for NFS firewalld

Finally, make sure that your network adapter is correctly exposing the 2049 port to the outside world with the “netstat” command.

$ netstat -tulpn | grep 2049

Customize Firewall Rules for NFS netstat

Okay, now that you have made sure that your NFS server is correctly up and running and that your shares are exported, let’s see how you can configure your NFS clients.

Configuring NFSv4 Clients

Configuration on the client is pretty straight-forward, but you are going to need specific packages to mount NFS partitions.

Mounting NFS partitions on clients

First, you need to install the “nfs-utils” package in order to be able to mount NFS packages.

You obviously need to have sudo privileges in order to install new packages. Here are some tutorials for Debian/Ubuntu and CentOS/RHEL.

$ sudo apt-get install nfs-utils

$ sudo yum install nfs-utils

Now that the package is installed, you can simply mount the partition using the following syntax

$ mount -t nfs <dest_ip_or_hostname>:<remote_path> <mount_point>

For example, let’s say that your NFS server is located on the 192.168.178.31/24 IP address and that you want to share the /var/share folder on the server.

To export this folder, you would write the following command

$ sudo mount -t nfs 192.168.178.31:/var/share /var/share

The NFS client troubleshooting is not very practical, however it your terminal hands, it probably means that you cannot reach the destination host.

If the command executes successfully, you should be able to list your new mount point using the df command.

$ df -H

Mounting NFS partitions on clients df

Creating new files on the NFS volume

As you probably remember from the last section, we have seen that our NFS volume is configured to squash the root account by default but no other users.

Furthermore, the shared folder is owned by root and by the root group.

Creating new files on the NFS volume owning

If you try to create new files on this volume, you will get a permission denied error, even when trying to create them with sudo.

Creating new files on the NFS volume permission-denied

Why?

The client account does not belong to the “root” group on the server, and if you try to create a file as root on the client, you will be squashed to the anonymous account.

A Word on NFS User Management

Before configuring our server and client in order to share folders properly, let’s have a quick review on how user management works on NFS volumes.

As you probably learnt in our previous tutorials, a user is identified by a user ID (also called UID) and this UID is unique on a machine but it won’t be unique on multiple machines of a same site.

A Word on NFS User Management user-management

However, if your system is not configured to work with a central user management system (such as NIS, OpenLDAP, or Samba), your user IDs might conflict on the systems that you are operating on.

In this case, if we consider that you are not having a central management system, we will simply state that you are keeping consistent user list among systems.

A Word on NFS User Management user-management-2

Now that user and groups are made consistent among hosts, let’s create a group that will be able to add and delete files to the folder.

Creating a group for NFS sharing

In this tutorial, we are going to assume that “administrators” are able to add and delete files on this folder.

First, on the server, use the “groupadd” command in order to create this new group

$ sudo groupadd administrators

You can then change the group owning your NFS share to be “administrators

$ sudo chown :administrators /var/share

On the server, add the permitted users to the group you just created.

$ sudo usermod -aG administrators <user>

You don’t have to re-export your shared drives, you can simply start creating files now that permissions are properly configured.

On the client, let’s create a new file in the shared drive using the touch command.

$ cd /var/share && touch file-example

On the server, you will be able to see that your file was correctly created.

Creating a group for NFS sharing file-success

Awesome!

You successfully created a NFS volume and you shared it with client machines.

Persistent NFS mounts with fstab

As you already know from previous tutorials, mounting a drive on Linux using the mount command does not make it persistent over reboots.

In order to make your mounts persistent, you need to add them to the fstab file.

As a privileged user, edit the fstab file and add a line for your NFS drive

#
# /etc/fstab
# Accessible filesystems, by reference, are maintained under '/dev/disk'.

<ip_address>:<remote_path>   <mountpoint>  nfs  <options>  0   0

For example, given the NFS volume created before on “192.168.178.31” on the “/var/share” path, this would give

#
# /etc/fstab
# Accessible filesystems, by reference, are maintained under '/dev/disk'.

192.168.178.31:/var/share  /var/share  nfs  defaults  0   0

If you are using a systemd based system, you can reload dependent daemons by running the daemon-reload command

$ systemctl daemon-reload

Awesome!

You can now reboot your client machine and verify that your drive was correctly mounted at boot.

Persistent NFS mounts with fstab df-h

Going Further with NFS

In this section, we are going to discuss advanced topics about NFS, specifically how concurrent editing is handled and how you can tweak your NFS configurations to specific client hosts.

Concurrent Editing

When using NFS, you will probably end up editing some files along with multiple other users.

Natively, the NFS server won’t prevent you from editing the same file.

If you are using vi as a text editor, you will be notified that some modifications are already performed by another user (via a swp file).

Concurrent Editing being-edited

However, NFS file swaps won’t prevent you from editing the file : it will just display a warning message on the files currently being edited.

Moreover, if you are using other text editors, no “swp” files will be created and the file will have the content of the last modification performed.

Note that there is a way to lock files locally using the local_lock” parameter on the client-side, you can check the Linux documentation if you are interested in this option.

Concurrent Editing local-lock

Exporting folders to specific client IP addresses

In some cases, you may need to export a folder to specific clients on your subnet.

In order to determine the IP address of your client, head over to the client machine and use the “ip” command with the “a” option for address.

$ ip a

As you can see, my client host has two interfaces : the loopback interface (or localhost) and one network adapter named “enp0s3”.

The latter has an IP address already assigned to the interface which can be seen on the “inet” line : 192.168.178.27/24.

If you want to export your folders to an entire subnet, you can specific the subnet IP : as a consequence, every IP on the subnet will be able to export your folder.

Exporting folders to specific client IP addresses nfs-arch

Similarly, it is possible to check the hostname of the client machine in order to export it later on the server.

$ hostname

Exporting folders to specific client IP addresses hostname

Back to the exports file, you can choose to have one or multiple IP addresses exported or to export a machine by its hostname.

Exporting folders to specific client IP addresses specific-ip

NFS monitoring

When installing the nfs-common package, you will also end up installing the “nfsstat” utility which is a program that exposes NFS statistics.

Using nfsstat, you will be able to see the total number of operations done on your NFS server as well as the current activity.

NFS monitoring nfsstat

Conclusion

In this tutorial, you learnt how you can setup a NFSv4 server easily using the nfs-kernel-server utility.

You also learnt how you can mount the drives on the clients and about the different options that you have to tweak your NFS mounts.

Finally, you went in-depth about NFS drives and learnt how user management is done among multiple host machines and how you should setup your own user management system.

If you are interested in Linux System administration, we have a complete section dedicated to it on the website, so make sure to check it out!

How To Configure Linux as a Static Router

As a network administrator, you probably know how costly routers can be.

If you are configuring a complex network architecture, you might need Cisco or Netgear routers, as they embed advanced features for network management.

However, if you plan on creating a small network for your company, there might be a cheapier alternative.

What if you could configure a simple Linux server to act as a static router?

Using those features, you could have a Raspberry Pi on your site, that could handle the traffic over two or three different networks.

In this tutorial, we are going to see how you can configure a Linux host to act as a simple static router.

We are also going to review the basics of subnetting in order for you to understand the rules you put in place.

Prerequisites

In order to configure a Linux server as a static router, you need to have sudo privileges on your host.

In order to verify it, you can run the “sudo” command with the “-v” option.

$ sudo -v

If you don’t have sudo rights, you can have a look at our tutorials on becoming sudo on Debian or CentOS distributions.

Now that you have sudo privileges, there are essentially three steps in order to configure your static router :

  • You need to have a global view of your network architecture : what network IP addresses are and which networks will need to communicate with each other;
  • You need to configure the static routing table on your Linux router;
  • You need to enable IP forwarding for packets to flow down your router.

That’s quite a long program, so without further ado, let’s figure out the network architecture and what our network IP addresses are.

Understanding Network Architecture

For the sake of simplicity, we are going to configure a simple static router between two networks.

In order to determine the network IP addresses, let’s pick two hosts in each network : 192.168.200.2/24 and 192.168.190.2/24.

The two hosts don’t belong to the same subnet : as a consequence, they are not able to communicate directly.

Given the netmask of the first host, we are able to determine that the first network has an IP address of 192.168.200.0/24.

Similarly, the second network has an IP address of 192.168.190.0/24.

Using this information, we will be able to configure network interfaces on our Linux router.

Configuring Router Network Interfaces

In order to be able to route packets from one network to another, you need to have two network interfaces : one in the first network and another one in the second network.

In order to keep the tutorial simple, we are going to assume that both hosts are using the router as the default gateway for their respective networks.

This means that the first host is contacting the router on the 192.168.200.1/24 IP address and that second host is contacting the router on the 192.168.190.1/24 IP address.

First of all, you have to identify the network interfaces used for routing

$ ip link show

Private and Public IP Addresses schema

On this host, we have two network interfaces named “enp0s3” and “enp0s8”.

Note : You may have to write down those names as you will have to use them in the next section.

Now that you have your network interfaces names, you will configure your router with a static IP addresses.

Configuring Static IP Address on Debian

If you are running Debian or Ubuntu, head over to the /etc/network/interfaces file and add your two network interface information in it.

$ sudo nano /etc/network/interfaces

# Defining the first interface
auto <interface_name>
iface <interface_name> inet static
address 192.168.190.1
netmask 255.255.255.0

# Defining the second interface
auto <interface_name>
iface <interface_name> inet static
address 192.168.200.1
netmask 255.255.255.0
Note : do not forget to add the “auto” directive, otherwise your interfaces won’t be raised at boot time.

Save your file and restart your networking service in order for the changes to be applied.

$ sudo systemctl restart networking.service

$ sudo systemctl status networking.service

In this case, we are not using the NetworkManager : we are managing interfaces using the ifupdown utility (pretty much like in old distributions).

By now, your interfaces should be up and running, you can check them by running the “ip” command with the “a” option.

Îf your interfaces are not running, or marked as “DOWN”, you can bring them up by running the “ifup” command.

$ ifup <interface_name>

Configuring Static IP Address on CentOS

In order to configure your CentOS host with a static IP address, head over to the “/etc/sysconfig/network-scripts” directory and create two distinct files for your network interfaces.

$ touch ifcfg-enp0s3 && touch ifcfg-enp0s8

To configure a static IP address, you can add the following information in your file.

# Content of enp0s3

BOOTPROTO="static"
IPADDR=192.168.200.1
NETMASK=255.255.255.0
NAME="enp0s3"
ONBOOT="yes"

# Content of enp0s8
BOOTPROTO="static"
IPADDR=192.168.190.1
NETMASK=255.255.255.0
NAME="enp0s8"
ONBOOT="yes"
Note : do not forget to add the “ONBOOT” directives in order for your interfaces to be raised at boot time.

Now that you have your router connected to both networks, you will need to add a static route between your two networks in order for them to communicate.

Creating Static Routes using ip

Having two network interfaces does not mean that your kernel will naturally route packets from one interface to another.

First of all, make sure to list the existing routes that may exist on your server by running the “ip route” command.

$ ip route

Creating Static Routes using ip-route

Deleting existing static routes

If static routers are already defined for your network interfaces, you will need to delete them : otherwise, you won’t be able to add new ones.

To delete a route, use the “ip route” command with the “delete” option and specify the route to be deleted.

$ ip route delete <route>

In our case, we want to delete routes that are pointing to the 192.168.190.0/24 and 192.168.200.0/24 networks.

$ ip route delete 192.168.190.0/24

$ ip route delete 192.168.200.0/24

$ ip route

Deleting existing static routes ip-route-2

Now that routes are deleted, you can add the ones you are interested in.

Creating new static routes

In order for the packets to flow from the first network to the second, your first network card need to point to the second one and vice-versa.

First, you can create a route from the first network adapter IP address to the second network IP address.

$ ip route add 192.168.200.0/24 via 192.168.190.1

Using this rule, all packets coming using the 192.168.190.1 interface as their gateway can be redirected to the 192.168.200.0 network.

Similarly, you can add another route in the opposite direction in order for your packets to be able to flow back.

$ ip route add 192.168.190.0/24 via 192.168.200.1

Now that your routes are added, you can verify that they are up and active by running the “ip route” command again.

$ ip route

Creating new static routes ip-route-3

Now that your routes are added, there is one last step that you need to configure in order for your hosts to be able to ping each other.

Enabling IP forwarding on Linux

Even if routes exist, the Kernel will not naturally forward packets to corresponding network interfaces without configuration.

In order to enable IP forwarding, head over to the /etc/sysctl.conf file and look for the “net.ipv4.ip_forward” parameter.

$ vi /etc/sysctl.conf

By default, this parameter is set to “0”, but you want to set it to “1” in order to enable IP forwarding.

Enabling IP forwarding on Linux ip-forwarding
Save your file and refresh the system configuration by running the “sysctl” command.

$ sysctl -p /etc/sysctl.conf

Enabling IP forwarding on Linux sysctl

Testing network connectivity

Now that IP forwarding is enabled, you should be able to ping from a host on the first network to a host on the second network.

In order to check it, connect to a host on the first network and run a “ping” command on a host located on the second network.

$ ping <host_second_network>

In our case, we would want to ping the “192.168.190.2/24” host from the “192.168.200.2/24” one.

Testing network connectivity ping-network

Awesome! Your first host is able to ping the second one.

As an additional check, you could make sure that your second host is able to ping the first one.

Great!

Now that your setup is ready, you should be able to add new hosts to both networks and start communicating between the two networks.

Conclusion

In this tutorial, you learnt how you can easily configure a Linux system as a static router.

This setup can be quite useful if you plan on building a small network infrastructure for your company.

Instead of buying and having to configure a Cisco router, you can simply use a Raspberry Pi as a static router.

If your company grows and you plan on having a bigger network infrastructure, then you can check managed routers as they will probably offer more flexibility to your needs.

If you are interested in Linux System Administration, we have a complete section dedicated to it on the website, so make sure to check it out!

How To Get Your IP Address on Linux

When working on Linux operating systems, knowing how to get your IP address is essential.

Getting your IP address is often the first step of most network troubleshooting processes.

If you are trying to reach a website but the website is no answering back, it might be because your network adapter is badly configured.

Similarly, you might want to reach internal addresses, but if your IP address is configured in the wrong subnet, you won’t be able to ping them.

In this tutorial, we are going to see how you can get your IP address on Linux easily.

We are also going to explain the difference between private IP addresses and public IP addresses.

Find your private IP on Linux

The easiest way to get your private IP address on Linux is to use the “ip” command with the “a” option for “address”.

$ ip a

$ ip address

When running the “ip” command, you will be presented with all the network interfaces available on your host.

In this case, the server has two network interfaces : the loopback address (or localhost) and the “enp0s3” interface.

For this network interface, you are presented with multiple information :

  • Network adapter general information : its state (up or down), its MTU as well as the qlen for the Etherner buffer queue;
  • Layer 2 information : in this case, you are running on the Ethernet protocol with a given MAC address and a broadcast address;
  • Layer 3 information : what you are probably interested in which is your IPv4 address in CIDR notation, the subnet broadcast address as well as the address lifetime (valid_lft and preferred_lft)
  • IPv6 addresses : this section might not appear in your network adapter configuration as not all interfaces are running IPv6 addresses. If this is the case, it will appear here.

Find IP Address using hostname

The “hostname” command is quite popular on Linux operating systems and it is used in order to get and set the hostname of a server.

In order to find your private IP address, use the “hostname” command with the “-I” option for IP address. Note that multiple IP addresses will be shown if you own IPv4 and IPv6 addresses on the same interface.

$ hostname -I

As you can see, in this case, my network adapter owns two different IP addresses :

  • 192.168.178.30 : which is a private IP address of the local subnet (192.168.178.0)

However, in this case, you are presented with the subnet mask which is not very handy if you are looking to allocate an IP to a new host on this subnet.

Find Subnet Mask using ifconfig

In order to use the ifconfig command, you need to have the “net-tools” package installed on your host.

In order to install the “net-tools”, simply run the “apt-get install” command with the “net-tools” package. You will need to have sudo rights to install packages on your system.

$ sudo apt-get install net-tools

In order to find the subnet mask for your host, use the “ifconfig” command with the interface name and pipe it with the “grep” command to isolate the “mask” string.

$ sudo ifconfig | grep -i mask

Find Subnet Mask using ifconfig mask

In this case, you are presented with subnet masks for every network interface (loopback interface included).

Note that you are also provided with the broadcast address if applicable.

Get your private IP address on Desktop

In some cases, you might find handy to find your private IP address by navigating the menus provided by your desktop environment.

  • To get your private IP address, open the “Settings” utility by browsing the “Activities” menu at the top left corner of your screen.

Get your private IP address on Desktop settings

  • Now that the “Settings” are open, find the “Network” section and click on the cog-wheel located at the right of your default network adapter.

Get your private IP address on Desktop network

  • In the settings of your default network adapter, you will be provided with your different IP addresses, as well as your hardware address (or MAC address) and your default DNS address.

Awesome, you have successfully found your private IP address using the desktop environment (in this case, GNOME)

Find Default Gateway IP Address

In some cases, you are not interested in your own IP address but in the IP address of the gateway.

In order to find the IP address of your default gateway, use the “ip” command with the “r” option for “route”. You can use the “grep” command in order to isolate the “default” string which is the default gateway.

$ ip r | grep default

$ ip route | grep default

Find Default Gateway IP Address ip-route

In this case, you are interested in the line with a “default” option which is the route taken for packets sent over the network by default.

Private and Public IP Addresses

In the previous sections, we have seen how you can easily have your IP address using several commands.

However, those commands were used to determine your private IP address, not your public one.

So what’s the difference between your private IP address and your public IP address?

In short, the private IP address is used on your specific private subnet, most of the time at home on a LAN network.

When you are trying to reach websites outside of your home network, you are using a public IP address that is assigned by your Internet Service Provider (or ISP).

As a consequence, you are not able to directly get your public IP address because it will be assigned to the network adapter of your default gateway (which is a router at home).

Private and Public IP Addresses schema

To get your public IP address, you will need to ask an external service unless you are able to connect to your router directly.

Find Public IP Address on Linux

The first method to find your public IP address on Linux is to use a external HTTP services.

Those HTTP services are programmed to send back the IP that made the request in the first place, which is your default public IP address.

In order to get your public IP address on Linux, use the “curl” command and add one of the following websites as a parameter :

  • ifconfig.io
  • ifconfig.co
$ curl http://ifconfig.io

222.265.124.60

Awesome, you have successfully identified your public IP address using a external third-party service.

Find Public IP Address using dig

The other way to get your public IP address on Linux is to use the “dig” utility.

The “dig” utility might not come directly with your distribution. If you do not own “dig”, you can install it by installing the “dnsutils” package on your machine.

$ sudo apt-get install dnsutils
Note : you need to have sudo privileges in order to install new packages on your machine.

Now that “dig” is correctly installed, you can perform a DNS query in order to get your public IP address.

To get your public IP address, use the “dig” command and specify specific DNS servers that are programmed in order to answer your own IP address back (in this case, Google DNS servers)

$ dig TXT +short o-o.myaddr.l.google.com @ns1.google.com

"222.265.124.60"

Great, you have successfully identified your public IP address on Linux!

Conclusion

In this article, you learnt how you can easily get your private IP address using command-line utilities already installed on your computer.

You have learnt about the difference between private IP addresses and public IP addresses and you have used external third-party utilities in order to identify your public IP address.

If you are interested in Linux System Administration, we have a complete section dedicated to this subject, so make sure to check it out!

How To Change IP Address on Linux

As a network administrator, you are probably managing various Linux machines over different subnets of your company infrastructure.

As network topology changes, you may need to change the IP address already implemented on some machines.

Also, if you switched from DHCP to static IP addressing, you will also need to change the IP address on some of your computers.

Luckily for you, Linux has multiple ways of changing your IP address, whether you want it to be dynamic or static.

You will see how it is possible to have multiple IP addresses for a single machine and how you can assign IP addresses to virtual network adapters.

Prerequisites

Before changing your IP address, make sure to have a look at your current IP address.

To find your current IP address, you can use the “ip” command with the “a” option for address.

$ ip a

As you can see from the screenshot, my host is equipped with two network adapters :

  • the loopback address (or localhost) which is used to test the network connectivity of your own computer;
  • the “enp0s3” interface : acting as a main network adapter, the network card has multiple IP addresses associated with it (IPv4 and IPv6) followed by the IP address assigned to them.

In the present situation, my computer can be reached on “192.168.178.31/24” via the “192.168.178.1/24” gateway.

Change IP Address using ifconfig

On modern distributions, the “ifconfig” command has been completely deprecated and it is now advised to use the “ip” command.

However, you should still be able to use the “ifconfig” to change your IP address.

$ which ifconfig

/usr/sbin/ifconfig

To change your IP address on Linux, use the “ifconfig” command followed by the name of your network interface and the new IP address to be changed on your computer.

To assign the subnet mask, you can either add a “netmask” clause followed by the subnet mask or use the CIDR notation directly.

$ ifconfig <interface_name> <ip_address> netmask <netmask_address>
Note : in order to change your IP address, you will need to be an administrator on your computer (part of the sudo group on Debian/Ubuntu or wheel on CentOS/RedHat)

For example, given the IP addresses used in the previous sections, if we want to change our IP address (to 192.168.178.32/24), we would run the following command

$ ifconfig enp0s3 192.168.178.32/24

$ ifconfig enp0s3 192.168.178.32 netmask 255.255.255.0

In order to verify that your IP address was correctly changed, you can run the “ifconfig” command followed by the name of your network adapter.

$ ifconfig <interface_name>

From DHCP to Static

When manually changing your IP address, Linux automatically understands that you want to change from using a DHCP server to static IP addressing.

This information is materialized in the “ifconfig” command : in the first screenshot, you can see that my IP address was assigned with a “dynamic” parameter also called DHCP.

This is not the case anymore after assigning the IP address manually.

Note that your changes are not made permanent by modifying your IP settings with the “ifconfig” : they are only modified for the current session.

Change IP Address Permanently using ifupdown

On Linux, changing your IP address using network utilities does not mean that your IP configuration will be saved on reboots.

Network Files on Debian & Ubuntu

In order to change your IP address on Linux, you will have to add your network configuration in the “/etc/network/interfaces” or create this file if it does not exist already.

# Content of /etc/network/interfaces

iface eth0 inet static
address <ip_address>
netmask <network_mask>
gateway <gateway_ip>

For example, let’s say that you want to change your IP to be “192.168.178.32” with a subnet mask of “255.255.255.0” and a default gateway of “192.168.178.1”.

To change your IP address to reflect those changes, you would edit the content of your interfaces file and add the following content

$ vim /etc/network/interfaces

# Content of /etc/network/interfaces

iface eth0 inet static
address 192.168.178.32
netmask 255.255.255.0
gateway 192.168.178.1

In order for the changes to be applied, you will need to restart your networking service (managed by ifupdown)

# For systemd hosts

$ sudo systemctl restart networking.service

# For pre-systemd hosts

sudo /etc/init.d/networking restart

After restarting your networking service, you should be able to see your new IP by running the “ifconfig” or the “ip” command.

$ ifconfig

$ ip address

Network Files on CentOS & Red Hat

In order to change your IP address on Linux, you will have to add your network configuration in the “/etc/sysconfig/network-scripts” directory.

In the “/etc/sysconfig/network-scripts”, identify the network interface to be modified and start editing it.

$ ls -l /etc/sysconfig/network-scripts

$ nano <file>

Network Files on CentOS & Red Hat network-centos

In order to set an IP to be static on CentOS or RHEL, you want to modify the “BOOTPROTO” parameter from “dhcp” to “static” and add your network information such as the netmask or the default gateway.

On recent distributions such as CentOS 8 or RHEL 8, you have to use the nmcli utility in order for the changes to be effective.

However, if you are still using the network service (for distributions such as CentOS 7 or RHEL 7), you can restart the network service for the changes to be applied.

$ nmcli device reapply <interface_name> (on CentOS 8)

$ systemctl restart network.service (on CentOS 7/RHEL 7)

Awesome!

You successfully changed your IP address on Linux.

Make sure to execute the “ip” command again to verify that your changes were applied.

$ ip a

$ ifconfig

Change IP Address using Network Manager

On modern distributions, equipped with systemd, you may have come across the Network Manager many times.

The Network Manager is an all-in-one tool that exposes multiple utility tools in order to change connections, devices or connectivity settings (even wireless) on your host.

One of those utilities is called “nmcli” and this is what we are going to use in order to change our IP address.

To change your IP address, use “nmcli” on the “device” section and specify that you want to “modify” the “ipv4.address” of your network card.

$ nmcli device modify <interface_name> ipv4.address <ip_address>

Change IP Address using Network Manager nmcli

When using the “nmcli device modify” command, your Network Manager will automatically create a new connection file in the /etc/NetworkManager/system-connections folder.

Change IP Address using Network Manager system-connections

In order for the changes to be effective, you will need to “reapply” parameters to your current connection settings.

$ nmcli device reapply <interface_name>

Congratulations, you successfully changed your IP using the Network Manager!

However, changing settings using the nmcli tool won’t make your changes persistent over multiple reboots.

Change IP Address Permanently using Network Manager

In order for changes to be persistent, you need to edit the connection files located at /etc/NetworkManager/system-connections.

In order to change your IP address, edit the Network Manager configuration file, identify the line to be modified and set the IP address accordingly.

Change IP Address Permanently using Network Manager

Save the file and make sure to reapply the device configuration by using the “nmcli” command with the “device reapply” options.

$ nmcli device reapply

Now that your changes are effective, you can check your IP address by running the “ifconfig” or “ip” commands.

Modify IP Address using Graphical Interface

In some cases, you may want to modify your IPv4 address by navigating through graphical windows.

On modern distributions, the network parameters can be managed by the “network” icon (which is called nm-applet) located at the top right corner of your screen.

Modify IP Address using Graphical Interface nm-applet

In your network settings, click on the “gear wheel” next to the connection to be modified.

Modify IP Address using Graphical Interface nm-applet-2

Next, in the IPv4 section of your connection settings, you can set your IP method to manual and attribute your static IP address.

Modify IP Address using Graphical Interface nm-applet-3

To change your IP address, simply click on “Apply” and restart the networking services by using nmcli.

$ nmcli networking off

$ nmcli networking on

That’s it! You just changed your IP address on Linux.

How networking is managed on Linux

As of January 2020, on recent distributions, you may deal with several tools that are used by your distribution to configure networking.

Most of the time, the Network Manager and ifupdown are managing networking.

$ sudo systemctl status NetworkManager

$ sudo systemctl status networking

In some distributions, “ifupdown” might not be installed at all and interfaces are only managed by the NetworkManager.

However, if the two services exist on your computer, you will be able to declare interfaces in the /etc/network/interfaces file without the NetworkManager interfering with those settings.

How networking is managed on Linux networking

If you want the Network Manager to manage interfaces declared in the interfaces file, you will have to modify the “managed” parameter to true in the NetworkManager.conf configuration file.

How networking is managed on Linux managed

Conclusion

In this tutorial, you learnt how you can successfully change your IP address on Linux : either using the Network Manager or the ifupdown utility.

You also learnt how networking is managed and architectured on Linux and how you should configure it to avoid IP address conflicts.

If you are interested in Linux system administration, we have a complete section dedicated to it on the website, so make sure to check it out!