
Are you searching various websites to learn How To Install Logstash on Ubuntu 18.04 and Debian 9? Then, this tutorial is the best option for you all as it covers the detailed steps to install and configure the Logstash on Ubuntu 18.4 and Debian 9. If you are browsing this tutorial, it is apparently because you preferred to bring Logstash into your infrastructure. Logstash is a powerful tool, but you have to install and configure it properly so make use of this tutorial efficiently.
- What is Logstash?
- Why do we use Logstash?
- Prerequisites
- Steps to Install install Logstash on Ubuntu and Debian
- 1 – Install the latest version of Java
- 2 – Add the GPG key to install signed packages
- 3 – Install Logstash with apt
- 4 – Personalize Logstash with configuration files
- 5 – Monitoring Logstash using the Monitoring API
- Installing Logstash on macOS with Homebrew
- Starting Logstash with Homebrew
What is Logstash?
Logstash is a lightweight, open-source, server-side data processing pipeline that lets you get data from different sources, transform it on the fly, and send it to your aspired destination. It is used as a data processing pipeline for Elasticsearch, an open-source analytics and search engine that points at analyzing log ingestion, parsing, filtering, and redirecting.
Why do we use Logstash?
We use Logstash because Logstash provides a set of plugins that can easily be bound to various targets in order to gather logs from them. Moreover, Logstash provides a very expressive template language, that makes it very easy for developers to manipulate, truncate or transform data streams.
Logstash is part of the ELK stack: Elasticsearch – Logstash – Kibana but tools can be used independently.
With the recent release of the ELK stack v7.x, installation guides need to be updated for recent distributions like Ubuntu 18.04 and Debian 9.
Do Check:
Prerequisites
- Java version 8 or 11 (required for Logstash installation)
- A Linux system running Ubuntu 20.04 or 18.04
- Access to a terminal window/command line (Search > Terminal)
- A user account with sudo or root privileges
Steps to Install install Logstash on Ubuntu and Debian
The following are the steps to install Logstash on Ubuntu and Debian:
1 – Install the latest version of Java
Logstash, as every single tool of the ELK stack, needs Java to run properly.
In order to check whether you have Java or not, run the following command:
$ java -version
openjdk version "11.0.3" 2019-04-16
OpenJDK Runtime Environment (build 11.0.3+7-Ubuntu-1ubuntu218.04.1)
OpenJDK 64-Bit Server VM (build 11.0.3+7-Ubuntu-1ubuntu218.04.1, mixed mode, sharing)
If you don’t have Java on your computer, you should have the following output.

You can install it by running this command.
$ sudo apt-get install default-jre
Make sure that you now have Java installed via the first command that we run.
- How to Install Eclipse IDE on Ubuntu 18.04
- Monitoring Linux Logs with Kibana and Rsyslog | Using Kibana and Rsyslog to monitor Linux logs
- How To Install Git On Debian 10 Buster | Debian Git Repository | Debian Buster Git
2 – Add the GPG key to install signed packages
In order to make sure that you are getting official versions of Logstash, you have to download the public signing key and you have to install it.
To do so, run the following commands.
$ wget -qO - https://artifacts.elastic.co/GPG-KEY-elasticsearch | sudo apt-key add -
On Debian, install the apt-transport-https package.
$ sudo apt-get install apt-transport-https
To conclude, add the Elastic package repository to your own repository list.
$ echo "deb https://artifacts.elastic.co/packages/7.x/apt stable main" | sudo tee -a /etc/apt/sources.list.d/elastic-7.x.list
3 – Install Logstash with apt
Now that Elastic repositories are added to your repository list, it is time to install the latest version of Logstash on our system.
$ sudo apt-get update
$ sudo apt-get install logstash

This directive will :
- create a logstash user
- create a logstash group
- create a dedicated service file for Logstash
From there, running Logstash installation should have created a service on your instance.
To check Logstash service health, run the following command.
On Ubuntu and Debian, equipped with system
$ sudo systemctl status logstash
Enable your new service on boot up and start it.
$ sudo systemctl enable logstash
$ sudo systemctl start logstash
Having your service running is just fine, but you can double-check it by verifying that Logstash is actually listening on its default port, which is 5044.
Run a simple netstat command, you should have the same output.
$ sudo lsof -i -P -n | grep logstash
java      28872        logstash   56u  IPv6 1160098302      0t0  TCP
127.0.0.1:47796 > 127.0.0.1:9200 (ESTABLISHED)
java      28872        logstash   61u  IPv4 1160098304      0t0  UDP 127.0.0.1:10514
java      28872        logstash   79u  IPv6 1160098941      0t0  TCP 127.0.0.1:9600 (LISTEN)
As you can tell, Logstash is actively listening for connections on ports 10514 on UDP and 9600 on TCP. It is important to note if you were to forward your logs (from rsyslog to Logstash for example, either by UDP or by TCP).
On Debian and Ubuntu, here’s the content of the service file.
[Unit]
Description=logstash

[Service]
Type=simple
User=logstash
Group=logstash
# Load env vars from /etc/default/ and /etc/sysconfig/ if they exist.
# Prefixing the path with '-' makes it try to load, but if the file doesn't
# exist, it continues onward.
EnvironmentFile=-/etc/default/logstash
EnvironmentFile=-/etc/sysconfig/logstash
ExecStart=/usr/share/logstash/bin/logstash "--path.settings" "/etc/logstash"
Restart=always
WorkingDirectory=/
Nice=19
LimitNOFILE=16384

[Install]
WantedBy=multi-user.target
The environment file (located at /etc/default/logstash) contains many of the variables necessary for Logstash to run.
If you wanted to tweak your Logstash installation, for example, to change your configuration path, this is the file that you would change.
4 – Personalize Logstash with configuration files
In this step, you need to perform two more steps like as follows:
a – Understanding Logstash configuration files
Before personalizing your configuration files, there is a concept that you need to understand about configuration files.
Pipelines configuration files
In Logstash, you define what we called pipelines. A pipeline is composed of :
- An input: where you take your data from, it can be Syslog, Apache, or NGINX for example;
- A filter: a transformation that you would apply to your data; sometimes you may want to mutate your data, or to remove some fields from the final output.
- An output: where you are going to send your data, most of the time Elasticsearch, but it can be modified to send a wide variety of different sources.
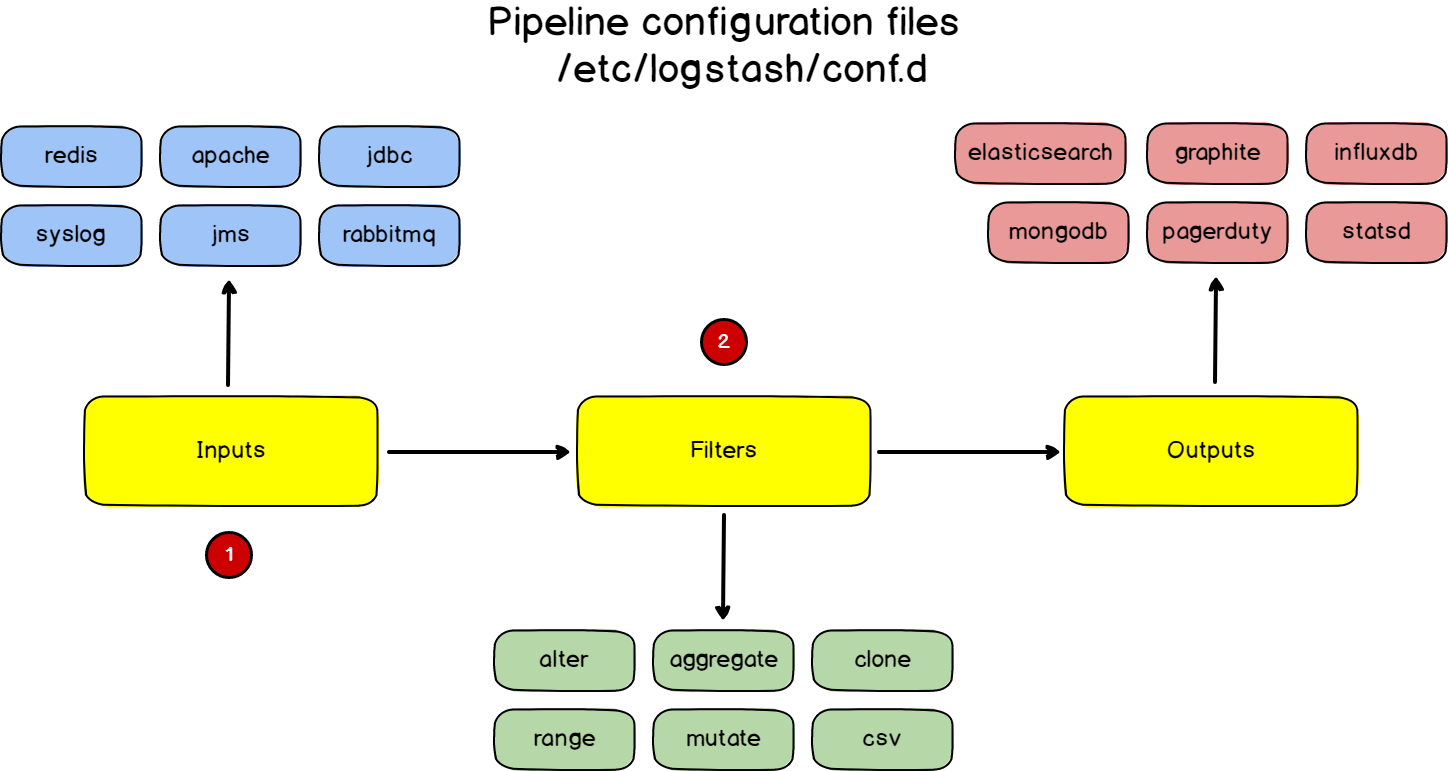
Those pipelines are defined in configuration files.
In order to define those “pipeline configuration files“, you are going to create “pipeline files” in the /etc/logstash/conf.d directory.
Logstash general configuration file
But with Logstash, you also have standard configuration files, that configure Logstash itself.
This file is located at /etc/logstash/logstash.yml. The general configuration files define many variables, but most importantly you want to define your log path variable and data path variable.
b – Writing your own pipeline configuration file
For this part, we are going to keep it very simple.
We are going to build a very basic logging pipeline between rsyslog and stdout.
Every single log process via rsyslog will be printed to the shell running Logstash.
As Elastic documentation highlighted it, it can be quite useful to test pipeline configuration files and see immediately what they are giving as an output.
If you are looking for a complete rsyslog to Logstash to Elasticsearch tutorial, here’s a link for it.
To do so, head over to the /etc/logstash/conf.d directory and create a new file named “syslog.conf“
$ cd /etc/logstash/conf.d/
$ sudo vi syslog.conf
Paste the following content inside.
input {
  udp {
    host => "127.0.0.1"
    port => 10514
    codec => "json"
    type => "rsyslog"
  }
}

filter { }


output {
  stdout { }
}
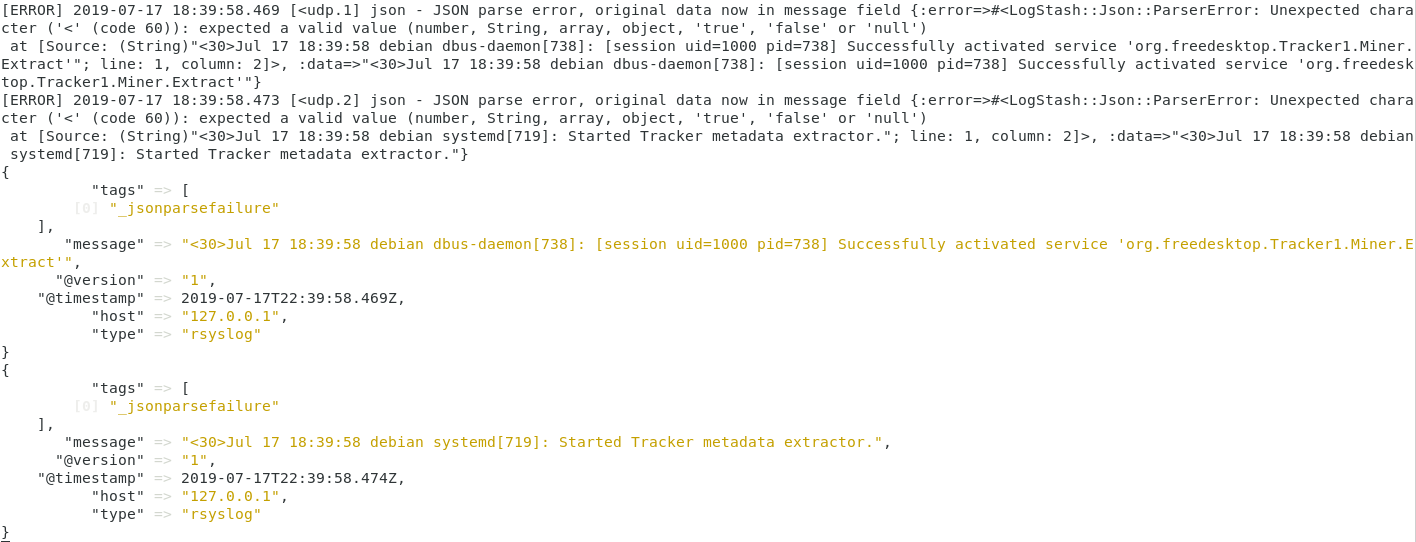
As you probably guessed, Logstash is going to listen to incoming Syslog messages on port 10514 and it is going to print it directly in the terminal.
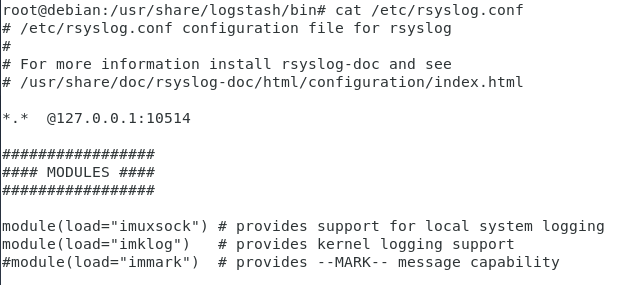
To forward rsyslog messages to port 10514, head over to your /etc/rsyslog.conf file, and add this line at the top of the file.
*.* @127.0.0.1:10514
Now in order to debug your configuration, you have to locate the logstash binary on your instance.
To do so, run a simple whereis command.
$ whereis -b logstash
/usr/share/logstash
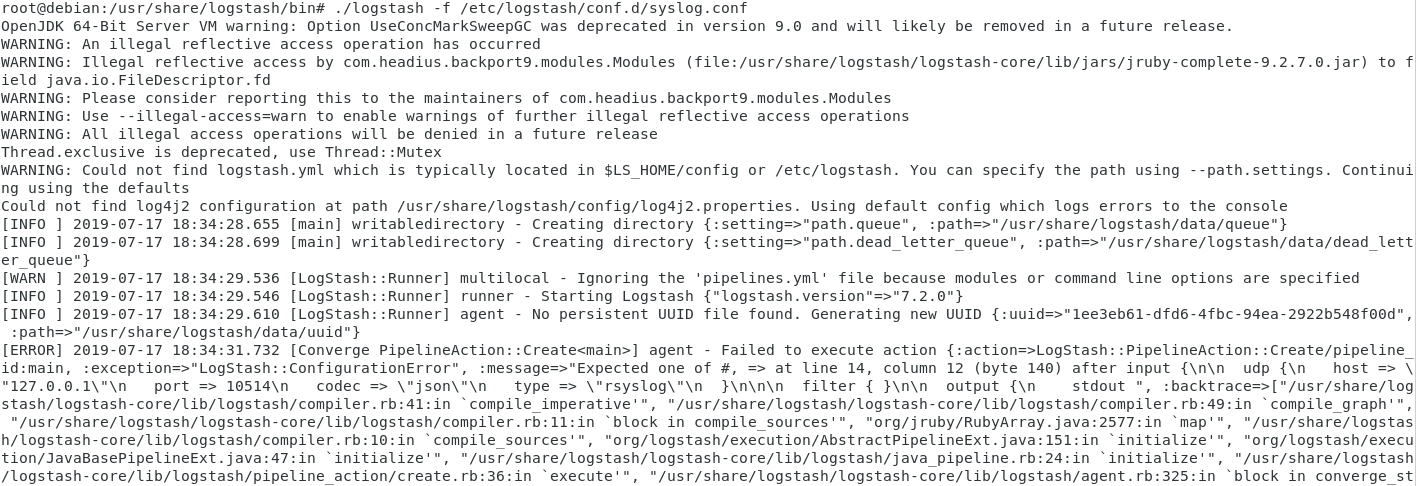
Now that you have located your logstash binary, shut down your service and run logstash locally, with the configuration file that you are trying to verify.
$ sudo systemctl stop logstash
$ cd /usr/share/logstash/bin
$ ./logstash -f /etc/logstash/conf.d/syslog.conf
Within a couple of seconds, you should now see the following output on your terminal.
Note : if you have any syntax errors in your pipeline configuration files, you would also be notified.
As a quick example, I removed one bracket from my configuration file. Here’s the output that I got.
5 – Monitoring Logstash using the Monitoring API
There are multiple ways to monitor a Logstash instance:
- Using the Monitoring API provided by Logstash itself
- By configuring the X-Pack tool and sending retrieved data to an Elasticsearch cluster
- By visualizing data into dedicated panels of Kibana (such as the pipeline viewer for example)
In this chapter, we are going to focus on the Monitoring API, as the other methods require the entire ELK stack installed on your computer to work properly.
a – Gathering general information about Logstash
First, we are going to run a very basic command to get general information about our Logstash instance.
Run the following command on your instance:
$ curl -XGET 'localhost:9600/?pretty'
{
  "host" : "devconnected-ubuntu",
  "version" : "7.2.0",
  "http_address" : "127.0.0.1:9600",
  "id" : "05cfb06f-a652-402c-8da1-f7275fb06312",
  "name" : "devconnected-ubuntu",
  "ephemeral_id" : "871ccf4a-5233-4265-807b-8a305d349745",
  "status" : "green",
  "snapshot" : false,
  "build_date" : "2019-06-20T17:29:17+00:00",
  "build_sha" : "a2b1dbb747289ac122b146f971193cfc9f7a2f97",
  "build_snapshot" : false
}
If you are not running Logstash on the conventional 9600 port, make sure to adjust the previous command.
From the command, you get the hostname, the current version running, as well as the current HTTP address currently used by Logstash.
You also get a status property (green, yellow, or red) that has already been explained in the tutorial about setting up an Elasticsearch cluster.
b – Retrieving Node Information
If you are managing an Elasticsearch cluster, there is a high chance that you may want to get detailed information about every single node in your cluster.
For this API, you have three choices:
- pipelines: in order to get detailed information about pipeline statistics.
- jvm: to see current JVM statistics for this specific node
- os: to get information about the OS running your current node.
To retrieve node information on your cluster, issue the following command:
$ curl -XGET 'localhost:9600/_node/pipelines'
{
  "host": "schkn-ubuntu",
  "version": "7.2.0",
  "http_address": "127.0.0.1:9600",
  "id": "05cfb06f-a652-402c-8da1-f7275fb06312",
  "name": "schkn-ubuntu",
  "ephemeral_id": "871ccf4a-5233-4265-807b-8a305d349745",
  "status": "green",
  "snapshot": false,
  "pipelines": {
    "main": {
      "ephemeral_id": "808952db-5d23-4f63-82f8-9a24502e6103",
      "hash": "2f55ef476c3d425f4bd887011f38bbb241991f166c153b283d94483a06f7c550",
      "workers": 2,
      "batch_size": 125,
      "batch_delay": 50,
      "config_reload_automatic": false,
      "config_reload_interval": 3000000000,
      "dead_letter_queue_enabled": false,
      "cluster_uuids": []
    }
  }
}
Here is an example for the OS request:
$ curl -XGET 'localhost:9600/_node/os'
{
  "host": "schkn-ubuntu",
  "version": "7.2.0",
  "http_address": "127.0.0.1:9600",
  "id": "05cfb06f-a652-402c-8da1-f7275fb06312",
  "name": "schkn-ubuntu",
  "ephemeral_id": "871ccf4a-5233-4265-807b-8a305d349745",
  "status": "green",
  "snapshot": false,
  "os": {
    "name": "Linux",
    "arch": "amd64",
    "version": "4.15.0-42-generic",
    "available_processors": 2
  }
}
c – Retrieving Logstash Hot Threads
Hot Threads are threads that are using a large amount of CPU power or that have an execution time that is greater than normal and standard execution times.
To retrieve hot threads, run the following command:
$ curl -XGET 'localhost:9600/_node/hot_threads?pretty'
{
  "host" : "schkn-ubuntu",
  "version" : "7.2.0",
  "http_address" : "127.0.0.1:9600",
  "id" : "05cfb06f-a652-402c-8da1-f7275fb06312",
  "name" : "schkn-ubuntu",
  "ephemeral_id" : "871ccf4a-5233-4265-807b-8a305d349745",
  "status" : "green",
  "snapshot" : false,
  "hot_threads" : {
    "time" : "2019-07-22T18:52:45+00:00",
    "busiest_threads" : 10,
    "threads" : [ {
      "name" : "[main]>worker1",
      "thread_id" : 22,
      "percent_of_cpu_time" : 0.13,
      "state" : "timed_waiting",
      "traces" : [ "java.base@11.0.3/jdk.internal.misc.Unsafe.park(Native Method)"...]
    } ]
  }
}
Installing Logstash on macOS with Homebrew
Elastic issues Homebrew formulae thus you can install Logstash with the Homebrew package manager.
In order to install with Homebrew, firstly, you should tap the Elastic Homebrew repository:
brew tap elastic/tap
Once you have clicked on the Elastic Homebrew repo, you can utilize brew install to install the default distribution of Logstash:
brew install elastic/tap/logstash-full
The above syntax installs the latest released default distribution of Logstash. If you want to install the OSS distribution, define this elastic/tap/logstash-oss.
Starting Logstash with Homebrew
To have launched start elastic/tap/logstash-full now and restart at login, run:
brew services start elastic/tap/logstash-full
To run Logstash, in the forefront, run:
logstash
Going Further
Now that you have all the basics about Logstash, it is time for you to build your own pipeline configuration files and start stashing logs.
I highly suggest that you verify Filebeat, which gives a lightweight shipper for logs and that simply be customized in order to build a centralized logging system for your infrastructure.
One of the key features of Filebeat is that it provides a back-pressure sensitive protocol, which essentially means that you are able to regulate the number that you receive.
This is a key point, as you take the risk of overloading your centralized server by pushing too much data to it.
For those who are interested in Filebeat, here’s a video about it.