
Are you using GitHub without setting up SSH Keys? Then, you’re actually missing out on more security and convenience. SSH Keys are the best two authentication methods used on GitHub for secure log-in and address modifications to repositories. Well, this tutorial will help you Setup SSH keys on GitHub easily and in a simpler way for administration.
If you want to check whether you have installed and configured Git on your Windows or Linux OS then make use of this Git Commands tutorial & dig deep into your main requirement.
- Why use an SSH key?
- How to Create SSH keys for Github
- Create SSH keys on Linux using ssh-keygen
- Create SSH keys on Windows using ssh-keygen
- Add SSH key to your GitHub Account
- Test GitHub SSH keys
- Troubleshooting
Why use an SSH Key?
If you want to access your account in a convenient and secured way then it can be possible by using an SSH Key. It’s helpful because you don’t need to memorize a long password. Also, you can get your actual password so brutally long and secure that no human or bot could guess it. The SSH key works as an actual key that only you control.
- How To Generate Git SSH Keys | Process of Git Generate SSH Key on Windows, Linux, Mac
- Issues with logging into EX Virtual Chassis via SSH and HTTP
- How To Clone a Git Repository | Clone a Git Repository with Command Line & Sourcetree
How to Create SSH keys for Github
Depending on the operating system you are using, there are two ways of creating SSH keys for GitHub.
Do Check: How To Generate Git SSH Keys
Create SSH keys on Linux using ssh-keygen
First of all, let’s have a look at creating SSH keys on Linux operating systems.
To create SSH keys on Linux, use the ssh-keygen command with an RSA algorithm (using the “-t” option)
$ cd ~/.ssh/ && ssh-keygen -t rsa -b 4096 -C "email@example.com"
Note: It is recommended to setup your SSH keys into the .ssh directory of your home directory. Storing them there is more convenient if multiple developers are working on the same repository.
You will be prompted with multiple questions.
You can choose to store your key in a custom file by typing a custom filename.
You can also choose to leave it blank in order for it to be added to the “id_rsa” existing file.
Generating public/private rsa key pair.
Enter file in which to save the key (/home/schkn/.ssh/id_rsa): custom_id_rsa
Enter passphrase (empty for no passphrase):
Enter same passphrase again:
Your identification has been saved in custom_id_rsa.
Your public key has been saved in custom_id_rsa.pub.
The key fingerprint is:
SHA256:6yBEAZCCAZCAfdeokgo256452574ffaaz+F6dedefr23222CUXTQc email@example.com
The key's randomart image is:
+---[RSA 4096]----+
|@*o+=+.   E..    |
|*+.+o    o .     |
|... =.  ....     |
| . + =. ..o      |
|  . *.o.S  .     |
|   . o.= =  .    |
|    . o o.+.     |
|     . o.oo      |
|        =*o      |
+----[SHA256]-----+
Similarly, you can leave the passphrase blank, otherwise, you will be asked for it as a password when performing operations on your repositories.
The ssh-keygen utility created two files for you :
- file_id_rsa: the private key used in the SSH authentication process. You should not share this private key by any means.
- file_id_rsa.pub: the extension gives the hint that this is the public key of your SSH authentication process. This is the key you are going to copy to Github in order to perform operations on your repos.
Configure your SSH keys
If you chose to create the GitHub public key in a separate file, named “custom_id_rsa” for example, you need to configure your SSH client in order to take into account this separate file.
Create a new file named “config” in your .ssh directory and paste the following content into it.
$ sudo nano ~/.ssh/config

Host *
    Hostname github.com
    User git
    IdentityFile ~/.ssh/custom_id_rsa
If you chose a different name, make sure to change the file name in the IdentifyFile line.
Save your file – you should not have to restart your SSH client for the changes to be applied.
Now that your files are ready, you can skip the next section dedicated to Windows hosts and start importing your keys to GitHub.
Create SSH keys on Windows using ssh-keygen
In order to use ssh-keygen on Windows, you need to have the OpenSSH client enabled.
Enabling OpenSSH client on Windows 10
In order to enable the OpenSSH client, you essentially have two options: by using Powershell or by using the graphical interface.
To enable the OpenSSH client via Powershell, use the “Add-WindowsCapability” option and specify the OpenSSH Client.
$ Add-WindowsCapability -Online -Name OpenSSH.Client*

Path          :
Online        : True
RestartNeeded : False
Note : you need to be administrator in order to enable OpenSSH on your computer.
You can also enable the OpenSSH client via the graphical interface :
- Click on “Start” and search for “Manage Optional Features“
- Click on “Add a Feature“
- Search for OpenSSH and install the OpenSSH client
Installing the OpenSSH client on Windows 10 will allow you to perform multiple commands via the Powershell: ssh-add, ssh-keygen (the one we are interested in), ssh-agent, ssh-keyscan, and the ssh executable.
On Windows, for versions greater than Windows 7, you can use ssh-keygen in order to connect to your remote Git repositories.
Open Powershell and type the following commands
$ ssh-keygen

Enter file in which to save the key (C:\Users\schkn/.ssh/id_rsa): C:\Users\schkn/.ssh/custom_id_rsa
Enter passphrase (empty for no passphrase):
Enter same passphrase again:
Your identification has been saved in custom_id_rsa.
Your public key has been saved in custom_id_rsa.pub.
The key fingerprint is:
SHA256:WTQ schkn@DESKTOP-PH31996
The key's randomart image is:
+---[RSA 2048]----+
|          o...   |
|         . ...   |
|      . + . .    |
|     E + * =     |
|    .   S B o.   |
|     ..= * .. . .|
|    ..=o* . .o.o.|
|     +oo+*  ..ooo|
|     .=B+.oo..oo |
+----[SHA256]-----+
In the first prompt, you can choose to save your public key in a separate file, but you will need to specify the entire path to the file.
If you chose to create your keys in a separate file, you will need to create a file named “config” into your .ssh directory
Note: The “config” file needs to have no extension at all, it cannot be named “config.txt” for example.
Configure your SSH keys
In order to configure your SSH keys, run the “New-Item” command to create a new file using Powershell.
$ New-Item -Path 'C:/Users/user/.ssh/config' -ItemType File
Note: You have to replace “user” with the actual user using the account
In the configuration file, paste the following content in order to select the correct key when performing Git commands.
Host *
    Hostname github.com
    User git
    IdentityFile ~/.ssh/custom_id_rsa
Save your file, and you should be good to go.
Add SSH key to your GitHub Account
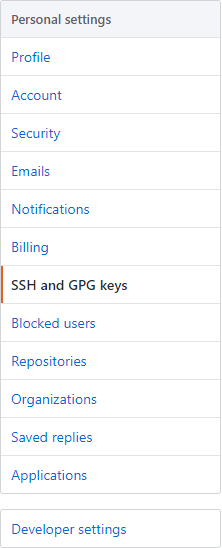
In order to add an SSH key to your GitHub account, head over to the settings of your account and select the “SSH and GPG keys” option in the left menu.
On the right panel, click on the “New SSH key” button in order to create a new SSH key for Github.
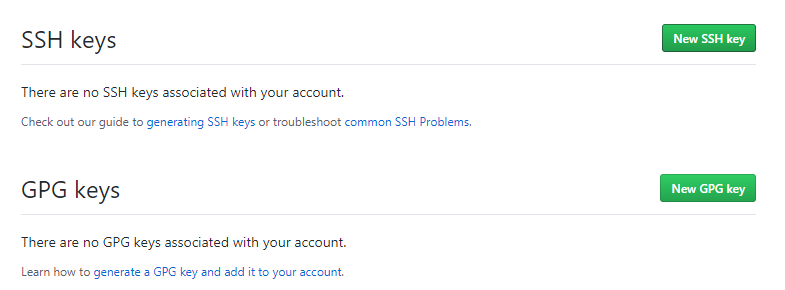
When clicking on “New SSH key“, you will be asked to choose a name for your key and to paste the public key you saved before.
To get the content of your public key on Linux, use the cat command on your public key file.
$ cat ~/.ssh/custom_id_rsa.pub

ssh-rsa AAAAB3NzaC1yc2EAAAADAQABAAACAQC+HvRnxwPJyUiUO/UCPKrW6mFPgJF8LxsC2lbBePtn+UDv4Xy+eMJRgG5fbaqy2i0tvP+7T7bjVWtO9AAIlclkIVeu5LmV7RaE8H78VXxGVQLcWXvlS0SGlwIxXXd9hBeGh6qPmrya63Ezrt/J1fNy6Ro9s5+ndLogBG2G0JKdAoytbCIBgPmm6sK9nvv3kHrjSK4S0rRz0nb9oaxCQF6V+T75hPgYp+JMOl8yZZMGLN3GPadE2ye2/lskJXzYjlHyjAE6a0g+vrHmMjOULPUrO+aHEA84f   email@example.com
Note: You can also use the “cat” command in Powershell
Paste the content of your public key to the dedicated key text area on GitHub.
Click on “Add SSH key” in order to complete the process.
A new entry should be added to your SSH keys with the key fingerprint as well as the permissions given by the key (read and write by default)
Congratulations, you have successfully added your SSH keys to GitHub.
In order to validate the entire process, we are going to clone a Git repository to our local system.
This is where you might have authentication failures but multiple solutions will be provided in order to solve those issues.
Test GitHub SSH keys
In order to test our GitHub SSH keys, let’s try to clone one of our repositories on our local server.
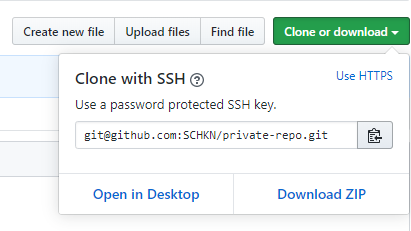
In order to find the SSH URL, you have to use, head over to your repository and click on the “Clone or download” green button.
Make sure that you are using the SSH method by clicking on “Use SSH” if not already selected.
To clone the Github repository, use the “git clone” command with the URL provided in the previous box.
$ git clone git@github.com:SCHKN/private-repo.git

Cloning into 'private-repo'...
remote: Enumerating objects: 3, done.
remote: Counting objects: 100% (3/3), done.
remote: Total 3 (delta 0), reused 0 (delta 0), pack-reused 0
Receiving objects: 100% (3/3), done.
Awesome!
The repository was correctly fetched from GitHub and you can start working on the codebase.
Troubleshooting
In some cases, you may not be able to fetch your repositories from GitHub when setting up SSH authentication.
You will probably get the following error when performing simple git commands on your client
git@github.com: Permission denied (publickey)
This may be happening because of multiple reasons :
- Your public key is not correctly set on GitHub
Make sure in your account settings that your public key is set and that the permissions are also set properly.
- You are using a different file from the “id_rsa” default file to store your keys and you did not create the “config” file into your .ssh directory.
Refer to the previous sections to set your “config” file properly.
- You are not using the correct URL in order to fetch your repositories.
Make sure that you are executing your commands as the “git” user and not with the GitHub username you are using on the website.
$ git clone git@github.com:SCHKN/private-repo.git   <--- Correct

$ git clone user@github.com:SCHKN/private-repo.git  <--- Incorrect
Conclusion
In this tutorial, you learned how you can set up SSH keys for Github accounts and how you will have to configure them to use custom keys.
If you are curious about Git or about software engineering in general, we have a complete section dedicated to it on the website, so make sure to read our latest guides.