
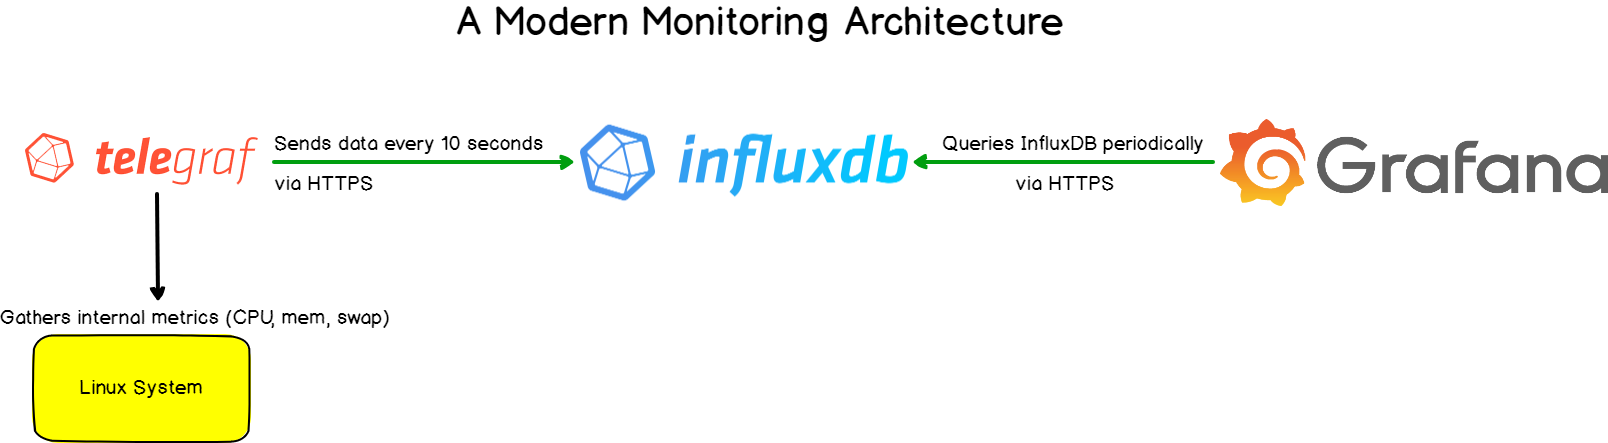
The TIG (Telegraf, InfluxDB, and Grafana) stack is apparently the most famous among all existing modern monitoring tools. Also, this stack is very helpful in monitoring a board panel of various datasources like from Operating systems to databases. There are unlimited possibilities and the origin of the TLG stack is very easy to follow.
Today’s tutorial is mainly on How To Setup Telegraf InfluxDB and Grafana on Linux along with that you can also gain proper knowledge about InfluxDB, Telegraf, and Grafana.
As you can know, Telegraf is a tool that takes responsibility for gathering and aggregating data, like the current CPU usage for instance. InfluxDB will store data, and expose it to Grafana, which is a modern dashboarding solution.
Moreover, we are securing our instances with HTTPS via secure certificates.
Also, it comprises steps for Influx 1.7.x, but I will link to the InfluxDB 2.x setup once it is written.
- Prerequisites
- Installing InfluxDB
- Installing Telegraf
- a – Getting packages on Ubuntu distributions
- b – Getting packages on Debian distributions.
- c – Install Telegraf as a service
- d – Verify your Telegraf installation
- Configure InfluxDB Authentication
- a – Create an admin account on your InfluxDB server
- b – Create a user account for Telegraf
- c – Enable HTTP authentication on your InfluxDB server
- d – Configure HTTP authentication on Telegraf
- Configure HTTPS on InfluxDB
- a – Create a private key for your InfluxDB server
- b – Create a public key for your InfluxDB server
- c – Enable HTTPS on your InfluxDB server
- d – Configure Telegraf for HTTPS
- Exploring your metrics on InfluxDB
- Installing Grafana
- a – Add InfluxDB as a datasource on Grafana
- b – Importing a Grafana dashboard
- c – Modifying InfluxQL queries in Grafana query explorer
- Troubleshooting
Prerequisites
If you are following our tutorial to install all these monitoring tools then ensure that you have sudo privileges on the system, otherwise, you won’t be able to install any packages further.
Installing InfluxDB
The complete Installation of InfluxDB can be acquired from this active link. So, make use of it properly and finish your InfluxDB installation.
If you guys looking for the complete guide on How to Install InfluxDB on Windows, then go for it using the available link & start gaining the knowledge.
Later, we are going to learn how to install Telegraf from the below modules:
Installing Telegraf
Telegraf is an agent that collects metrics related to a wide panel of different targets. It can also be used as a tool to process, aggregate, split, or group data.
The whole list of available targets (also called inputs) is available here. In our case, we are going to use InfluxDB as an output.
- How To Install InfluxDB Telegraf and Grafana on Docker
- InfluxDays London 2021 Recap | Key Facts of InfluxDays London 2021
- How To Install InfluxDB on Windows in 2021 | Installation, Configuration & Running of InfluxDB on Windows
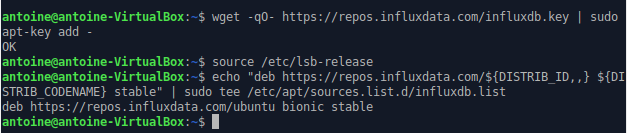
a – Getting packages on Ubuntu distributions
To download packages on Ubuntu 18.04+, run the following commands:
$ wget -qO- https://repos.influxdata.com/influxdb.key | sudo apt-key add -
$ source /etc/lsb-release
$ echo "deb https://repos.influxdata.com/${DISTRIB_ID,,} ${DISTRIB_CODENAME} stable" | sudo tee /etc/apt/sources.list.d/influxdb.list
This is the output that you should see.
b – Getting packages on Debian distributions.
To install Telegraf on Debian 10+ distributions, run the following commands:
First, update your apt packages and install the apt-transport-https package.
$ sudo apt-get update
$ sudo apt-get install apt-transport-https<
Finally, add the InfluxData keys to your instance.
Given your Debian version, you have to choose the corresponding packages.
$ cat /etc/debian_version
10.0
![]()
$ wget -qO- https://repos.influxdata.com/influxdb.key | sudo apt-key add -
$ source /etc/os-release


# Debian 7 Wheezy
$ test $VERSION_ID = "7" && echo "deb https://repos.influxdata.com/debian wheezy stable" | sudo tee /etc/apt/sources.list.d/influxdb.list

# Debian 8 Jessie
$ test $VERSION_ID = "8" && echo "deb https://repos.influxdata.com/debian jessie stable" | sudo tee /etc/apt/sources.list.d/influxdb.list

# Debian 9 Stretch
$ test $VERSION_ID = "9" && echo "deb https://repos.influxdata.com/debian stretch stable" | sudo tee /etc/apt/sources.list.d/influxdb.list

# Debian 10 Buster
$ test $VERSION_ID = "10" && echo "deb https://repos.influxdata.com/debian buster stable" | sudo tee /etc/apt/sources.list.d/influxdb.list

c – Install Telegraf as a service
Now that all the packages are available, it is time for you to install them.
Update your package list and install Telegraf as a service.
$ sudo apt-get update
$ sudo apt-get install telegraf
d – Verify your Telegraf installation
Right now, Telegraf should run as a service on your server.
To verify it, run the following command:
$ sudo systemctl status telegraf
Telegraf should run automatically, but if this is not the case, make sure to start it.
$ sudo systemctl start telegraf

However, even if your service is running, it does not guarantee that it is correctly sending data to InfluxDB.
To verify it, check your journal logs.
$ sudo journalctl -f -u telegraf.service

If you are having error messages in this section, please refer to the troubleshooting section at the end.
Configure InfluxDB Authentication
In order to have a correct TIG stack setup, we are going to setup InfluxDB authentication for users to be logged in when accessing the InfluxDB server.
a – Create an admin account on your InfluxDB server
Before enabled HTTP authentication, you are going to need an admin account.
To do so, head over to the InfluxDB CLI.
$ influx
Connected to http://localhost:8086 version 1.7.7
InfluxDB shell version: 1.7.7

> CREATE USER admin WITH PASSWORD 'password' WITH ALL PRIVILEGES
> SHOW USERS

user   admin
----   -----
admin  true
b – Create a user account for Telegraf
Now that you have an admin account, create an account for Telegraf
> CREATE USER telegraf WITH PASSWORD 'password' WITH ALL PRIVILEGES
> SHOW USERS

user      admin
----      -----
admin     true
telegraf  true
c – Enable HTTP authentication on your InfluxDB server
HTTP authentication needs to be enabled in the InfluxDB configuration file.
Head over to /etc/influxdb/influxdb.conf and edit the following lines.
[http]
  # Determines whether HTTP endpoint is enabled.
  enabled = true

  # The bind address used by the HTTP service.
  bind-address = ":8086"

  # Determines whether user authentication is enabled over HTTP/HTTPS.
  auth-enabled = true
d – Configure HTTP authentication on Telegraf
Now that a user account is created for Telegraf, we are going to make sure that it uses it to write data.
Head over to the configuration file of Telegraf, located at /etc/telegraf/telegraf.conf.
Modify the following lines :
## HTTP Basic Auth
  username = "telegraf"
  password = "password"
Restart the Telegraf service, as well as the InfluxDB service.
$ sudo systemctl restart influxdb
$ sudo systemctl restart telegraf
Again, check that you are not getting any errors when restarting the service.
$ sudo journalctl -f -u telegraf.service
Awesome, our requests are now authenticated.
Time to encrypt them.
Configure HTTPS on InfluxDB
Configuring secure protocols between Telegraf and InfluxDB is a very important step.
You would not want anyone to be able to sniff data you are sending to your InfluxDB server.
If your Telegraf instances are running remotely (on a Raspberry Pi for example), securing data transfer is a mandatory step as there is a very high chance that somebody will be able to read the data you are sending.
a – Create a private key for your InfluxDB server
First, install the gnutls-utils package that might come as gnutls-bin on Debian distributions for example.
$ sudo apt-get install gnutls-utils
(or)
$ sudo apt-get install gnutls-bin
Now that you have the certtool installed, generate a private key for your InfluxDB server.
Head over to the /etc/ssl folder of your Linux distribution and create a new folder for InfluxDB.
$ sudo mkdir influxdb && cd influxdb
$ sudo certtool --generate-privkey --outfile server-key.pem --bits 2048
b – Create a public key for your InfluxDB server
$ sudo certtool --generate-self-signed --load-privkey server-key.prm --outfile server-cert.pem
Great! You now have a key pair for your InfluxDB server.
Do not forget to set permissions for the InfluxDB user and group.
$ sudo chown influxdb:influxdb server-key.pem server-cert.pem
c – Enable HTTPS on your InfluxDB server
Now that your certificates are created, it is time to tweak our InfluxDB configuration file to enable HTTPS.
Head over to /etc/influxdb/influxdb.conf and modify the following lines.
# Determines whether HTTPS is enabled.
  https-enabled = true

# The SSL certificate to use when HTTPS is enabled.
https-certificate = "/etc/ssl/influxdb/server-cert.pem"

# Use a separate private key location.
https-private-key = "/etc/ssl/influxdb/server-key.pem"
Restart the InfluxDB service and make sure that you are not getting any errors.
$ sudo systemctl restart influxdb
$ sudo journalctl -f -u influxdb.service
d – Configure Telegraf for HTTPS
Now that HTTPS is available on the InfluxDB server, it is time for Telegraf to reach InfluxDB via HTTPS.
Head over to /etc/telegraf/telegraf.conf and modify the following lines.
# Configuration for sending metrics to InfluxDB
[[outputs.influxdb]]

# https, not http!
urls = ["https://127.0.0.1:8086"]

## Use TLS but skip chain & host verification
insecure_skip_verify = true
Why are we enabling the insecure_skip_verify parameter?
Because we are using a self-signed certificate.
As a result, the InfluxDB server identity is not certified by a certificate authority. If you want an example of what a full-TLS authentication looks like, make sure to read the guide to centralized logging on Linux.
Restart Telegraf, and again make sure that you are not getting any errors.
$ sudo systemctl restart telegraf
$ sudo journalctl -f -u telegraf.service
Exploring your metrics on InfluxDB
Before installing Grafana and creating our first Telegraf dashboard, let’s have a quick look at how Telegraf aggregates our metrics.
By default, for Linux systems, Telegraf will start gathering related to the performance of your system via plugins named cpu, disk, diskio, kernel, mem, processes, swap, and system.
Names are pretty self-explanatory, those plugins gather some metrics on the CPU usage, the memory usage as well as the current disk read and write IO operations.
Looking for a tutorial dedicated to Disk I/O? Here’s how to setup Grafana and Prometheus to monitor Disk I/O in real-time.
Let’s have a quick look at one of the measurements.
To do this, use the InfluxDB CLI with the following parameters.
Data is stored in the “telegraf” database, each measurement being named as the name of the input plugin.
$ influx -ssl -unsafeSsl -username 'admin' -password 'password'
Connected to http://localhost:8086 version 1.7.7
InfluxDB shell version: 1.7.7

> USE telegraf
> SELECT * FROM cpu WHERE time > now() - 30s

Great!
Data is correctly being aggregated on the InfluxDB server.
It is time to setup Grafana and builds our first system dashboard.
Installing Grafana
The installation of Grafana has already been covered extensively in our previous tutorials.
You can follow the instructions detailed here in order to install it.
a – Add InfluxDB as a datasource on Grafana
In the left menu, click on the Configuration > Data sources section.
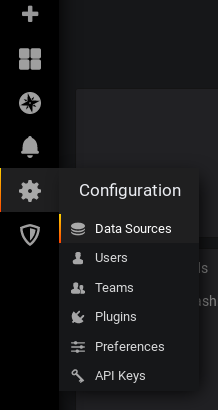
In the next window, click on “Add datasource“.

In the datasource selection panel, choose InfluxDB as a datasource.

Here is the configuration you have to match to configure InfluxDB on Grafana.
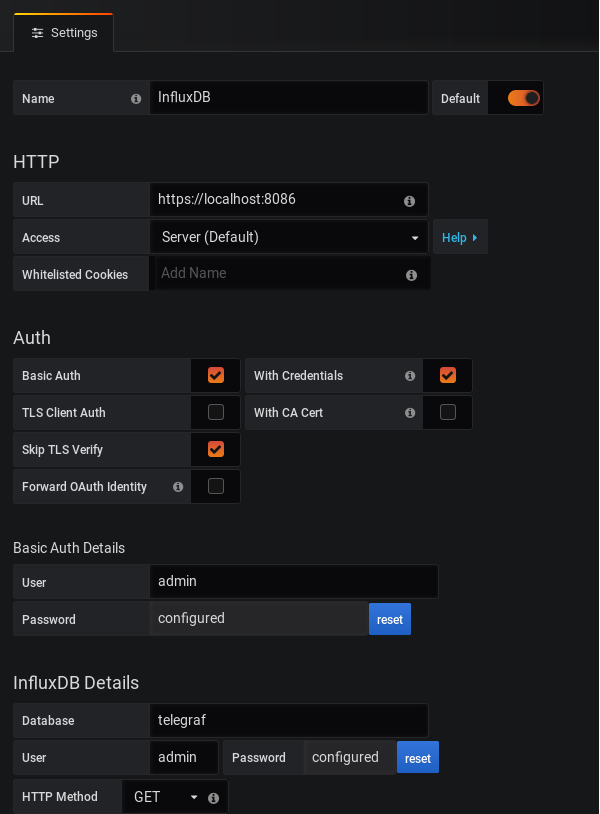
Click on “Save and Test”, and make sure that you are not getting any errors.

Getting a 502 Bad Gateway error? Make sure that your URL field is set to HTTPS and not HTTP.
If everything is okay, it is time to create our Telegraf dashboard.
b – Importing a Grafana dashboard
We are not going to create a Grafana dashboard for Telegraf, we are going to use a pre-existing one already developed by the community.
If in the future you want to develop your own dashboard, feel free to do it.
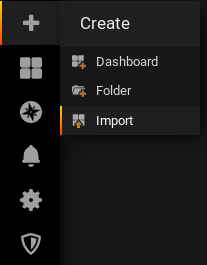
To import a Grafana dashboard, select the Import option in the left menu, under the Plus icon.
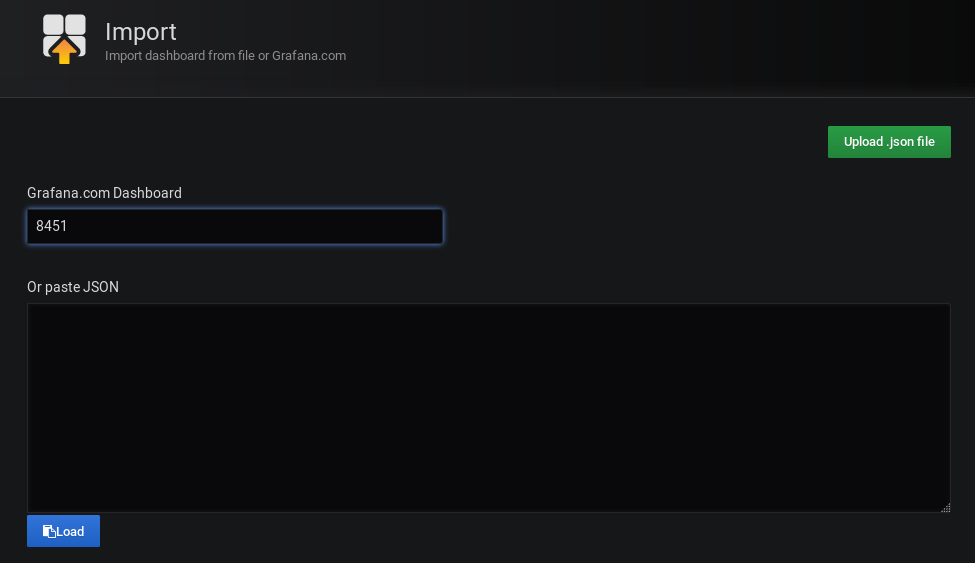
On the next screen, import the dashboard with the 8451 ID.
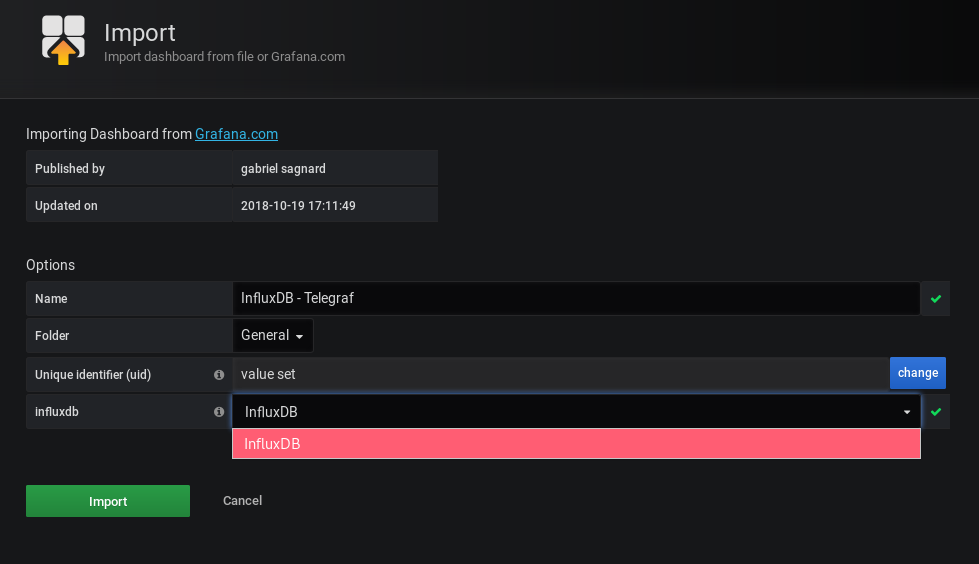
This is a dashboard created by Gabriel Sagnard that displays system metrics collected by Telegraf.
From there, Grafana should automatically try to import this dashboard.
Add the previously configured InfluxDB as the dashboard datasource and click on “Import“.
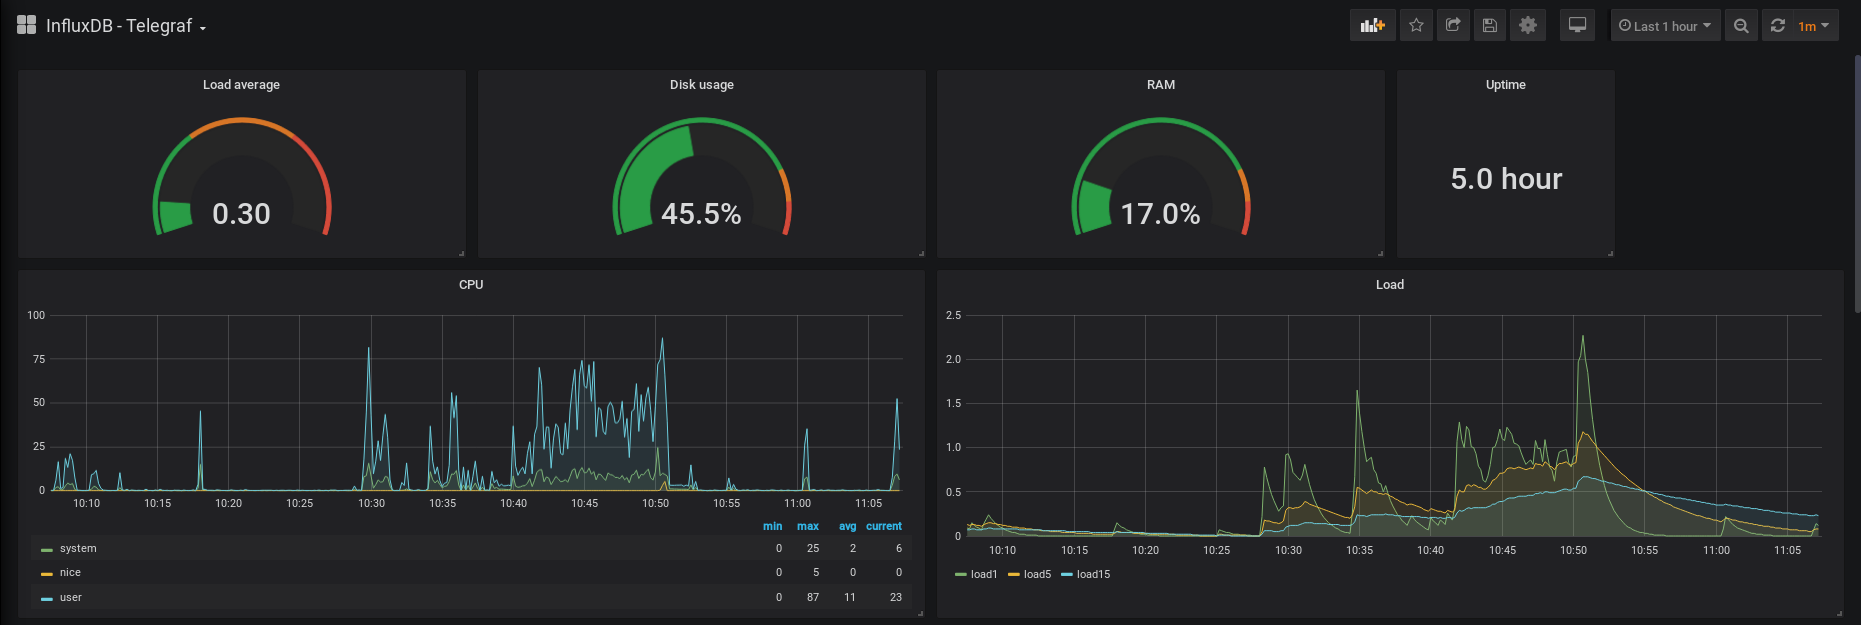
Great!
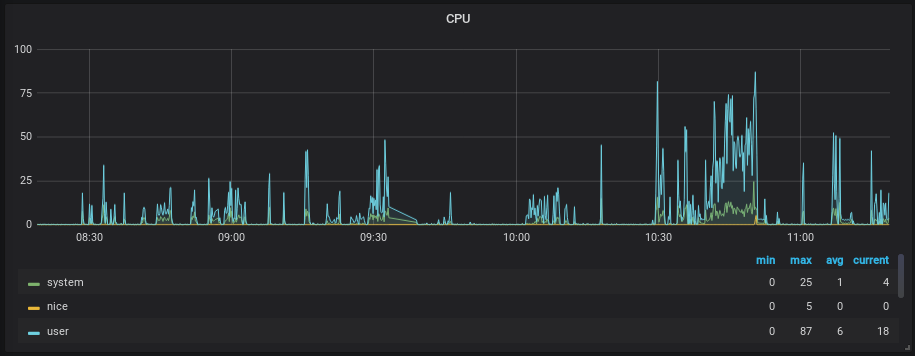
We now have our first Grafana dashboard displaying Telegraf metrics.
This is what you should now see on your screen.
c – Modifying InfluxQL queries in Grafana query explorer
When designing this dashboard, the creator specified the hostname as “Nagisa”, which is obviously different from one host to another (mine is for example named “Debian-10”)
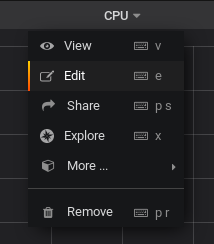
To modify it, head over to the query explorer by hovering the panel title, and clicking on “Edit”.
In the “queries” panel, change the host, and the panel should starting displaying data.
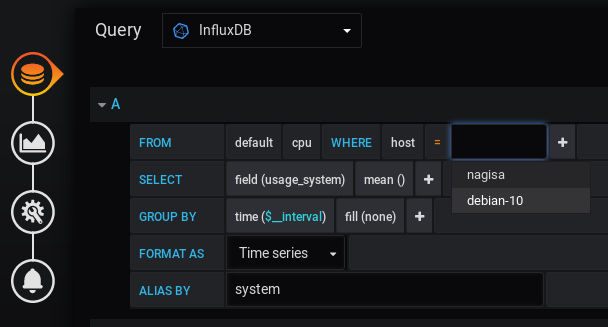
Go back to the dashboard, and this is what you should see.
Conclusion
In this tutorial, you learned how to setup a complete Telegraf, InfluxDB, and Grafana stack on your server.
So where should you go from there?
The first thing would be to connect Telegraf to different inputs, look for existing dashboards in Grafana or design your own ones.
Also, we already made a lot of examples using Grafana and InfluxDB, you could maybe find some inspiration reading those tutorials.
Troubleshooting
- Error writing to output [influxdb]: could not write any address

Possible solution: make sure that InfluxDB is correctly running on the port 8086.
$ sudo lsof -i -P -n | grep influxdb
influxd   17737        influxdb  128u  IPv6 1177009213      0t0  TCP *:8086 (LISTEN)
If you are having a different port, change your Telegraf configuration to forward metrics to the custom port that your InfluxDB server was assigned.
-
- [outputs.influxdb] when writing to [http://localhost:8086] : 401 Unauthorized: authorization failed
Possible solution: make sure that the credentials are correctly set in your Telegraf configuration. Make sure also that you created an account for Telegraf on your InfluxDB server.
-
- http: server gave HTTP response to HTTPS client
Possible solution: make sure that you enabled the https-authentication parameter in the InfluxDB configuration file. It is set by default to false.
- x509: cannot validate certificate for 127.0.0.1 because it does not contain any IP SANs
Possible solution: your TLS verification is set, you need to enable the insecure_skip_verify parameter as the server identity cannot be verified for self-signed certificates.