It is very easy to create and manage branches on Git for developers. As a matter of fact, the flexibility and power of its branching model is the major advantage of git. In Git, branches are a part of your everyday development process. Git branches are effectively a pointer to a snapshot of your modifications.
When you want to add a new feature or fix a bug, you need to create a new branch to encapsulate your changes. In this tutorial, you can get a deeper knowledge of Git branches and easily can understand why they chose to express this behavior in such a non-obvious manner. Also, take a look at the main concept of today’s guide ie., How to create a Git Branch along with Git Commands.
- What is a branch?
- What is Git Branching?
- What does the “git branch” command do?
- How do I create a new branch based on the current HEAD?
- Creating a Git branch using checkout
- Create Git Branch without switching
- Create Git Branch from Commit
- Create Git Branch from Tag
- How to create a new branch from a remote branch?
- How to create a new branch in a remote repository?
- Note on Ambiguous Names
What is a branch?
A branch in Git is simply a lightweight movable pointer to [a commit]. The default branch name in Git is master.
What is Git Branching?
Git branching allows developers to diverge from the production version of code to fix a bug or add a feature. However, developers create branches to work with a copy of the code without changing the current version.
What does the “git branch” command do?
There are a variety of tasks that can perform by using the “git branch” command. They are as follows:
- creating new local branches
- deleting existing local or remote branches
- listing local and/or remote branches
- listing branches that e.g. haven’t been merged yet
How do I create a new branch based on the current HEAD?
If you want to create a new branch as per your currently checked out (HEAD) branch, just use “git branch” with the name of the new branch as the only parameter shown below:
$ git branch <new-branch>
- How To Switch Branch on Git | What is Git Switch? | Git Switch vs Checkout
- How To Set Upstream Branch on Git | What is a Git Upstream Branch? | Git Set Upstream Branch without Push
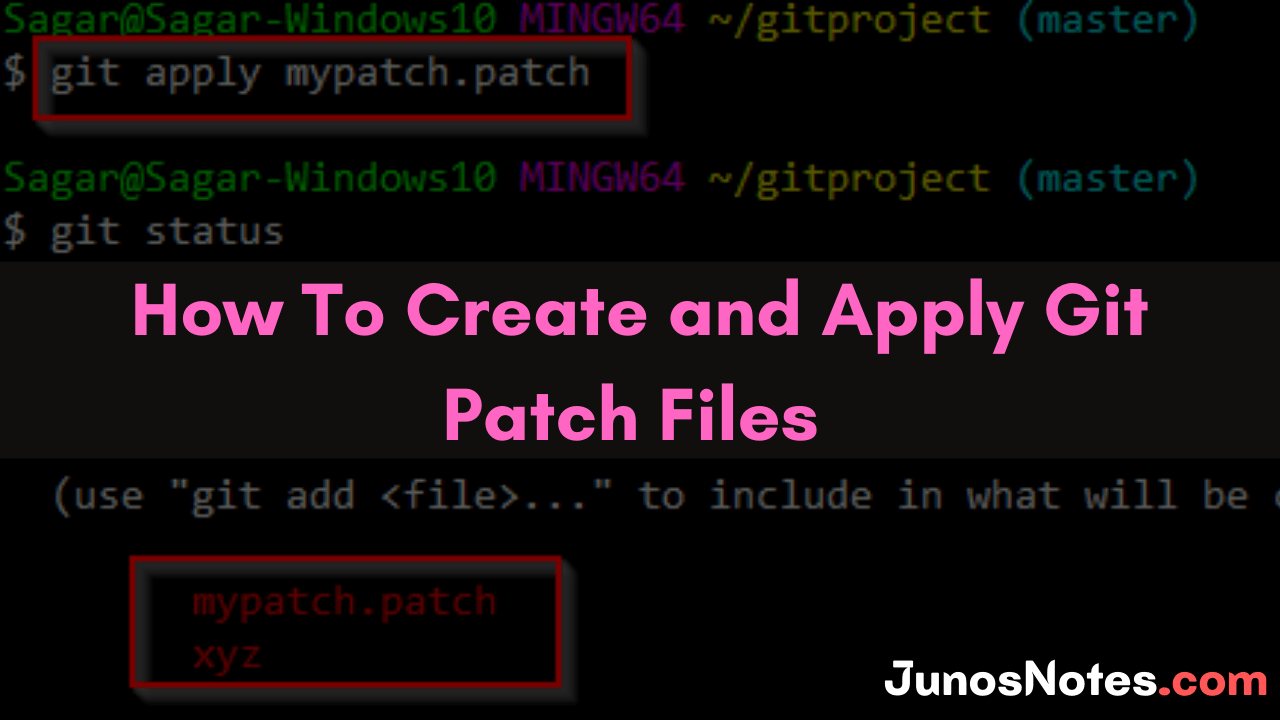
- How To Create and Apply Git Patch Files | Creating & Applying Git Patch Files with Different Git Commands
Creating a Git branch using checkout
The easiest way to create a Git branch is to use the “git checkout” command with the “-b” option for a new branch. Next, you just have to specify the name of the branch you want to create.
$ git checkout -b <branch-name>
As an example, let’s say that you want to create a new Git branch from the master branch named “feature”
To achieve that, you will run the “git checkout” command with the “-b” option and add “feature” as the branch name.
$ git checkout -b feature
Switched to new branch 'feature'
As you can see, by using the “git checkout” command, you are creating a new branch and you are switching to this new branch automatically.
But what if you wanted to create a Git branch without switching to the new branch automatically?
Create Git Branch without switching
In order to create a new Git branch, without switching to this new branch, you have to use the “git branch” command and specify the name of the Git branch to be created.
$ git branch <branch_name>
Later on, you can switch to your new Git branch by using the “git checkout” function.
$ git checkout <branch_name>
Going back to our previous example, let’s say that you want to create a branch named “feature”.
$ git branch feature
You can inspect existing branches by running the “git branch” command with the “-a” option for all branches.
$ git branch -a
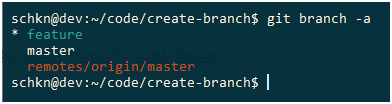
Awesome, you have successfully created a new Git branch and you switched to it using the checkout command.
Create Git Branch from Commit
In the last sections, we have seen how you can create a new Git branch from the HEAD commit of the current branch.
In some cases, you want to create a Git branch from a specific commit in your Git history.
To create a Git branch from a commit, use the “git checkout” command with the “-b” option and specify the branch name as well as the commit to creating your branch from.
$ git checkout -b <branch_name> <commit_sha>
Alternatively, you can use the “git branch” command with the branch name and the commit SHA for the new branch.
$ git branch <branch_name> <commit_sha>
Going back to our previous example, let’s say that you want to create a Git branch from a specific commit in your Git history.
To get commits SHA from your history, you have to use the “git log” with the “–oneline” option.
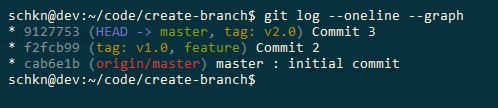
$ git log --oneline --graph

* 9127753 (HEAD -> master) Commit 3
* f2fcb99 Commit 2
* cab6e1b (origin/master) master : initial commit
To create a new Git branch from the second commit (f2fcb99), you would run the following command
$ git checkout -b feature f2fcb99
Switched to a new branch named 'feature'
Using the “git log” command, you can verify that your branch was created from the second commit of your history.
$ git log --oneline --graph

* f2fcb99 (HEAD -> feature) Commit 2
* cab6e1b (origin/master) master : initial commit
Awesome, you have successfully created a new Git branch from a specific commit!
Create Git Branch from Tag
In previous tutorials, we have seen that Git tags are pretty useful: they can be used as reference points in your development.
As a consequence, it can be quite useful to create Git branches from existing tags.
In order to create a new Git branch from a tag, use the “git checkout” command with the “-b” option and specify the branch name as well the tag name for your new branch.
$ git checkout -b <branch_name> <tag_name>
Alternatively, if you don’t want to switch to your new branch, you can use the “git branch” with the branch name and the tag name.
$ git branch <branch_name> <tag_name>
Back to our previous example, let’s say that you want to create a new Git branch from a tag named “v1.0” in your history.
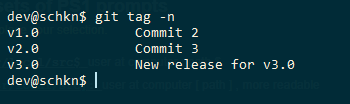
In order to list your existing tags, you can use the “git tag” command. Alternatively, you can use the “git log” command to identify a tag associated with a commit.
$ git tag
v1.0
Now that you have identified your tag, you can create a new branch from it using the “git checkout” command.
$ git checkout -b feature v1.0
Next, you can inspect your Git history in order to make sure that your new branch was indeed created from the tag.

Alternatively, you could have used the “git branch” in order to create this branch.
$ git branch feature v1.0
How to create a new branch from a remote branch?
If you require to take a remote branch based on your new local branch, you can utilize the “–track” option:
$ git branch --track <new-branch> origin/<base-branch>
On the other hand, you can also use the “checkout” command to perform this. If you want to name the local branch like the remote one, you only have to define the remote branch’s name:
$ git checkout --track origin/<base-branch>
How to create a new branch in a remote repository?
Once you are done with working on a new local branch for some time, you may require to publish it in your remote repository, in order to share it with your team:
$ git push -u origin <local-branch>
The “-u” flag tells Git to establish a “tracking connection”, which will make pushing and pulling much easier in the future.
Note on Ambiguous Names
When you are creating new Git objects (whether they are branches, tags, or commits), you might run into this error
fatal: Ambiguous object name: <object>
So why does this error happens?
This exception occurs whenever two objects are named in the exact same way: a branch and a tag for example.
Whenever you are running a command involving one of those objects, Git can not tell the difference between the two and it returns this exception.
You might run into this error when running the “checkout” command.
If you are creating a new branch from a tag named “v1.0”, but one of your branches is already named “v1.0”, you will be presented with this error
$ git checkout -b feature v1.0
warning: refname 'v1.0' is ambiguous.
warning: refname 'v1.0' is ambiguous.
fatal: Ambiguous object name: 'v1.0'.
In order to solve this issue, you have to specify that your last argument is a tag and not the branch name.
To solve ambiguous notation, simply append the refs notation to the object that is ambiguous
$ git checkout -b feature refs/tags/v1.0
Switched to a new branch 'feature'
Conclusion
In this tutorial, you learned how you can easily create Git branches using the “git checkout” command.
You also learned that you can the “git branch” command if you don’t want to switch automatically to your new branch.
Finally, you have seen more advanced use-cases: creating branches from specific commits or from specific tags in your Git history.
Curious about Git, you can check our latest tutorials:
If you are interested in Git or in software engineering, we have a complete section dedicated to it on the website, so make sure to check it out!