
In Git History, tags are ref’s that point to specific points. Generally, Tagging is done to capture a point in history that is utilized for a marked version release (i.e. v1.0.1). A tag is like a branch that doesn’t change. If your want to have a reference to a given release of your software should create a new tag.
Are you new to Git and not familiar with the Git tags & Git Commands? Check out this entire tutorial and learn How to Create Git Tags easily along with naming the Git tags following the best practices of “Semantic Versioning”.
- How do you Create Git Tag?
- Create Tag with Message
- Git Tag Types
- Lightweight Tags
- Annotation Tags
- Naming tags with Semantic Versioning
- Push your created tags
- Create Git Tag for Commit
- Create Tag For Last Commit
How do you Create Git Tag?
In order to create a new tag, you have to use the “git tag” command and specify the tag name that you want to create.
$ git tag <tag_name>
As an example, let’s say that you want to create a new tag on the latest commit of your master branch.
To achieve that, execute the “git tag” command and specify the tag name.
$ git tag v2.0
Usually, you want to name your tag following the successive versions of your software.
Using this command, the latest commit (also called HEAD) of your current branch will be tagged.
To verify that your Git tag was successfully created, you can run the “git tag” command to list your existing tags.
$ git tag

v1.0
v2.0
Good job!
You have successfully created a tag on Git.
- How To List Git Tags | How to Check List of Tags in Git? | Process to List Local & Remote Tags in Git
- How To Create a Git Branch | Learn Git Create New Branch from Current Branch
- How To Delete Local and Remote Tags on Git | Git Delete Tag for local & remote
Create Tag with Message
Creating tags is great but you will need to add a description to your tag in order for other contributors to understand why you created it.
You would not create a commit without a commit message, you would not create a Git tag without a message.
To create a Git tag with a message, use the “git tag” command with the “-a” option for “annotated” and the “-m” option for message.
$ git tag -a <tag_name> -m "message"
Note: If you don’t provide the “-m” option, your default text editor will open in order for you to type the tag message.
As an example, let’s say that you want to create a new annotated tag on your master branch with the message “New release for v3.0”
To achieve that, you would run the following command
$ git tag -a v3.0 -m "New release for v3.0"
You can verify that your Git tag was successfully created by running the “git tag” command with the “-n” option.
$ git tag -n
Git Tag Types
As of now we know we have learned about git tag and how to create easily, let’s discuss the type of tags that supported by git. You can have two types of Git tags, one is Lightweight Tags and another is Annotated Tags.
Lightweight Tags
As the name suggests Lightweight Tags is the simpler and trimmed down version of creating a tag without any meta-information about the tag. Here is the syntax of the Git Lightweight tags.
$ git tag <tag_name>
Annotation Tags
Annotation Tags is a process of creating a Git tag with some extra meta information. To create an annotation tag you just need to add “-a” with the git tag command and “-m” to specify the message.
$ git tag -a v1.0 -m “Release v1.0 create.”
Now, you can apply the “git show” command to view all the data attached with the tag we simply created with annotation.
Naming tags with Semantic Versioning
When naming tags, the Git CLI does not put any constraints on the name of your Git tag.
However, there are some best practices when it comes to naming Git tags: using semantic versioning.
Semantic versioning is quite easy to understand: you want to name tags as versions of your software in the form of
v<major>.<minor>.<patch>
Where
- major: is a version number where you introduced breaking modifications (modifications of your new version are NOT compatible with previous versions);
- minor: is a version number that is compatible with previous versions;
- patch: is an increment for a bug fix or a patch fix done on your software.
For example, let’s say that you are currently working on version 1.0.0 of your software.
In your latest commit, you introduced a code-breaking change, as a consequence you are going to increment the major version number.
$ git tag v2.0.0
Push your created tags
By default, the “git push” command does not automatically push your tags to your remote repository.
To push your newly created tags, use the “git push” command and specify the “–tags” to explicitly push tags to your remote Git repository.
$ git push --tags
For example, given the tags that you created in the previous section, you would get the following output
$ git push --tags

To <user>/<repository>.git
* [new tag]         v1.0 -> v1.0
* [new tag]         v2.0 -> v2.0
Great, now your tags are pushed to your remote repository and your colleagues can start fetching it.
Create Git Tag for Commit
In some cases, you may want to create a Git tag for a specific commit of your Git history.
In order to create a Git tag for a specific commit, use the “git tag” command with the tag name and the commit SHA for the tag to be created.
$ git tag <tag_name> <commit_sha>
If you want to create an annotated tag for a specific commit, you can use the “-a” and “-m” options we described in the previous section.
$ git tag -a <tag_name> <commit_sha> -m "message"
As an example, let’s say that you want to create an annotated commit for the first commit of your Git history.
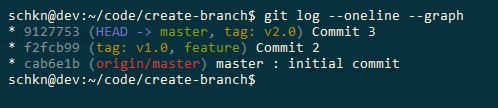
First, list the commits SHA by using the “git log” command with the “–oneline” option to get short commits SHA.
$ git log --oneline

9127753 (HEAD -> master) Commit 3
f2fcb99 (feature) Commit 2
cab6e1b (origin/master) master : initial commit
In order to create an annotated tag for the first commit in your Git history, you would execute the following command
$ git tag -a v1.0 cab6e1b -m "Tagged the first commit with v1.0"Next, run the “git log” command again to make sure that your commit was correctly tagged.
$ git log --oneline

9127753 (HEAD -> master) Commit 3
f2fcb99 (feature) Commit 2
cab6e1b (tag: v1.0, origin/master) master : initial commit
Awesome, you have successfully created a tag for a specific commit in your Git history.
Create Tag For Last Commit
If you want to create a Git tag from the last commit, there is a shorter syntax that you can use: the HEAD syntax.
In order to create a Git tag for the last commit of your current checked-out branch, use the “git tag” command with the tag name and specify “HEAD” as the commit to create the tag from.
$ git tag <tag_name> HEAD   (for the last commit)

$ git tag <tag_name> HEAD~1  (for the commit before HEAD)

$ git tag <tag_name> HEAD~1  (for two commits before HEAD)
Similarly, if you want your tag to be annotated, you can still use the “-a” and “-m” options to annotate your tag.
$ git tag -a <tag_name> HEAD -m "message"
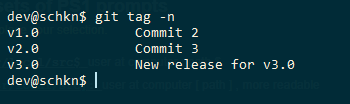
Like in the previous sections, you can verify that your tag was successfully created by running the “git tag” command with the “-n” option.
$ git tag -n

v1.0
v2.0
v3.0
Congratulations, you have successfully created a new tag for the last commit of your repository.
Conclusion
In this tutorial, you learned how you can easily create Git tags for your projects.
You also discovered advanced usages of tags with annotated messages but also about naming your git tags correctly using semantic versioning.
If you are interested in Git, you should have a look at our previous tutorials :
Also, if you are passionate about software engineering, we have a complete section dedicated to it on the website, so make sure to check it out!