Access control list (ACL) gives an additional, more flexible permission mechanism for file systems. It is intended to help UNIX file permissions. ACL permits you to grant permissions for any user or group to any disc resource.
If you are working as a system administrator then you would probably be familiar with Linux ACLs. Because they were used to define more fine-grained discretionary access rights for files and directories.
In today’s Access Control Lists on Linux Explained Tutorial, we are going to explain deeper information about Linux access control lists, what they are used for and how they are managed to configure a Linux system properly.
Get Ready to Learn A New Topic?
What You Will Learn
If you follow this tutorial until the end, you are going to learn about the following topics:
- Access Control Lists Basics on Linux
- What is ACL(Access Control Lists)?
- Listing Access Control List
- List of commands for setting up ACL
- Creating access control lists on Linux
- Checking ACL packages installation
- Setting access control lists using setfacl
- Listing access control lists using getfacl
- Working with the access control lists mask
- Creating access control lists defaults on directories
- Deleting default access control lists on directories
- Conclusion
That’s quite a long program, so without further ado, let’s start with a quick definition of what Linux file access control lists acls are.
Access Control Lists Basics on Linux
On Linux, there are two ways of setting permissions for users and groups: with regular file permissions or with access control lists.
What is ACL(Access Control Lists)?
Access control lists are used on Linux filesystems to set custom and more personalized permissions on files and folders. ACLs allow file owners or privileged users to grant rights to specific users or to specific groups.
In Linux, as you probably know, the permissions are divided into three categories: one for the owner of the file, one for the group, and one for the others.
- Chown Command in Linux (File Ownership)
- Complete Node Exporter Mastery with Prometheus | Monitoring Linux Host Metrics WITH THE NODE EXPORTER
- Syslog: The Complete System Administrator Guide
However, in some cases, you may want to grant access to a directory (the execute permission for example) to a specific user without having to put this user into the group of the file.
This is exactly why access control lists were invented in the first place.
Do Refer More Linux Tutorials:
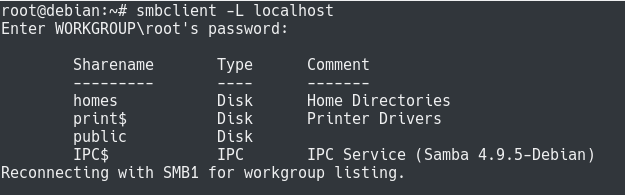
Listing Access Control List
On Linux, access control lists are not enabled when you create a new file or directory on your host (except if a parent directory has some ACLs predefined).
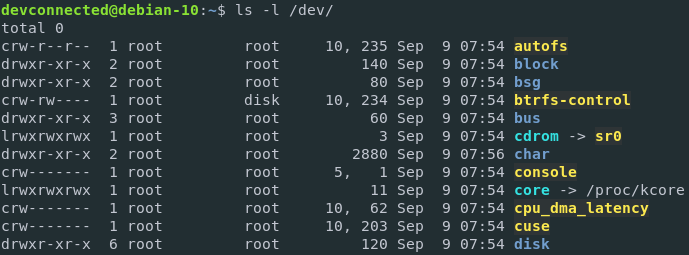
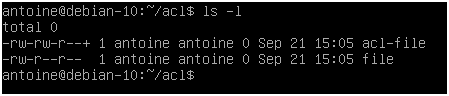
To see if access control lists are defined for a file or directory, run the ls command and look for a “+” character at the end of the permission line.
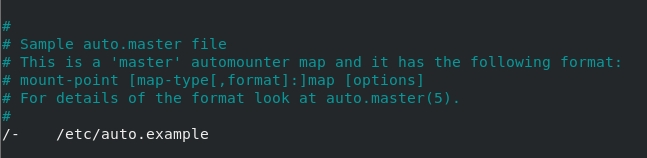
$ ls -l
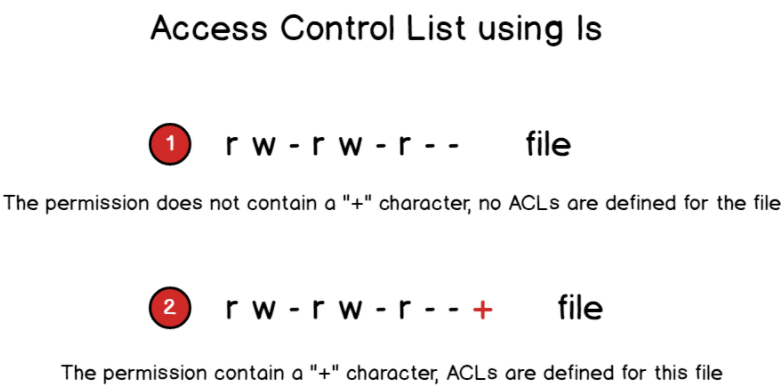
To show the difference, here is the difference when listing files on a minimal instance.
 Now that you have some basics about access control lists, let’s see how you can start creating basic ACL for your files and directories.
List of commands for setting up ACL
1) To add permission for user
setfacl -m "u:user:permissions" /path/to/file

2) To add permissions for a group
setfacl -m "g:group:permissions" /path/to/file

3) To allow all files or directories to inherit ACL entries from the directory it is within
setfacl -dm "entry" /path/to/dir

4) To remove a specific entry
setfacl -x "entry" /path/to/file

5) To remove all entries
setfacl -b path/to/file
Creating access control lists on Linux
Before starting with ACL commands, it is important to have the packages installed on your host.
Checking ACL packages installation
It might not be the case if you chose to have a minimal server running.
Start by checking the help related to the setfacl by running the following command
$ setfacl --help
If your host cannot find the setfacl command, make sure to install the necessary packages for ACL management.
$ sudo apt-get install acl -y
Note that you will need sudo privileges on Debian 10 to run this command.
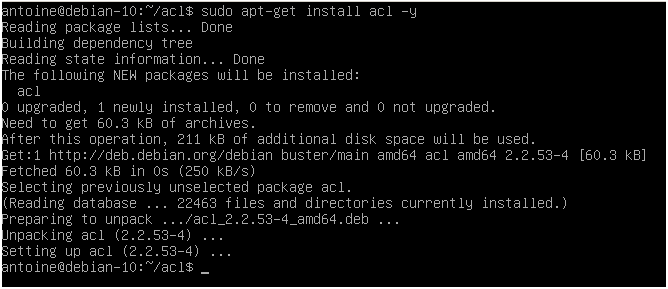
Run the setfacl command and make sure that you are able to see the help commands this time.
Now that your host is correctly configured, let’s see how the setfacl command works.
Setting access control lists using setfacl
With access control lists, there are two main commands that you need to remember: setfacl and getfacl.
In this chapter, we are going to take a look at the setfacl command as the getfacl one is pretty self-explanatory.
The setfacl command is used on Linux to create, modify and remove access control lists on a file or directory.
The setfacl has the following syntax
$ setfacl {-m, -x} {u, g}:<name>:[r, w, x] <file, directory>
Where curly brackets mean one of the following options and regular brackets mean one or several items.
- -m: means that you want to modify one or several ACL entries on the file or directory.
- -x: means that you want to remove one or several ACL entries on a file or directory.
- {u, g}: if you want to modify the ACL for a user or for a group.
- name: this is an optional parameter, it can be omitted if you want to set the ACL entries for every user or for every group on your host.
- [r, w, x]: in order to set read, write or execute permissions on the file or directory.
For example, in order to set specific write permissions for a user on a file, you would write the following command
$ setfacl -m u:user:w <file, directory>
In order to set execute permissions for all users on your host, you would write the following command
$ setfacl -m u::x <file, directory>
To set full permissions for a specific group on your host, you would write the setfacl this way
$ setfacl -m g:group:rwx <file, directory>
Now let’s say that you want to remove an ACL entry from a file.
In order to remove a user-specific entry from a file, you would specify the x option.
Note: you cannot specific rights from a single ACL entry, meaning that you can’t remove write permissions, keeping the ACL read permissions active.
$ setfacl -x u:<user> <file, directory>
Similarly, to remove ACL related to groups on your host, you would write the following command
$ setfacl -x g:<group> <file, directory>
Now that you have seen how you can create access control lists easily on Linux, it is time to see how you can check existing access control lists on files and directories.
Listing access control lists using getfacl
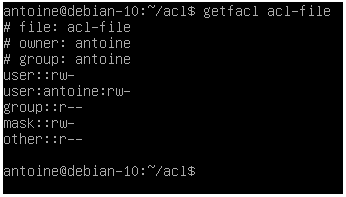
The getfacl command is used on Linux to print a complete listing of all regular permissions and access control lists permissions on a file or directory.
The getfacl can be used with the following syntax
$ getfacl <file, directory>
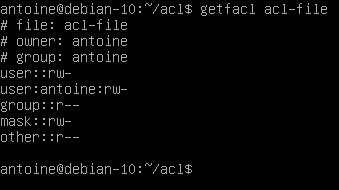
The getfacl command is divided into multiple categories :
- Filename, owner, and group: The information about the user and group ownership is shown at the top;
- User permissions: First, you would find regular user permissions, also called the owning user, followed by any user-specific ACL entries (called named users)
- Group permissions: Owning groups are presented followed by group-specific ACL entries, also called named groups
- Mask: That restricts the permissions given to ACL entries, the mask is going to be detailed in the next section;
- Other permissions: Those permissions are always active and this is the last category explored when no other permissions match with the current user or group.
Working with the access control lists mask
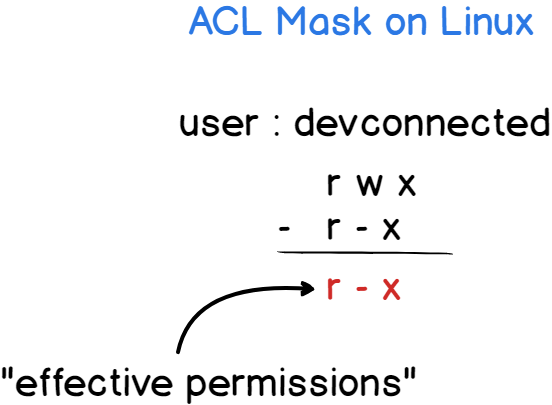
As you probably saw from the last screenshot, there is a mask entry between the named groups and the other permissions.
But what is this mask used for?
The ACL mask is different from the file creation mask (umask) and it is used in order to restrict existing ACL entries existing on a file or directory.
The ACL mask is used as the maximum set of ACL permissions regardless of existing permissions that exceed the ACL mask.
As always, a diagram speaks a hundred words.
The ACL mask is updated every time you run a setfacl command unless you specify that you don’t want to update the mask with the -n flag.
To prevent the mask from being updated, run the setfacl with the following command
$ setfacl -n -m u:antoine:rwx <file, directory>
As you can see in this example, I have set the user “antoine” to have full permissions on the file.
The mask is set to restrict permissions to read and write permissions.
As a consequence, the “effective permissions” set on this file for this user are read and write ones, the execute permission is not granted.
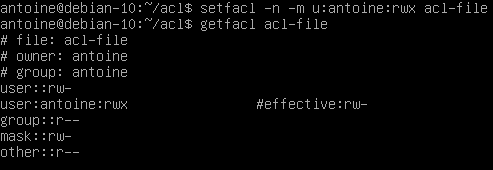
Note: If your maximum set of permissions differs from the mask entry, you will be presented with an effective line computing the “real” set of ACL entries used.
Creating access control lists defaults on directories
As already mentioned in this article, it is possible to create ACL entries on directories and they work in the same way file access control lists work.
However, there is a small difference when it comes to directories: you have to option to create access control lists defaults.
Access control lists defaults are used to create ACL entries on a directory that will be inherited by objects in this directory like files or subdirectories.
When creating default ACL entries :
- Files created in this directory inherit the ACL entries specified in the parent directory
- Subdirectories created in this directory inherit the ACL entries as well as the default ACL entries from the parent directory.
To create default ACL entries, specify the -d option when setting ACL using the setfacl command.
$ setfacl -d -m {u, g}:<name>:[r, w, x] <directory>
For example, to assign read permissions to all files created in a directory, you would run the following command
$ setfacl -d -m u::r directory
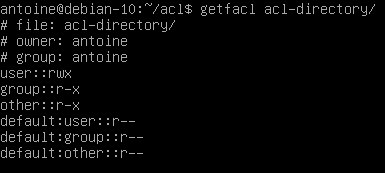
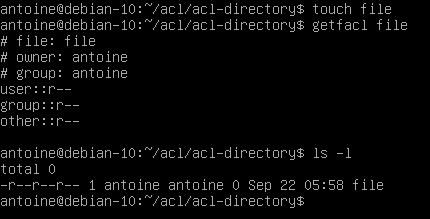
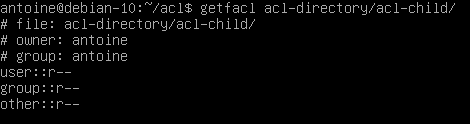
Now, when a file is created in this acl-directory, you can see that default ACL entries are applied to the file.
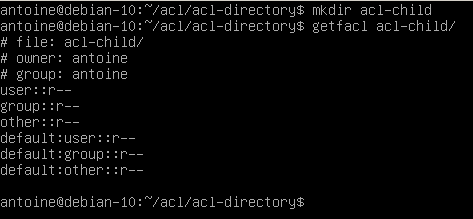
Similarly, when a directory is created in the acl-directory, it will inherit default ACL entries specified in the parent directory.
Note that it is recommended to specify default permissions for all three categories (user, group, and other).
In fact, specifying one of the three entries will create the remaining two with permissions related to the file creation mask.
Deleting default access control lists on directories
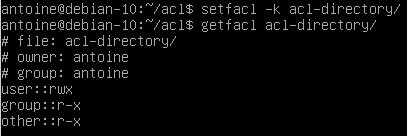
In order to delete default existing access control lists on directories, use the -k flag with the setfacl command.
$ setfacl -k <directory>
Given the example we specified earlier, here is how to delete default entries
$ setfacl -k acl-directory
Note that deleting ACL entries from the parent directory does not delete ACL entries in files or directories contained in the parent directory.
To remove default ACL entries in a directory and all subdirectories, you would have to use a recursive option (-R)
$ setfacl -kR <directory>
Conclusion
In this tutorial, you learned about access control lists on Linux, the getfacl, and the setfacl command.
You also discovered more about the access control lists mask and how default ACL is used in order to create ACL entries on files and subdirectories contained in the parent directory.
If you are curious about Linux system administration, we have many more tutorials on the subject, make sure to read them!