LVM Snapshots Backup and Restore on Linux

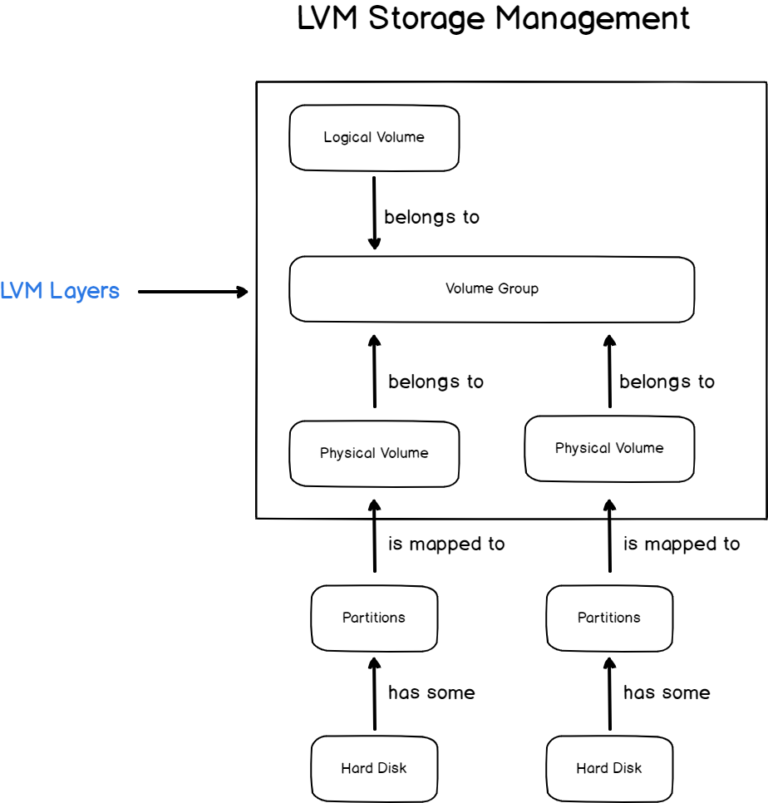
In our previous tutorials, we have seen that implementing LVM volumes can be very beneficial in order to manage space on your host.

The Logical Volume Management layer exposes an API that can be used in order to add or remove space at will, while your system is running.

However, there is another key feature exposed by LVM that can be very beneficial to system administrators : LVM snapshots.

In computer science, snapshots are used to describe the state of a system at one particular point in time.

In this tutorial, we are going to see how you can implement LVM snapshots easily.

We are also going to see how you can backup an entire filesystem using snapshots and restore it at will.

Prerequisites

In order to create LVM snapshots, you obviously need to have at least a logical volume created on your system.

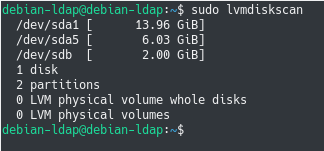
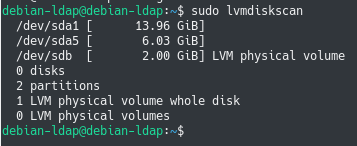
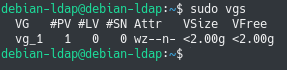
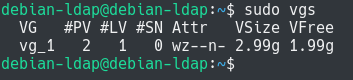
If you are not sure if this is the case or not, you can run the “lvs” command in order to display existing logical volumes.

$ lvs

LVM Snapshots Backup and Restore on Linux lvs

In this situation, we have a 3 GB logical volume created on our system.

However, having a 3 GB logical volume does not necessarily mean that the entire space is used on our system.

To check the actual size of your logical volume, you can check your used disk space using the “df” command.

$ df -h
Note : your logical volume needs to be mounted in order for you to check the space used..

If you are not sure about mounting logical volumes or partitions, check our tutorial on mounting filesystems.

LVM Snapshots Backup and Restore on Linux df-2

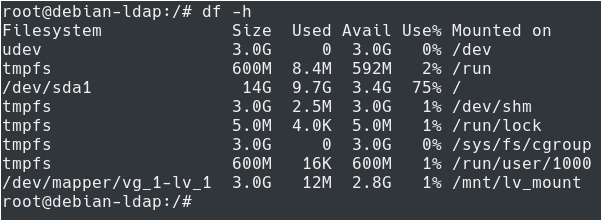
As you can see here, the logical volume has a 3 GB capacity, yet only 3.1 MB are used on the filesystem.

As an example, let’s say that we want to backup the /etc folder of our server.

$ cp -R /etc /mnt/lv_mount

Now that our configuration folder is copied to our logical volume, let’s see how we can creating a LVM snapshot of this filesystem.

Creating LVM Snapshots using lvcreate

In order to create a LVM snapshot of a logical volume, you have to execute the “lvcreate” command with the “-s” option for “snapshot”, the “-L” option with the size and the name of the logical volume.

Optionally, you can specify a name for your snapshot with the “-n” option.

$ lvcreate -s -n <snapshot_name> -L <size> <logical_volume>

Creating LVM Snapshots using lvcreate snapshot

Note : you won’t be able to create snapshot names having “snapshot” in the name as it is a reserved keyword.

You will also have to make sure that you have enough remaining space in the volume group as the snapshot will be created in the same volume group by default.

Now that your snapshot is created, you can inspect it by running the “lvs” command or the “lvdisplay” command directly.

$ lvs

$ lvdisplay <snapshot_name>

Creating LVM Snapshots using lvcreate lvs-2

As you can see, the logical volume has a set of different attributes compared to the original logical volume :

  • s : for snapshot, “o” meaning origin for the original logical volume copied to the snapshot;
  • : for writeable meaning that your snapshot has read and write permissions on it;
  • i : for “inherited”;
  • a : for “allocated”, meaning that actual space is dedicated to this logical volume;
  • o : (in the sixth field) meaning “open” stating that the logical volume is mounted;
  • s : snapshot target type for both logical volumes

Now that your snapshot logical volume is created, you will have to mount it in order to perform a backup of the filesystem.

Mounting LVM snapshot using mount

In order to mount a LVM snapshot, you have to use the “mount” command, specify the full path to the logical volume and specify the mount point to be used.

$ mount <snapshot_path> <mount_point>

As an example, let’s say that we want to mount the “/dev/vg_1/lvol0” to the “/mnt/lv_snapshot” mount point on our system.

To achieve that, we would run the following command :

$ mount /dev/vg_1/lvol0 /mnt/snapshot

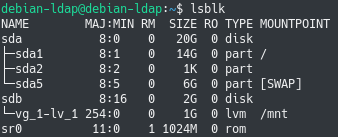
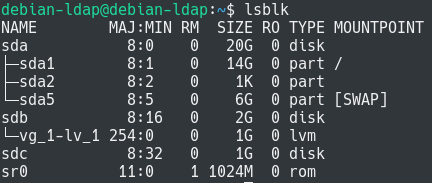
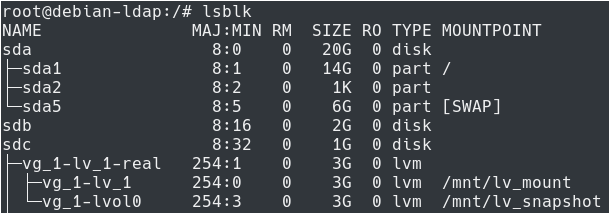
You can immediately verify that the mounting operating is effective by running the “lsblk” command again.

$ lsblk

Mounting LVM snapshot using mount lsblk

Backing up LVM Snapshots

Now that your snapshot is mounted, you will be able to perform a backup of it using either the tar or the rsync commands.

When performing backups, you essentially have two options : you can perform a local copy, or you can choose to transfer archives directly to a remote backup server.

Creating a local LVM snapshot backup

The easiest way to backup a LVM snapshot is to use the “tar” command with the “-c” option for “create”, the “z” option in order to create a gzip file and “-f” to specify a destination file.

$ tar -cvzf backup.tar.gz <snapshot_mount>

In our case, as the snapshot is mounted on the “/mnt/lv_snapshot” mountpoint, the backup command would be :

$ tar -cvzf backup.tar.gz /mnt/lv_snapshot

When running this command, a backup will be created in your current working directory.

Creating and transferring a LVM snapshot backup

In some cases, you own a backup server that can be used in order to store LVM backups on a regular basis.

To create such backups, you are going to use the “rsync” command, specify the filesystem to be backed up as well as the destination server to be used.

# If rsync is not installed already, you will have to install using apt
$ sudo apt-get install rsync

$ rsync -aPh <snapshot_mount> <remote_user>@<destination_server>:<remote_destination>
Note : if you are not sure about file transfers on Linux, you should check the tutorial we wrote on the subject.

As an example, let’s say that the snapshot is mounted on the “/mnt/lv_snapshot” and that we want to send the snapshot to the backup server sitting on the “192.168.178.33” IP address.

To connect to the remote backup server, we use the “kubuntu” account and we choose to have files stored in the “/backups” folder.

$ rsync -aPh /mnt/lv_snapshot kubuntu@192.168.178.33:/backups

Now that your logical volume snapshot is backed up, you will be able to restore it easily on demand.

Creating and transferring a LVM snapshot backup

Restoring LVM Snapshots

Now that your LVM is backed up, you will be able to restore it on your local system.

In order to restore a LVM logical volume, you have to use the “lvconvert” command with the “–mergesnapshot” option and specify the name of the logical volume snapshot.

When using the “–mergesnapshot”, the snapshot is merged into the original logical volume and is deleted right after it.

$ lvconvert --mergesnapshot <snapshot_logical_volume>

In our case, the logical volume snapshot was named lvol0, so we would run the following command

$ lvconvert --mergesnapshot vg_1/lvol0

Restoring LVM Snapshots lvconvert

As you probably noticed, both devices (the original and the snapshot can’t be open for the merge operation to succeed.

Alternatively, you can refresh the logical volume for it to reactivate using the latest metadata using “lvchange”

$ lvchange --refresh vg_1/lv_1

After the merging operation has succeeded, you can verify that your logical volume was successfully removed from the list of logical volumes available.

$ lvs

Restoring LVM Snapshots lvs-3

Done!

The logical volume snapshot is now removed and the changes were merged back to the original logical volume.

Conclusion

In this tutorial, you learnt about LVM snapshots, what they are and how they can be used in order to backup and restore filesystems.

Creating backups on a regular basis is essential, especially when you are working in a medium to large company.

Having backups and being able to restore them easily is the best way to make sure that you will be able to prevent major data loss on your systems.

If you are interested in Linux System Administration, we have a complete section dedicated to it on the website, so make sure to check it out!

Bash If Else Syntax With Examples

When working with Bash and shell scripting, you might need to use conditions in your script.

In programming, conditions are crucial : they are used to assert whether some conditions are true or not.

In this tutorial, we are going to focus on one of the conditional statement of the Bash language : the Bash if else statement.

We are going to see how you can use this statement to execute your scripts conditionally.

You will also learnt how you can use nested Bash if else statements to create more complex code.

Bash If Else Statement

In order to execute a Bash “if else” statement, you have to use four different keywords : if, then, else and fi :

  • if : represents the condition that you want to check;
  • then : if the previous condition is true, then execute a specific command;
  • else : if the previous condition is false, then execute another command;
  • fi : closes the “if, then, else” statement.

When using the “if else” statement, you will need to enclose conditions in single or double squared brackets.

if [[ condition ]]
then
  <execute command>
else
  <execute another command>
fi

Note that the “ELSE” statement is optional, if you omit it, nothing will be executed if the condition evaluates to false.

Note : you need to separate the condition from the squared brackets with a space, otherwise you might get a syntax error.

If Else Examples

Now that you know more about the Bash “if else” statement, let’s see how you can use it in real world examples.

In this section, we are going to build a script that prints a message if it is executed by the root user.

If the script is not executed by the root user, it is going to write another custom message.

In order to check whether the script is executed by root, we need to see if the UID of the caller is zero.

#!/bin/bash

# If the user is root, its UID is zero.

if [ $UID  -eq  0 ]
then
  echo "You are root!"
else
  echo "You are not root."
fi

If Else Examples bash-else-if

As stated earlier, the “else” statement is not mandatory.

If we omit in our script created earlier, we would still be able to execute the first “then” statement.

#!/bin/bash

# If the user is root, its UID is zero.

if [ $UID  -eq  0 ]
then
  echo "You are root!"
fi

If Else Examples bash-else-if-2

Now, what if you want to add additional “if” statements to your scripts?

Bash If Elif Statement

The “If Elif” statement is used in Bash in order to add an additional “if” statements to your scripts.

In order to execute a Bash “if elif” statement, you have to use five different keywords : if, then, elif, else and fi :

  • if : represents the condition that you want to check;
  • then : if the previous condition is true, then execute a specific command;
  • elif : used in order to add an additional condition to your statement;
  • else: if the previous conditions are false, execute another command;
  • fi : closes the “if, elif, then” statement.
if [[ condition ]]
then
  <execute command>
elif [[ condition ]]
then
  <execute another command>
else
  <execute default command>
fi

Again, the “ELSE” statement is optional, so you may want to omit it if you do not need a default statement.

if [[ condition ]]
then
  <execute command>
elif [[ condition ]]
then
  <execute another command>
fi

If Elif Examples

In our previous section, we used the “if else” statement to check whether a user is root or not.

In this section, we are going to check if the user is root or if the user has a UID of 1002.

If this is not the case, we are going to exit the script and return the prompt to the user.

if [[ $UID  -eq  0 ]]
then
  echo "You are root!"
elif [[ $UID  -eq 1002 ]]
then
  echo "You are user, welcome!"
else
  echo "You are not welcome here."
  exit 1;
fi

If Elif Examples elif

Congratulations, now you know how to use the “if elif” statement!

Now what if you want to have multiple conditions under the same “if” statement?

Multiple Conditions in If Else

In order to have multiple conditions written in the same “if else” statement, you need to separate your conditions with an “AND” operator or a “OR” operator.

# AND operator used in if else.

if [[ <condition_1> && <condition_2> ]];
then
   <execute command>
fi

# OR operator used in if else.
if [[ <condition_1> || <condition_2> ]];
then
   <execute_command>
else
   <execute_another_command>
fi

For example, if you want to write a script that checks that you are the root user and that you provided the correct parameter, you would write :

#!/bin/bash
 
# If the user is root and the first parameter provided is 0.
if [[ $UID -eq 0 && $1 -eq 0 ]];
then
    echo "You provided the correct parameters"
else
    echo "Wrong parameters, try again"
fi

Multiple Conditions in If Else and-operator-1

Nested If Else Statements

In some cases, you want to implement nested conditions in order to have conditions checked under preliminary conditions.

In order to have nested “if else” statements, you simply have to include the “if” statement in another “if” statement and close your nested statement before the enclosing one.

if [[ condition ]]
then  
  if [[ other condition ]]
  then
    <execute command>
  else
    <execute another command>
  fi
fi
Note : make sure to have a closing “fi” statement for every “if” statement that you open. One single “fi” is simply not enough for multiple “if” statements.

Nested Statements Examples

As an example, let’s say that you want to verify that the user is root before verifying that the first argument provided is zero.

To solve that, you would write a nested “if, then, else” statement in the following way :

#!/bin/bash

if [[ $UID -eq 0 ]]
then  
  if [[ $1 -eq 0 ]]
  then
    echo "You are allowed to execute this script."
  else
    echo "You should have provided 0 as the first argument."
  fi
fi

Nested Statements Examples nested-statements

Bash Tests

As you probably noticed, in the previous sections, we used the “-eq” operator in order to compare a variable value to a number.

We did a simple equality check, but what if you want to have an inequality check?

What if you wanted to check whether a value is greater than a given number for example?

In order to perform this, you will need Bash tests.

Bash tests are a set of operators that you can use in your conditional statements in order to compare values together.

Bash tests can be listed by running the “help test” command.

$ help test

Bash Tests help-test

When writing Bash tests, you essentially have three options :

  • Write conditions on file and directories : if they exist, if they are a character file, a device file and so on;
  • Write conditions on numbers : if they are equal to each other, if one is greater than the other;
  • Write conditions on strings : if a string variable is set or if two strings are equal to each other.

Bash File Conditions

Bash file conditions are used in order to check if a file exists or not, if it can be read, modified or executed.

Bash file tests are described in the table below :

Operator Description
-e Checks if the file exists or not
-d Checks if the file is a directory
-b Checks if the file is a block device
-c Checks if the file is a character device
f1 -nt f2 If file f1 is newer than file f2
f1 -ot f2 If file f1 is older than file f2
-r File can be read (read permission)
-w File can be modified (write permission)
-x File can be executed (execute permission)

For example, to check if a file is a directory, you would write the following script

#!/bin/bash

# Checking the first argument provided
if [[ -d $1 ]]
then  
  echo "This is a directory"
else
  echo "Not a directory"
fi

Bash File Conditions directory

Bash Number Conditions

Bash number conditions are used in order to compare two numbers : if they are equal, if one is greater than another or lower than another.

Here is a table of the most used Bash number conditions :

Operator Description
num1 -eq num2 Check if numbers are equal
num1 -ne num2 Check if numbers are not equal
num1 -lt num2 Checking if num1 is lower than num2
num1 -le num2 Lower or equal than num2
num1 -gt num2 Greater than num2
num1 -ge num2 Greater or equal than num2

For example, to check if a number is not equal to zero, you would write :

#!/bin/bash

# Checking the first argument provided
if [[ $1 -eq 0 ]]
then  
  echo "You provided zero as the first argument."
else
  echo "You should provide zero."
fi

Bash String Conditions

Bash string conditions are used to check if two strings are equal or if a string if empty.

Here is a table of the main Bash string conditions :

Operator Description
str1 = str2 Checks if strings are equal or not
str1 != str2 Checks if strings are different
-z str1 Checks if str1 is empty
-n str1 Checks if str1 is not empty

For example, to check if a user provided a value to your script, you would write :

#!/bin/bash

# Checking the first argument provided
if [[ -n $1 ]]
then  
  echo "You provided a value"
else
  echo "You should provide something"
fi

Conclusion

In today’s tutorial, you learnt about the Bash “If Else” statement.

You saw, with examples, that you can build more complex statements : using elif and nested statements.

Finally, you have discovered about Bash tests, what they are and how they are used in order to check conditions in scripts.

If you are interested in Linux System Administration, we have a complete section dedicated to it on the website, so make sure to check it out!

How To Set Environment Variable in Bash

As a system administrator, you probably know how important environment variables are in Bash.

Environment variables are used to define variables that will have an impact on how programs will run.

In Bash, environment variables define many different things : your default editor, your current username or the current timezone.

Most importantly, environment variables can be used in Bash scripts in order to modify the behaviour of your scripts.

In this tutorial, we are going to see how you can easily set environment variables in Bash.

Set Environment Variables in Bash

The easiest way to set environment variables in Bash is to use the “export” keyword followed by the variable name, an equal sign and the value to be assigned to the environment variable.

For example, to assign the value “abc” to the variable “VAR“, you would write the following command

$ export VAR=abc

If you want to have spaces in your value, such as “my value” or “Linus Torvalds“, you will have to enclose your value in double quotes.

$ export VAR="my value"

$ export VAR="Linus Torvalds"

Set Environment Variables in Bash export

In order to display of your environment variable, you have to precede the variable with a dollar sign.

$ echo $VAR

Linus Torvalds

Similarly, you can use the “printenv” command in order to print the value of your environment variable.

This time, you don’t have to precede it with a dollar sign.

$ printenv VAR

Linus Torvalds

Setting variables using Bash interpolation

In some cases, you may need to set a specific environment variable to the result of a command on your server.

In order to achieve that, you will need Bash interpolation, also called parameter substitution.

Let’s say for example that you want to store the value of your current shell instance in a variable named MYSHELL.

To set an environment variable using parameter substitution, use the “export” keyword and have the command enclosed in closing parenthesis preceded by a dollar sign.

$ export VAR=$(<bash command>)

For example, given our previous example, if you want to have the “SHELL” environment variable in a new variable named “MYSHELL”, you would write

$ export MYSHELL=$(echo $SHELL)

Setting variables using Bash interpolation parameter-substitution

Congratulations, you have successfully created your first environment variable in Bash!

Setting Permanent Environment Variables in Bash

When you assign a value to a variable using “export” in a shell, the changes are not persisted on reboots or to other shells.

In order to set a permanent environment variable in Bash, you have to use the export command and add it either to your “.bashrc” file (if this variable is only for you) or to the /etc/environment file if you want all users to have this environment variable.

$ nano /home/user/.bashrc

# Content of the .bashrc file

export VAR="My permanent variable"

Setting Permanent Environment Variables in Bash

For the changes to be applied to your current session, you will have to source your .bashrc file.

$ source .bashrc

Now, you can check the value of your environment variable in every shell that you want.

$ printenv VAR

Setting Permanent Environment Variables in Bash printenv

This variable will be created on every shell instance for the current user.

However, if you add it to the “/etc/environment” file, the environment variable will be set for all the users on your system.

$ nano /etc/environment

# Content of the environment file

export GLOBAL="This is a global variable"

Setting Permanent Environment Variables in Bash global

After sourcing the file, the environment variables will be set for every user on your host.

$ source /etc/environment

$ echo $GLOBAL

global-2

Awesome, you have successfully set a global environment variable on your server!

Conclusion

In this tutorial, you learnt how you can easily set environment variables in Bash using the export command.

You also learnt that changes are not made permanent until you add them to your :

  • .bashrc : if you want the variable to be only for the current user logged-in;
  • /etc/environment : if you want the variable to be shared by all the users on the system.

If you are interested in Linux System Administration, or in Bash, we have a complete section dedicated to it on the website, so make sure to check it out!

How To Chown Recursively on Linux

Chown is a command on Linux that is used in order to change the owner of a set of files or directories.

Chown comes with multiple options and it is often used to change the group owning the file.

However, in some cases, you may need to change the owner of a directory with all the files in it.

For that, you may need to use one of the options of the chown command : recursive chown.

In this tutorial, you are going to learn how you can recursively use the chown command to change folders and files permissions recursively.

Chown Recursively

The easiest way to use the chown recursive command is to execute “chown” with the “-R” option for recursive and specify the new owner and the folders that you want to change.

$ chown -R <owner> <folder_1> <folder_2> ... <folder_n>

For example, if you want to change the owner of directories and files contained in the home directory of a specific user, you would write

$ chown -R user /home/user

Chown Recursively chown-recursive

Note : if you need a complete guide on the chown command, we wrote an extensive one about file permissions on Linux.

Chown User and Group Recursively

In order to change the user and the group owning the directories and files, you have to execute “chown” with the “-R” option and specify the user and the group separated by colons.

$ chown -R <user>:<group> <folder_1> <folder_2> ... <folder_n>

For example, let’s say that you want to change the user owning the files to “user” and the group owning the files to “root”.

In order to achieve that, you would run the following command

$ chown -R user:root /home/user

Chown User and Group Recursively chown-recursive-group

Congratulations, you successfully use the “chown” command recursively to change owners on your server!

Chown recursively using find

Another way of using the “chown” command recursively is to combine it with the “find” command in find files matching a given pattern and changing their owners and groups.

$ find <path> -name <pattern> -exec chown <user>:<group> {} \;

For example, let’s say that you want to change the owner for all the TXT files that are present inside a given directory on your server.

First of all, it is very recommended to execute the “find” command alone in order to verify that you are matching the correct files.

In this example, we are going to match all the TXT files in the home directory of the current user.

$ find /home/user -name *.txt

Chown recursively using find

Now that you made sure that you are targeting the correct files, you can bind it with the “chown” in order to recursively change permissions.

$ find /home/user -name *.txt -exec chown user {} \;

Chown recursively using find-chown

As you can see, the owner of the TXT files were changed, yet none of the other files and directories were altered.

Being careful with recursive chown

On Linux, executing commands such as chown, chmod or rm is definitive : there is no going back.

As a consequence, you will have to be very careful not to execute any commands that will harm your system.

This point is illustrated in the previous section : we run the find command alone and we made sure it was the correct result.

Then, we executed the chown command in order to recursively change files permissions from the previous command.

As a rule of thumb : if you are not sure of the output of a command, divide it into smaller pieces until you are sure that you won’t execute anything harmful.

Conclusion

In this tutorial, you learnt how you can execute the chown command recursively on your system.

You learnt that you can achieve it using the “-R” option or by combining it with the find command.

Linux Permissions are a wide topic : we really encourage you to have a look at our complete guide on Linux Permissions if you want to learn more.

Also, if you are interested in Linux System Administration, we have a complete section dedicated to it on the website, so make sure to check it out!

How To Search LDAP using ldapsearch (With Examples)

If you are working in a medium to large company, you are probably interacting on a daily basis with LDAP.

Whether this is on a Windows domain controller, or on a Linux OpenLDAP server, the LDAP protocol is very useful to centralize authentication.

However, as your LDAP directory grows, you might get lost in all the entries that you may have to manage.

Luckily, there is a command that will help you search for entries in a LDAP directory tree : ldapsearch.

In this tutorial, we are going to see how you can easily search LDAP using ldapsearch.

We are also going to review the options provided by the command in order to perform advanced LDAP searches.

Search LDAP using ldapsearch

The easiest way to search LDAP is to use ldapsearch with the “-x” option for simple authentication and specify the search base with “-b”.

If you are not running the search directly on the LDAP server, you will have to specify the host with the “-H” option.

$ ldapsearch -x -b <search_base> -H <ldap_host>

As an example, let’s say that you have an OpenLDAP server installed and running on the 192.168.178.29 host of your network.

If your server is accepting anonymous authentication, you will be able to perform a LDAP search query without binding to the admin account.

$ ldapsearch -x -b "dc=devconnected,dc=com" -H ldap://192.168.178.29

Search LDAP using ldapsearch ldapsearch

As you can see, if you don’t specify any filters, the LDAP client will assume that you want to run a search on all object classes of your directory tree.

As a consequence, you will be presented with a lot of information. If you want to restrict the information presented, we are going to explain LDAP filters in the next chapter.

Search LDAP with admin account

In some cases, you may want to run LDAP queries as the admin account in order to have additionnal information presented to you.

To achieve that, you will need to make a bind request using the administrator account of the LDAP tree.

To search LDAP using the admin account, you have to execute the “ldapsearch” query with the “-D” option for the bind DN and the “-W” in order to be prompted for the password.

$ ldapsearch -x -b <search_base> -H <ldap_host> -D <bind_dn> -W

As an example, let’s say that your administrator account has the following distinguished name : “cn=admin,dc=devconnected,dc=com“.

In order to perform a LDAP search as this account, you would have to run the following query

$ ldapsearch -x -b "dc=devconnected,dc=com" -H ldap://192.168.178.29 -D "cn=admin,dc=devconnected,dc=com" -W

Search LDAP with search-admin-account

When running a LDAP search as the administrator account, you may be exposed to user encrypted passwords, so make sure that you run your query privately.

Running LDAP Searches with Filters

Running a plain LDAP search query without any filters is likely to be a waste of time and resource.

Most of the time, you want to run a LDAP search query in order to find specific objects in your LDAP directory tree.

In order to search for a LDAP entry with filters, you can append your filter at the end of the ldapsearch command : on the left you specify the object type and on the right the object value.

Optionally, you can specify the attributes to be returned from the object (the username, the user password etc.)

$ ldapsearch <previous_options> "(object_type)=(object_value)" <optional_attributes>

Finding all objects in the directory tree

In order to return all objects available in your LDAP tree, you can append the “objectclass” filter and a wildcard character “*” to specify that you want to return all objects.

$ ldapsearch -x -b <search_base> -H <ldap_host> -D <bind_dn> -W "objectclass=*"

When executing this query, you will be presented with all objects and all attributes available in the tree.

Finding user accounts using ldapsearch

For example, let’s say that you want to find all user accounts on the LDAP directory tree.

By default, user accounts will most likely have the “account” structural object class, which can be used to narrow down all user accounts.

$ ldapsearch -x -b <search_base> -H <ldap_host> -D <bind_dn> -W "objectclass=account"

By default, the query will return all attributes available for the given object class.

Finding user accounts using ldapsearch search-user

As specified in the previous section, you can append optional attributes to your query if you want to narrow down your search.

For example, if you are interested only in the user CN, UID, and home directory, you would run the following LDAP search

$ ldapsearch -x -b <search_base> -H <ldap_host> -D <bind_dn> -W "objectclass=account" cn uid homeDirectory

Finding user accounts using ldapsearch attributes

Awesome, you have successfully performed a LDAP search using filters and attribute selectors!

AND Operator using ldapsearch

In order to have multiple filters separated by “AND” operators, you have to enclose all the conditions between brackets and have a “&” character written at the beginning of the query.

$ ldapsearch <previous_options> "(&(<condition_1>)(<condition_2>)...)"

For example, let’s say that you want to find all entries have a “objectclass” that is equal to “account” and a “uid” that is equal to “john”, you would run the following query

$ ldapsearch <previous_options> "(&(objectclass=account)(uid=john))"

AND Operator using ldapsearch and-operator

OR Operator using ldapsearch

In order to have multiple filters separated by “OR” operators, you have to enclose all the conditions between brackets and have a “|” character written at the beginning of the query.

$ ldapsearch <previous_options> "(|(<condition_1>)(<condition_2>)...)"

For example, if you want to find all entries having a object class of type “account” or or type “organizationalRole”, you would run the following query

$ ldapsearch <previous_options> "(|(objectclass=account)(objectclass=organizationalRole))"

Negation Filters using ldapsearch

In some cases, you want to negatively match some of the entries in your LDAP directory tree.

In order to have a negative match filter, you have to enclose your condition(s) with a “!” character and have conditions separated by enclosing parenthesis.

$ ldapsearch <previous_options> "(!(<condition_1>)(<condition_2>)...)"

For example, if you want to match all entries NOT having a “cn” attribute of value “john”, you would write the following query

$ ldapsearch <previous_options> "(!(cn=john))"

Finding LDAP server configuration using ldapsearch

One advanced usage of the ldapsearch command is to retrieve the configuration of your LDAP tree.

If you are familiar with OpenLDAP, you know that there is a global configuration object sitting at the top of your LDAP hierarchy.

In some cases, you may want to see attributes of your LDAP configuration, in order to modify access control or to modify the root admin password for example.

To search for the LDAP configuration, use the “ldapsearch” command and specify “cn=config” as the search base for your LDAP tree.

To run this search, you have to use the “-Y” option and specify “EXTERNAL” as the authentication mechanism.

$ ldapsearch -Y EXTERNAL -H ldapi:/// -b cn=config
Note : this command has to be run on the server directly, not from one of your LDAP clients.

Finding LDAP server configuration using ldapsearch config

By default, this command will return a lot of results as it returns backends, schemas and modules.

If you want to restrict your search to database configurations, you can specify the “olcDatabaseConfig” object class with ldapsearch.

$ ldapsearch -Y EXTERNAL -H ldapi:/// -b cn=config "(objectclass=olcDatabaseConfig)"

Using Wildcards in LDAP searches

Another powerful way of searching through a list of LDAP entries is to use wildcards characters such as the asterisk (“*”).

The wildcard character has the same function as the asterisk you use in regex : it will be used to match any attribute starting or ending with a given substring.

$ ldapsearch <previous_options> "(object_type)=*(object_value)"

$ ldapsearch <previous_options> "(object_type)=(object_value)*"

As an example, let’s say that you want to find all entries having an attribute “uid” starting with the letter “j”.

$ ldapsearch <previous_options> "uid=jo*"

Using Wildcards in LDAP searches wildcards

Ldapsearch Advanced Options

In this tutorial, you learnt about basic ldapsearch options but there are many others that may be interested to you.

LDAP Extensible Match Filters

Extensible LDAP match filters are used to supercharge existing operators (for example the equality operator) by specifying the type of comparison that you want to perform.

Supercharging default operators

To supercharge a LDAP operator, you have to use the “:=” syntax.

$ ldapsearch <previous_options> "<object_type>:=<object_value>"

For example, if you want to search for all entries have a “cn” that is equal to “john,” you would run the following command

$ ldapsearch <previous_options> "cn:=john"

# Which is equivalent to

$ ldapsearch <previous_options> "cn=john"

As you probably noticed, running the search on “john” or on “JOHN” returns the same exact result.

As a consequence, you may want to constraint the results to the “john” exact match, making the search case sensitive.

Using ldapsearch, you can add additional filters separated by “:” characters.

$ ldapsearch <previous_options> "<object_type>:<op1>:<op2>:=<object_value>"

For example, in order to have a search which is case sensitive, you would run the following command

$ ldapsearch <previous_options> "cn:caseExactMatch:=john"

If you are not familiar with LDAP match filters, here is a list of all the operators available to you.

Conclusion

In this tutorial, you learnt how you can search a LDAP directory tree using the ldapsearch command.

You have seen the basics of searching basic entries and attributes as well as building complex matching filters with operators (and, or and negative operators).

You also learnt that it is possible to supercharge existing operators by using extensible match options and specifying the custom operator to be used.

If you are interested in Advanced Linux System Administration, we have a complete section dedicated to it on the website, so make sure to check it out!

How To Zip Folder on Linux

From all the compression methods available, Zip is probably one of the most popular ones.

Released in 1989 by Philip Katz, Zip is widely used by system administrators in order to reduce the size of bulky files and directories on your system.

Nowadays, Zip is available on all operating systems on the market : whether it is Windows, Linux or MacOS.

With zip, you can easily transfer files between operating systems and save space on your disks.

In this tutorial, we are going to see how you can easily zip folders and directories on Linux using the zip command.

Zip Folder using zip

The easiest way to zip a folder on Linux is to use the “zip” command with the “-r” option and specify the file of your archive as well as the folders to be added to your zip file.

You can also specify multiple folders if you want to have multiple directories compressed in your zip file.

$ zip -r <output_file> <folder_1> <folder_2> ... <folder_n>

For example, let’s say that you want to archive a folder named “Documents” in a zip file named “temp.zip”.

In order to achieve that, you would run the following command

$ zip -r temp.zip Documents

In order to check if your zip file was created, you can run the “ls” command and look for your archive file.

$ ls -l | grep .zip

Alternatively, if you are not sure where you stored your zip files before, you can search for files using the find command

$ find / -name *.zip 2> /dev/null

Zip Folder using find

Another great way of creating a zip file for your folders is to use the “find” command on Linux. You have to link it to the “exec” option in order to execute the “zip” command that creates an archive.

If you want to zip folders in the current working directory, you would run the following command

$ find . -maxdepth 1 -type d -exec zip archive.zip {} +

Zip Folder using find create-zip

Using this technique is quite useful : you can choose to archive folders recursively or to have only a certain level of folders zipped in your archive.

Zip Folder using Desktop Interface

If you are using GNOME or KDE, there’s also an option for you to zip your folders easily.

Compress Folders using KDE Dolphin

If you are using the KDE Graphical Interface, you will be able to navigate your folders using the Dolphin File Manager.

In order to open Dolphin, click on your the “Application Launcher” button at the bottom left of your screen and type “Dolphin“.

Compress Folders using KDE Dolphin dolphin

Click on the “Dolphin – File Manager” option.

Now that Dolphin is open, select the folders to be zipped by holding the “Control” key and left-clicking on the folders to be compressed together.
Compress Folders using KDE Dolphin step-1

Now that folders are selected, right-click wherever you want and select the “Compress” option.

When hovering your mouse cursor over the “Compress” option and select the “Here (as ZIP)” option in the menu.

If you want to zip folders in another location, you will have to select the “Compress to” option, specify the location and the compression mode (as ZIP).

Zip Folder using Desktop Interface compress-zip-1

After a quick time, depending on the size of your archive, your zip should be created with all the folders you have selected in it.

Compress Folders using KDE Dolphin created

Congratulations, you successfully created a zip for your folders on Linux!

Compress Folders on GNOME

If you are using GNOME, on Debian 10 or on CentOS 8 for example, you will also be able to compress your files directly from the user interface.

Select the “Applications” menu at the top left corner of your Desktop, and search for “Files

Compress Folders on GNOME gnome

Select the “Files” option : your file explorer should start automatically.

Now that you are in your file explorer, select multiple folders by holding the “Control” key and left-clicking on all the folders to be zipped.

When you are done, right-click and select the “Compress” option.

Compress Folders on GNOME compress

Now that the “Compress” option is selected, a popup window should appear asking for the filename of your zip as well as the extension to be used.

Compress Folders on GNOME archive

When you are done, simply click the “Create” option for your zip file to be created.

Compress Folders on GNOME archive2

That’s it!

Your folders should now be zipped in an archive file : you can start sending the archive or extracting the files that are contained in it.

Zipping Directories using Bash

In some cases, you may not have a graphical interface directly installed on your server.

As a consequence, you may want to zip folders directly from the command-line, using the Bash programming language.

If you are not sure about Bash, here’s a Bash beginners guide and another one for more advanced Bash scripting.

In order to zip folders using Bash, use the “for” loop and iterate over the directories of the current working directory

$ for file in $(ls -d */); do zip archive.zip $file; done

Zipping Directories using Bash for-files

Using bash, you can actually get specific when it comes to the folders to be zipped.

For example, if you want to zip folders beginning with the letter D, you can write the following command

$ for file in $(ls -d */ | grep D); do zip archive.zip $file; done

Zipping Directories using Bash list-directories-2

Congratulations, you successfully created a zip for your folders in the current working directory!

Conclusion

In this tutorial, you learnt how you can easily create zip files for your folders on Linux.

You learnt that it is either possible to do it using the command-line and commands such as zip, find or the Bash programming language.

If you are using a graphical interface (such as KDE or GNOME), you can also zip folders by navigating the file explorer and right-clicking on the folders you are interested in.

If you are interested in Linux System Administration and quick tips, we have a complete section dedicated to it on the website, so make sure to check it out!

Logical Volume Management Explained on Linux

On Linux, it can be quite hard to manage storage and filesystems and it often needs a lot of different commands to move data.

Traditional storage is usually made of three different layers : the physical disk (whether it is a HDD or a SSD), the logical partitions created on it and the filesystem formatted on the partition.

However, those three layers are usually tighly coupled : it can be quite hard to shrink existing partitions to create a new one.

Similarly, it is quite hard to extend a filesystem if you add a new disk to your system : you would have to move data from one disk to another, sometimes leading to data loss.

Luckily for you, there is a tool, or an abstraction that you can use on Linux to manage storages : LVM.

LVM, short for Logical Volume Management, comes as a set of tools that allows you to extend, shrink existing volumes as well as replacing existing disks while the system is running.

In this tutorial, we are going to learn about LVM and how you can easily implement them on your system.

LVM Layers Explained

Before starting, it is important that you can get a strong understanding of how LVM are designed on your system.

If you have been dealing with regular storage devices before, you already know the relationship between disks and filesystems.

LVM Layers Explained regular-storage-management

On Linux, you have physical disks that automatically detected and managed by udev when first inserted.

On those disks, you can create partitions using one of the popular utilities available (fdisk, parted or gparted).

Finally, you format filesystems on those partitions in order to store your files.

Using LVM, the storage design is a bit different.
LVM Layers Explained lvm-layers

Between partitions and filesystems, you have three additional layers : physical volumes, volume groups and logical volumes.

Physical Volume

When using LVM, physical volumes are meant to represent partitions already existing on your hard drives.

When system administrators refer to “physical volumes”, they often mean the actual physical device storing data on our system.

Physical volumes are named in the same way than physical partitions : /dev/sda1 for the first partition of your first hard drive, /dev/sdb1 for the first partition of your second drive and so on.

Volume Group

Right over physical volumes, volumes group can be seen as multiple physical volumes grouped together to form one single volume.

Metaphorically, volume groups can be seen as storage buckets : they are a pool of different physical volumes that can be used to extend existing logical volumes or to create new ones.

Volume groups have no name convention, however it is common accepted that they are preceded with the “vg” prefix (“vg-storage“, “vg-drives” for example)

Logical Volumes

Finally, logical volumes are meant to be direct links between the volume groups and the filesystems formatted on your devices.

They have a one-to-one relationship with filesystems and they essentially represent a partition of your volume group.

Even if logical volumes are named in the same way mount points are, they are two different concepts and the logical volume is a very different entity from your filesystem.

Note : expanding your logical volume does not mean that you will automatically expand your filesystem for example.

Advantages of LVM over standard disk management

Logical Volume Management was built in the first place to fix most of the shortcomings associated with regular disk management on Linux.

One major advantage of LVM is the fact that you are able to reassemble your space while your system is running.

Modifying storage live

As you probably noticed in the past, your storage on a host is tightly coupled to the partitions written on your disks.

As a consequence, reformatting a partition or reassembling a filesystem over another partition forced any system administrator to restart the system.

This is mainly due to the fact that the Kernel cannot read the partition table live and it needs a full reboot in order to be able to probe the different partitions of your system.

This can obviously be a major issue if you are dealing with a production server : if your website is running on this server, you won’t be able to restart it without the website being down.

Advantages of LVM over standard disk management lvm-layers

If your website is down, it means that you probably won’t be able to serve your customer needs, leading to a money loss.

LVM solves this issue by building an abstraction layer on top of regular partitions : if you are not dealing with regular partitions, you don’t need to re-read the partition table anymore, you just need to update your device mapping.

With this design choice, storage management becomes a software-to-software problematic and it is not tied to hardware anymore, at least not directly.

Spreading space over multiple disks

Another great aspect of LVM is the fact that you can easily spread data over multiple disks.

If you look at the diagram shown before, you will see that there is a strong coupling between filesystems and partitions : as a consequence, it is quite hard to have data stored over multiple disks.

LVM comes as a great solution for this problem : your logical volumes belong to a central volume group.

Even if the volume group is made of multiple disks, you don’t have to manage them by yourself, the device mapper does it for you.

This is true for expanding filesystems but also for shrinking them as well as transferring data from one physical device to another.

Managing LVM Physical Volumes

In this section, we are going to use commands in order to display, create or remove physical volumes on your system.

Display existing physical volumes

In order to display existing storage devices on Linux, you have to use the “lvmdiskscan” command.

$ sudo lvmdiskscan
Note : if LVM utilities are not installed on your host, having a “command not found” error for example, you have to install LVM programs by running “apt-get install lvm2” as root.

Display existing physical volumes lvmdiskscan

When running the “lvmdiskscan”, you are presented with the different disks available on your host.

On those disks, you also see partitions if they are already created on those disks.

Finally, probably the most important information, you see how many LVM physical volumes are created on your system.

Note : this is an important point of LVM flexibility : you can create physical volumes out of whole disks or partitions of those disks.

In this case, we are starting with a brand new server with no LVM physical volumes created.

To display existing physical volumes existing on your host, you can also use the “pvs” command.

$ pvs

Create new physical volumes

Creating new physical volumes on Linux is pretty straightforward : you have to execute the “pvcreate” and specify the underlying physical devices to be created.

$ pvcreate <device_1> <device_2> ... <device_n>

In our case, let’s say that we want to create a physical volume for the second disk plugged on our host, which is “sdb”.

$ pvcreate /dev/sdb
Note : you won’t be able to create physical volumes out of devices that are already mounted on your system. As a consequence, “sda1” (that usually stores the root partition) can not be easily transitioned to LVM.

Create new physical volumes pvcreate

Running the “lvmdiskscan” command again shows a very different output compared to the first section.

$ lvmdiskscan

lvmdiskscan3

As you can see, our host automatically detects that one whole disk is formatted as a LVM physical volume and that it is ready to be added to a volume group.

Similarly, the “pvs” command has now a different output : our new disk has been added to the list of physical volumes available on our host.

$ pvs

Create new physical volumes pvs

Now that you have successfully created your first volume group, it is time to create your first volume group.

Managing LVM Volume Groups

Unless your system was preconfigured with LVM volumes, you should not have any volume groups created on your system.

To list existing volume groups on your host, you have to use the “vgs” command with no arguments.

$ vgs

Create Volume Group using vgcreate

The easiest way to create a volume group is to use the “vgcreate”, to specify the name of the volume group to be created and the physical volumes to be included in it.

$ vgcreate <volume_name> <physical_volume_1> <physical_volume_2> ... <physical_volume_n>

In our case, we only have one physical volume on our host (which is /dev/sdb) that is going to be used in order to create the “vg_1” volume group.

$ vgcreate vg_1 /dev/sdb

Create Volume Group using vgcreate

List and Display Existing Volume Groups

Listing the existing volume groups on your system using “vgs” should now display the “vg_1” volume group you just created.

$ vgs

List and Display Existing Volume Groups vgs

With no arguments, you are presented with seven different columns :

  • VG : describing the volume group name on the host;
  • #PV : displaying the number of physical volumes available in the volume group;
  • #LV : similarly, the number of logical volumes created out of the volume group;
  • #SN : number of snapshots created out of the logical volumes;
  • Attr : describing the attributes of the volume group (w for writable, z for resizable and n for “normal”);
  • VSize : the volume size in GBs of the volume group;
  • VFree : the space available on the volume group

If you want to get more information on your existing volume groups, you can use the “vgdisplay” command.

$ vgdisplay

$ vgdisplay <volume_group>

List and Display Existing Volume Groups vgdisplay

As you probably noticed, “vgdisplay” displays way more information than the simple “vgs” command.

Near the end of the output, you can see two columns named “PE Size” and “Total PE” short for “Physical Extents Size” and “Total Physical Extents”.

Under the hood, LVM manages physical extents which are chunks of data very similar to the concept of block size on partitions.
List and Display Existing Volume Groups physical-extents

In this case, LVM manages for this volume group physical extents that are 4.00 MiB big and the volume group has 511 different physical extents. The computation obviously leads to a 2.00 GiB space in size (4*511 = 2.044 MiB or 2.00 GiB).

Practically, you should not have to worry about physical extents too much : LVM always makes sure that the mapping between physical extents and the logical volumes is preserved.

Now that you have created your first volume group, it is time to create your first logical volume to store data.

Managing LVM Logical Volumes

In order to create a logical volume in a volume group, you have to use the “lvcreate” command, specify the name of the logical volume and the volume group that it belongs to.

In order to specify the space to be taken, you have to use the “-L” option and specify a size (composed of a number and its unit)

$ lvcreate -L <size> <volume_group>

If you want to give your logical volume a name, you can use the “-n” option.

$ lvcreate -n <name> -L <size> <volume_group>

Managing LVM Logical Volumes lvcreate

Again, you can list your newly created logical volume by running the “lvs” command as sudo.

$ lvs

Managing LVM Logical Volumes lvs

By running the “lvs” command, you are presented with many different columns :

  • LV : displaying the name of the logical volume;
  • VG : describing the volume group your logical volume belongs to;
  • Attr : listing the attributes of your logical volume (“w” for writable, “i” for inherited and “a” for allocated);
  • LSize : self explanatory, describing the size of your logical volume in GiB;

Other columns are describing advanced usage of LVM such as setting up mirrored spaces or striped ones. For this basic tutorial, we won’t describe them and they will be described in more advanced tutorials.

When you created your logical volume, some actions were taken by the kernel without you noticing it :

  • A virtual device was created under /dev : in a folder named after your volume group name (“vg_1”), a virtual logical device was created named after the name of the logical volume (“lv_1”)
  • The virtual device is a soft-link to the “dm-0” device available in /dev : “dm-0” is a virtual device that holds a mapping between your logical volumes and your real hard disks. (/dev/sda, /dev/sdb and so on)

Formatting and Mounting LVM Logical Volumes

The last step in order for you to start using your newly created space is to format and mount your logical volumes.

In order to format a logical volume, you have to use the “mkfs” command and specify the filesystem to be used.

$ mkfs -t <filesystem_type> <logical_volume>

In our case, let’s pretend that we want to format our logical volume as an “ext4” filesystem, we would run the following command

$ mkfs -t ext4 /dev/vg_1/lv_1

Formatting and Mounting LVM Logical Volumes mkfs

Now that the logical volume is formatted, you simply have to mount it on one folder on your system.

In order to mount a LVM logical volume, you have to use the “mount” command, specify the logical volume name and the mount point to be used.

$ mount <logical_volume> <mount_point>

For the example, let’s pretend that we are going to mount the filesystem on the “/mnt” directory of the root directory.

$ mount /dev/vg_1/lv_1 /mnt

If you now run the “lsblk” command, you should be able to see that your logical volume is now mounted.

$ lsblk
Formatting and Mounting LVM Logical Volumes lsblk

Congratulations, you can now start using your newly created volume!

Expanding Existing Filesystems using LVM

As a use-case of LVM, let’s see how easy it can be to increase the size of a filesystem by adding another disk to your host. If you add another disk to your host, udev will automatically pick it and it will assign a name to it. To have the name of the disk device on your system, make sure to execute the “lsblk” command.

$ lsblk

Expanding Existing Filesystems using LVM sdc

In our case, we added a new hard disk on the SATA connector which is named “sdc”.

To add this new disk to our LVM layers, we have to configure each layer of the LVM storage stack.

First, let’s mark this new disk as a physical volume on our host with the “pvcreate” command.

$ pvcreate /dev/sdc

Physical volume "/dev/sdc" successfully created

Then, you need to add your newly created physical volume to the volume group.

To add a physical volume to an existing volume group, you need to use the “vgextend” command, specify the volume group and the physical volumes to be added.

$ vgextend vg_1 /dev/sdc

Volume group "vg_1" successfully extended

With the “vgs” command, you can verify your volume group was successfully extended.

$ vgs<

Expanding Existing Filesystems using LVM vgs2

As you can see, compared to the first section, the output slightly changed : you now have two physical volumes. Also, the space increased from 2 GiB to almost 3 GiB.

Your logical volume is not bigger yet, you will need to increase its size to take some space available in the pool.

To increase the size of your logical volume, you have to use the “lvextend”, specify the logical volume as well as the size to be taken with the “-L” option.

$ lvextend -L +1G dev/vg_1/lv_1

Expanding Existing Filesystems using LVM lvextend

As you can see, the logical volume size changed as well as the number of physical extents dedicated to your logical volume.

Increasing your logical volume does not mean that your filesystem will automatically increase to match the size of your logical volume.

To increase the size of your filesystem, you have to use the “resize2fs” command and specify the logical volume to be expanded (in this case “/dev/vg_1/lv_1”)

$ resize2fs /dev/vg_1/lv_1

You can now inspect the size of your filesystem : it has been expanded to match the size of your logical volume, congratulations!

$ df -h

Expanding Existing Filesystems using LVM df-h-1

As you probably noticed, you increased the size of your filesystem by adding another disk, yet you did not have to restart your system or to unmount any filesystems in the process.

Shrinking Existing Filesystems using LVM

Now that you have seen how you can easily expand existing filesystems, let’s see how you can shrink them in order to reduce their space.

Before shrinking any logical volume, make sure that you see have some space available on the logical volume with the “df” command.

$ df -h

Using the logical volume from the previous section, we still have nearly 2 GiB available.

As a consequence, we can remove 1GiB from the logical volume.

To reduce the size of a logical volume, you have to execute the “lvreduce” command, specify the size with the “-L” option as well as the logical volume name.

$ lvreduce -L <size> <logical_volume>

In our case, this would lead to the following command (to remove 1GiB of space available)

$ lvreduce -L 1G /dev/vg_1/lv_1

Shrinking Existing Filesystems using LVM lvreduce

Note : note that this operation is not without any risks, you might delete some of your existing data if you choose to reduce your logical volume.

Consequently, the space was allocated back to the volume group and it is now ready to be used by another logical volume on the system.

$ vgs

Shrinking Existing Filesystems using LVM vgs3

Conclusion

In this tutorial, you learnt about LVM, short for Logical Volume Management, and how it is used in order to easily configure adaptable space on your host.

You learnt what physical volumesvolume groups and logical volumes are and how they can be used together in order to easily grow or shrink filesystems.

If you are interested in Linux System administration, we have a complete section dedicated to it on the website, so make sure to check it out!

How To Ping Specific Port Number

Pinging ports is one of the most effective troubleshooting technique in order to see if a service is alive or not.

Used by system administrators on a daily basis, the ping command, relying on the ICMP protocol, retrieves operational information about remote hosts.

However, pinging hosts is not always sufficient : you may need to ping a specific port on your server.

This specific port might be related to a database, or to an Apache web server or even to a proxy server on your network.

In this tutorial, we are going to see how you can ping a specific port using a variety of different commands.

Ping Specific Port using telnet

The easiest way to ping a specific port is to use the telnet command followed by the IP address and the port that you want to ping.

You can also specify a domain name instead of an IP address followed by the specific port to be pinged.

$ telnet <ip_address> <port_number>

$ telnet <domain_name> <port_number>

The “telnet” command is valid for Windows and Unix operating systems.

If you are facing the “telnet : command not found” error on your system, you will have to install telnet on your system by running the following commands.

$ sudo apt-get install telnet

As an example, let’s say that we have a website running on an Apache Web Server on the 192.168.178.2 IP address on our local network.

By default, websites are running on port 80 : this is the specific port that we are going to ping to see if our website is active.

$ telnet 192.168.178.2 80

Trying 192.168.178.2...
Connected to 192.168.178.2.
Escape character is '^]'.

$ telnet 192.168.178.2 389
Connected to 192.168.178.2.
Escape character is '^]'.

Being able to connect to your remote host simply means that your service is up and running.

In order to quit the Telnet utility, you can use the “Ctrl” + “]” keystrokes to escape and execute the “q” command to quit.

Ping Specific Port using telnet

Ping Specific Port using nc

In order to ping a specific port number, execute the “nc” command with the “v” option for “verbose”, “z” for “scanning” and specify the host as well as the port to be pinged.

You can also specify a domain name instead of an IP address followed by the port that you want to ping.

$ nc -vz <host> <port_number>

$ nc -vz <domain> <port_number>

This command works for Unix systems but you can find netcat alternatives online for Windows.

If the “nc” command is not found on your system, you will need to install by running the “apt-get install” command as a sudo user.

$ sudo apt-get install netcat

As an example, let’s say that you want to ping a remote HTTP website on its port 80, you would run the following command.

$ nc -vz amazon.com 80

amazon.com [<ip_address>] 80 (http) open

Ping Specific Port using nc netcat

As you can see, the connection was successfully opened on port 80.

On the other hand, if you try to ping a specific port that is not open, you will get the following error message.

$ nc -vz amazon.com 389

amazon.com [<ip_address>] 389 (ldap) : Connection refused

Ping Ports using nmap

A very easy way to ping a specific port is to use the nmap command with the “-p” option for port and specify the port number as well as the hostname to be scanned.

$ nmap -p <port_number> <ip_address>

$ nmap -p <port_number> <domain_name>
Note : if you are using nmap, please note that you should be aware of legal issues that may come along with it. For this tutorial, we are assuming that you are scanning local ports for monitoring purposes only.

If the “nmap” command is not available on your host, you will have to install it.

$ sudo apt-get install nmap

As an example, let’s say that you want to ping the “192.168.178.35/24” on your local network on the default LDAP port : 389.

$ nmap -p 389 192.168.178.35/24

Ping Ports using nmap port-up


As you can see, the port 389 is said to be open on this virtual machine stating that an OpenLDAP server is running there.

Scanning port range using nmap

In order to scan a range of ports using nmap, you can execute “nmap” with the “p” option for “ports” and specify the range to be pinged.

$ nmap -p 1-100 <ip_address>

$ nmap -p 1-100 <hostname>

Again, if we try to scan a port range on the “192.168.178.35/24”, we would run the following command

$ nmap -p 1-100 192.168.178.35/24

Scanning port range using nmap closed

Ping Specific Port using Powershell

If you are running a computer in a Windows environment, you can ping specific port numbers using Powershell.

This option can be very useful if you plan on including this functionality in automated scripts.

In order to ping a specific port using Powershell, you have to use the “Test-NetConnection” command followed by the IP address and the port number to be pinged.

$ Test-NetConnection <ip_address> -p <port_number>

As an example, let’s say that we want to ping the “192.168.178.35/24” host on the port 389.

To achieve that, we would run the following command

$ Test-NetConnection 192.168.178.35 -p 389

Ping Specific Port using Powershell

On the last line, you are able to see if the TCP call succeeded or not : in our case, it did reach the port on the 389 port.

Word on Ping Terminology

Technically, there is no such thing as “pinging” a specific port on a host.

Sending a “ping” request to a remote host means that you are using the ICMP protocol in order to check network connectivity.

ICMP is mainly used in order to diagnose network problems that would prevent you from reaching hosts.

When you are “pinging a port“, you are in reality establishing a TCP connection between your computer and a remote host on a specific port.

However, it is extremely common for engineers to state that they are “pinging a port” but in reality they are either scanning or opening TCP connections.

Conclusion

In this tutorial, you learnt all the ways that can be used in order to ping a specific port.

Most of the commands used in this tutorial can be used on WindowsUnix or MacOS operating systems.

They might not be directly available to you, but you will be able to find free and open source alternatives for your operating system.

If you are interested in Linux System Administration, we have a complete section dedicated to it on the website, so make sure to check it out!

Network Manager on Linux with Examples

If you are an experienced system administrator, and if you focus on network management, you have probably already heard about the Network Manager.

Released in 2004 and developed by Red Hat, the Network Manager is a set of different tools, mostly interfaces, designed to facilitate network management on your system.

If you want to turn on a network adapter, you will probably use the Network Manager in order to achieve that.

Similarly, if you want to edit an existing network card in order to change the IP address assigned to it, you would use the Network Manager again.

In this tutorial, we are going to describe how you can use the various tools in the Network Manager suite in order to manage your networks easily.

After listing the tools embedded in the suite (nmcli, nmtui, nm-applet), we will go through a list of practical use cases for network administrators.

Network Manager Architecture

Before diving into the capabilities of the Network Manager, let’s first describe its architecture and how it can communicate with Kernel related modules.

Network Manager API

The first concept to understand is that the Network Manager stands as an API in order to configure the network interfaces on your host.

However, the Network Manager does not work alone : it is part of a process from receiving a network message on an endpoint called a network socket.

A network socket is physically represented by an Ethernet NIC connected to an Ethernet Cable in order to start sharing data over a network.

When an Ethernet cable is plugged, it is first recognized by the udev module which will send a signal to the Network Manager in order to notify that a new cable has been plugged in.

This way, the Network Manager is able to maintain connections but it is also able to expose network availability to other applications.

If you are using Firefox, and if Firefox needs to know the status of a network connection, it can query the Network Manager through DBus in order to get this information.

Network Manager is really a network API that will offer details about network cards, wired or wireless networks available.

It will also provide an easy way to configure your network cards and interfaces with dedicated configuration files.

Network Manager vs ifupdown

Historically, Linux operating systems use to manage network interfaces in a different way, mainly using configuration files located at /etc/network.

In this directory, a file can be used in order to configure network interfaces : the interfaces file.

Network Manager vs ifupdown interfaces

However, on recent distributions, the “interfaces” file used by ifup and ifdown utilities is not used.

By default, Network Manager is the one managing your network interfaces but the way network is managed can be changed in the Network Manager configuration file.

Precisely, the “managed” parameter in the “ifupdown” section of the NetworkManager.conf file describes if Network Manager is used on your system or not.
Network Manager vs ifupdown config

Note : “false” means that Network Manager manages your connections and devices, “true” means that you prefer to do it the old way using ifup and ifdown.

About systemd-networkd

On newer systems, systemd is set to handle pretty much everything and network is no exception to the rule.

In some cases, your system may rely on the systemd-network daemon in order to manage interfaces.

Note that, in order to avoid configuration conflicts related to networks, only one networking service should be enabled at one time : whether it is ifupdown, systemd-networkd or Network Manager.

If you are used to manage your networks using the “interfaces” file, you might want to keep doing that, otherwise it is recommended to switch to the Network Manager.

Network Manager Tools

Now that you have a greater understanding of the Network Manager, let’s start enumerating the tools that are provided in this suite.

The Network Manager provides the following tools :

  • nmcli : the dedicated command line tool used in order to configure, add, edit and remove connections using the Network Manager;
  • nmtui : a graphical user interface that provides just a subset of features compated to nmcli. Using nmtui, you can edit a connection, activate a connection or change the hostname of your computer;
  • nm-applet : available in GNOME desktop environments, this applet is used as an interface overlay which can be used in order to connect or disconnect from networks.

Network Manager Tools nmtui

Note that some distributions may have Network Manager “shortcuts” for the tools described above : nmtui-connect, nmtui-edit or nmtui-hostname.

Most of the time, those utilities are actually simple soft links to the main nmtui utility.

Network Manager Tools nmtui-2

In the following sections, we are going to see how you can use the different tools cited above in order to configure your networks properly.

Network Configuration using nmcli

As described in the previous section, nmcli is a command line utility that can be used in order to monitor your network connectivity, but also to add, edit, delete connections as well as having detailed information about devices on your system.

You can interact with nmcli using the following syntax

$ nmcli <options> <section> <action>

The nmcli has a set of eight sections :

  • help : used in order to get general help about the nmcli usage;
  • general : used in order to get the status and the global configuration of the Network Manager itself;
  • networking : exposes methods in order to shut down the Network Manager or to bring it up again;
  • radio : used in order to manage wireless transmissions protocols such as the WIFI or the WAN;
  • connection : as its name indicates, this section is used in order to bring interfaces up and down and to add and delete existing connections;
  • device : mostly used in order to modify parameters associated with a given device (the interface name for example) or to connect a device using an existing connection;
  • agent & monitor : those sections are used to respectively handle secrets and to watch network changes.

Each section described has a set of predefined actions that can be found reading the nmcli documentation (show, add, delete, modify, load and so on)

As an example, if you were to list all connections that are currently active, you would execute “nmcli” with the “connection” section and the “show” action.

$ nmcli connection show

Network Configuration using nmcli-connection-show

In this case, my host has a wired Ethernet connection on a network adapter named “eth0”.

In the following sections, we are going to see how you can interact with network cards and connections in order to properly configure your system.

Connection Management

When using Network Manager, a connection can be seen as a “network configuration“.

As a consequence, a “connection” has all the information related to the layers 2 (data-link layer) and layers 3 (likely related to IP addressing).

When a connection is used by a device, namely a network adapter on your host, it is set to be “active” or to be “up”.

On the other hand, a connection can be “idle” and now used by any network interface at all : in this case it is set to be “inactive” or “down”

The first key point here is that whenever we are configuring networking on a Linux host, we are essentially configuring connections, that will be bound to devices later on.

Listing Network Connections

In order to list network connections available on your host, you can run the “show” action of the “connection” section.

$ nmcli connection show

Listing Network Connections connection-show

Optionally, you can provide the “–active” flag in order to restrict the result to active connections (i.e used by network adapters)

nmcli connection show --active

Adding Network Connections

In some cases, it might be handy to have multiple connections configured.

Say that you are working at two different places : one that uses DHCP in order to assign your IP address (dynamic IP addressing) and one that assigns a static IP to your computer.

In order to achieve that, you can create additional network connections that can be switched on depending on your location.

To add new network connections using Network Manager, you can :

  • Add your configuration file to the system-connections directory located at /etc/NetworkManager;
  • Add the “nmcli connection” command with the “add” option;
  • Use the nm-connection-editor utility that provides a GUI in order to add, modify and delete existing connections.

Using the nmcli command line, you can create a new connection by running the following command

$ sudo nmcli connection add type ethernet ifname eth2

Adding Network Connections eth2

Using nmcli, a new UUID connection will be assigned to your newly created connection and you will be able to start using it to connect to Internet for example.

Modifying connection parameters

One great feature of the nmcli utility is to modify the parameters of your existing connections.

If you want to modify your IP address and switch from DHCP to manual IP addressing, you would also use the nmcli utility to change those parameters.

In order to modify existing connection parameters, you would use the following syntax

$ nmcli connection modify <connection_id> <parameter> <value>

As an example, let’s say that you want your IP address to static and set to the value ‘192.168.1.19’

To achieve that, you would run the following command

$ nmcli connection modify <uuid> ipv4.method manual

$ nmcli connection modify <uuid> ipv4.address 192.168.1.19/24
Note : when changing the IP address, do not forget to set the subnet mask (here /24), otherwise you might get a default mask assigned which will be wrong in most cases.

In order for your changes to be effective, you need to restart your connection by using the “up” and “down” actions of the “connection” section.

$ nmcli connection down <uuid>

$ nmcli connection up <uuid>

Now that your interfaces are restarted, your IP change should be effective.

$ hostname -I

192.168.1.19

Device Management

Device” is one of the sections of the nmcli utility and it can be used in order to manage network adapters on your host.

Listing Network Adapters

In order to have a listing of the network adapter on your host, you can run the “show” action on the “device” section.

$ nmcli device show

Device Management device-show

This command describes extensively your network adapter, it lists :

  • The device name : assigned by udev when the device was plugged to your computer (eth0 in this case);
  • Your device MAC address, referred here as the hardware address;
  • The device state : whether it is connected to the network or not;
  • The IPv4 address using a CIDR notation (192.168.1.16/24)
  • The IPv4 of your subnet gateway (192.168.1.1);
  • The IPv4 of your main DNS (192.168.1.1)
Note : here, the gateway is acting as the main DNS but you might have dedicated name servers in your company.

Those characteristics are quite useful if you want to list network cards available on your host and determine whether they are connect or not.

Changing device configuration

In some cases, it might be useful to change device configuration directly.

However, there is a crucial point that you need to remember : you can change your device live, but if you want your changes to be persisted, you need to modify your connection configuration instead.

In short, device configuration changes are temporary.

In order to change your device configuration, you need to execute the “nmcli device” command with the “modify” option and specify the parameter to be changed.

$ nmcli device modify <interface_name> <parameter> <value>

$ nmcli dev mod <interface_name> <parameter> <value>

For example, let’s say that you want to change the IP address of your “eth0” network interface. You also want IP attribution to be static instead of dynamic.

In order to achieve that, you would execute the following command

$ nmcli device modify eth0 ipv4.method manual

Connection successfully reapplied to 'eth0'

$ nmcli dev mod eth0 ipv4.address 192.168.1.19/24

Connection successfully reapplied to 'eth0'

Reapplying parameters

Just to showcase that changes are temporary, if you were to “reapply” parameters to your interface, all your changes would be lost.

Instead, parameters defined in your connection configuration file (in /etc/NetworkManager/system-connections) would be reapplied.

$ nmcli dev reapply eth0

Connection successfully reapplied to 'eth0'

Reinspecting the IP address would give you another IP address from the one you statically assigned in the previous section.

$ hostname -I

192.168.1.18/24

Network Manager Graphical Tools

In this section, we are going to take a look at graphical tools included in the Network Manager suite : nmtui and nm-applet.

Nmtui utility

The nmtui is, as its name describes, a text user interface built in order to facilitate network operations with an easy-to-use user interface.

In order to start with nmtui, simply execute “nmtui” in a terminal shell.

$ nmtui

Network Manager Graphical Tools nmtui

In this graphical menu, you have three options :

  • Edit a connection : where you are able to select network interfaces and modify parameters assigned to them (such as the DNS, the IP address or the gateway address);
  • Activate a connection : but also desactivate existing connections. As a reminder, connections are only active or enabled whenever they are assigned to a specific device;
  • Set system hostname : like the “hostnamectl” or the “hostname”, you can set the PC name over a network.

Navigating in the nmtui tool is pretty straightforward : you can use keyboard keys to navigate, the ‘Enter’ key in order to confirm your selection and the ‘Escape’ key in order to cancel and go back to the previous screen.

Nm-applet on GNOME

The last application related to the Network Manager is nm-applet : a GUI applet available for GNOME user-interfaces.

The nm-applet tool is an overlay user interface that is available in the top-right corner of your desktop menu.

Nm-applet on GNOME nm-applet

Using the nm-applet, you can : see existing connections, add, edit and remove them at will.

You can see detailed information about the settings of your wired connections and edit them in order tochange your IP address or change the IP attribution method (from DHCP to manual for example)

Nm-applet on GNOME nm-applet-2

Conclusion

In this tutorial, you learnt about the Network Manager : a tool on modern distributions that is used in order to create, modify and manage network connections.

You have discovered the tools associated with the Network Manager (namely nmcli, nmtui and nm-applet) and you have learnt how you can use those tools in order to modify your existing connections.

If you are interested in networking or in Linux System Administration, we have a complete section dedicated to it on the website, so make sure to check it out!

How To Setup OpenLDAP Server on Debian 10

As a system administrator, you are probably already familiar with the LDAP protocol.

If you are working in a medium to large company, you can be sure that your company already owns a LDAP server, whether it is on Linux or Windows.

Invented in the early 80s, the LDAP protocol (for Lightweight Directory Access Protocol) was created in order to store data that should be accessed over a network.

The LDAP protocol was defined as part of the RFC 4511 specification and it was implemented by many different vendors.

In this tutorial, we are taking a look at one of the implementations of the LDAP protocol : OpenLDAP.

OpenLDAP is a free and open-source implementation of LDAP that provides a server (called slapd) as well as utilities and libraries for developers.

Using this tutorial, you will be able to setup a complete OpenLDAP server and configure it in order to use it for central authentication.

What You Will Learn

If you follow this tutorial until the end, you will be able to learn about the following topics :

  • How to install an OpenLDAP server on Debian 10;
  • How to configure OpenLDAP and what the configuration actually means;
  • How to use LDIF and LDAP utilities to modify your LDAP database;
  • How to add users in your OpenLDAP server for central authentication;
  • How to setup clients and how central authentication works on Linux;

That’s quite a long article so without further ado, let’s start by install a simple OpenLDAP server on Debian 10.

Install OpenLDAP server on Debian 10

Before starting, you should make sure that you have administrator rights on your system : you will need them to install new packages.

To check if you have sudo rights, execute the “sudo” command with the “-v” option.

$ sudo -v

If you are not sure on how to provide sudo rights for users on Debian 10 or CentOS 8, make sure to read our dedicated guides about it.

Also, make sure that your packages are correctly updated in order to get the latest package version from the repositories.

$ sudo apt-get update

On Linux, the OpenLDAP server is called “slapd“.

It is a simple and configurable stand-alone server that is used in order to read, modify and delete from a LDAP directory.

The slapd daemon also comes with many different utilities that can be used in order to create new entries easily, or to modify entries easily : slapadd or slappasswd just to name a few.

$ sudo apt-get install slapd

When installing this new package, you will be ask to configure the slapd daemon at the end of the installation.

Configuring slapd on Debian 10

The slapd configuration comes as text-based interfaces that you need to fill in order to setup the server properly.

First, you are asked to provide an administrator password for the LDAP server.

Configuring slapd on Debian 10 pass

Choose a secured password because the administrator entry in the LDAP directory has all the rights on the entire tree : add, delete and modify all the entries as well as reading all the LDAP attributes.

On the next screen, you are asked to confirm the password : simply type what you typed in the previous screen.

Configuring slapd on Debian 10 pass123-2

From there, your LDAP server should be initialized.

When installing the slapd server, the installation also :

  • Created a user named “openldap” on your server;
  • Created an initial configuration that is available at /etc/ldap
  • Created an initial and empty database that is ready to accept new entries.

Configuring slapd on Debian 10 configuration

By default, the OpenLDAP server will create a first database entry that reflects your current domain name.

However, if you did not configure your domain name properly (during the installation for example), there is a chance that your OpenLDAP server is badly configured.

To take a first look at the initial configuration of your OpenLDAP server, use the “slapcat” command and watch for the distinguished names created by slapd.

$ sudo slapcat

$ sudo slapcat | grep dn

slapcat

Usually, your OpenLDAP top DNs should match the DNS names of your domain.

It means that if you are currently working in the “devconnected.com” domain, your OpenLDAP server should have the “dc=devconnected,dc=com” top distinguished names.

As you can see, this is not the case for now but luckily for us there is a way to reconfigure the slapd daemon.

Reconfiguring slapd using dpkg-reconfigure

In order to reconfigure the slapd daemon, execute the “dpkg-reconfigure” command on the “slapd” daemon. Again, you need sudo privileges to reconfigure slapd.

$ sudo dpkg-reconfigure slapd

Reconfiguring slapd using dpkg-reconfigure slapd-1

First, you are asked if you want to omit the OpenLDAP server configuration.

We obviously want to press “No” on this option because we want the initial configuration of the database to be created for us.

On the next step, you are asked to provide the base distinguished name of your LDAP server.

Reconfiguring slapd using dpkg-reconfigure slap-dns

As you can see, the slapd daemon describes that the DNS domain name is used to build the base DN of your OpenLDAP directory.

In this case, we are choosing to have “dc=devconnected,dc=com” : note that you have to modify this entry to match your current DNS settings.

If you are not sure about the domain that you belong to, simply use the “domainname” command in your terminal.

$ domainname
devconnected.com

Next, you are asked to provide the name of your organization. This is exactly the same step as the one done before, simply type your organization name and hit “Ok”.

Reconfiguring slapd using dpkg-reconfigure slapd-3

Finally, similarly to the first slapd configuration, you are asked to provide admin credentials for your LDAP server.

Again, choose a strong password as it can be used in order to read and modify every single entry in the LDAP directory.

Reconfiguring slapd using dpkg-reconfigure pass-1

On the next screen, you are asked to provide the back-end to be used by LDAP.

For this step, you want to keep the default values (meaning a MDB for MariaDB back-end) unless you have a reason to choose another storage backend.
Reconfiguring slapd using dpkg-reconfigure mariadb

Next, you are asked if you want the database to be removed when slapd is purged.

In this case, we will choose “No” : there are many situations where you simply want to update your slapd package or switch to a different LDAP server.

If you choose yes, your database will be removed which can be a real problem if you don’t have any backups of your LDAP directory.

purge

Finally, you are prompted with a warning : there are already some files sitting in the “/var/lib” directory of your server.

In this directory, you currently have your old database stored. As you are trying to reconfigure your OpenLDAP server, you will overwrite the content of this folder.

By choosing “Yes”, the slapd utility will backup the content of your existing database to the “/var/backups” folder.

moveold

Done!

Your slapd server is now configured properly to match your current DNS settings.

To have a first look at the content of your LDAP database, simply execute the “slapcat” (with sudo privileges if you are not currently logged as root)

$ sudo slapcat

slapcat-2

With this initial setup :

  • Your configuration files are stored in “/etc/ldap” : they are storing the ldap configuration file, the schemas that you can add to slapd, as well as the slapd.d directory used for server customization;
  • Your database is stored at “/var/lib/ldap” under the “data.mdb” database : you should probably setup backups of this file in order to make sure that you won’t lose everything.

Configuring firewall rules for LDAP

If you are using a firewall, it is very likely that you will need to accept inbound requests to your LDAP server.

As a quick reminder, OpenLDAP runs on port 389.

To make sure that it is running correctly, run the “systemctl status” command on the “slapd” server.

$ sudo systemctl status slapd

slapd-service

If you are using recent distributions of Debian, you are probably using UFW as the default firewall.

To enable OpenLDAP on UFW, execute the “ufw allow” command on the port 389 of your server. You can accept TCP and UDP connections all together.

$ sudo ufw allow 389

Rule added
Rule added (v6)

You can then verify that the rule was correctly created using the status command.

firewall-status

In the next section, we are going to see how you can easily add new entries to your LDAP server using LDIF files.

Add OpenLDAP entries using LDIF files

When adding new entries to your OpenLDAP server, you could use the “slapadd” utility in order to add a new LDIF file.

However, this is not the utility that we are going to use, instead we are going to use “ldapadd”.

Difference between slapadd and ldapadd

Before adding new entries, it is important for you to know the difference between slap utilities and ldap utilities.

Both utilities take LDIF formatted files as an argument and they had the content to the database.

However, when using slapadd, you will have to restart your LDAP server for the changes to be applied.

This is not the case when using ldap utilities such as “ldapadd” : modifications are directly performed on the directory tree.

In order to be able to use “ldapadd”, “ldapsearch” and other LDAP utilities, you need to install the “ldap-utils” package on your system.

$ sudo apt-get install ldap-utils

Creating your first LDIF file

As explained earlier, if you are using the console line, you will need to create LDIF files and add them to your current LDAP configuration or database.

The LDIF format is a format used in order to add or modify existing entries in a LDAP directory.

Using LDIF, you specify the distinguished name of the node that you want to modify and you describe the modifications to be performed.

As an example, let’s say that you want to create a new node in your LDAP directory named “users”.

Adding a users group

To achieve that, create a new LDIF file named “users.ldif” and add the following content in it.

$ sudo touch /etc/ldap/users.ldif

# Content of the users file

dn: ou=People,dc=devconnected,dc=com
objectClass: organizationalUnit
ou: People

As you can see, we are provided the complete DN of the node to be added, we specify the object class and the name of the node to be created.

In order to add this entry to your LDAP directory, you have to use the “ldapadd” command and specify the LDIF file to be used.

$ sudo ldapadd -D "cn=admin,dc=devconnected,dc=com" -W -H ldapi:/// -f users.ldif

Enter LDAP Password:
added new entry "ou=People,dc=devconnected,dc=com"

If you are not familiar with ldap utility options, here is a description of the options provided :

  • -D : used to specify a node to bind to. When adding new entries to a LDAP server, you can choose your authentication mechanism but you usually want to bind to the admin node in order to gain all privileges on the tree;
  • -W : used in order to specify that we want the password to be prompted when connecting;
  • -H : used in order to specify the LDAP server to connect to. In this case, we are connecting to a LDAP server available at localhost;
  • -f : to specify the LDIF file to be added to the LDAP server.

Note that you can not use an external authentication in order to add new entries to LDAP by default : ACL are not configured to do that.

Now that your node is added to your tree, you can try to find it using the “ldapsearch” command.

$ sudo ldapsearch -x -b "dc=devconnected,dc=com" ou

ldapsearch

Great!

Now that the “People” organizational unit was added, let’s add some users to your LDAP tree.

Adding new users to LDAP

In order to add new users, we are going to follow the same logic : creating a LDIF file containing individual entries for users.

As described before, OpenLDAP uses schemas in order to define “objects” that can be added to the directory.

In this case, we are going to use the “posixAccount” schema which is already added to your database configuration by default.

The “posixAccount” object has several fields that can be used to describe a Linux user account such as the username, the surname but most importantly the user password.

Create a new LDIF file and add the following content in it :

$ sudo touch /etc/ldap/new_users.ldif

# Content of new_users LDIF file

dn: cn=john,ou=People,dc=devconnected,dc=com
objectClass: top
objectClass: account
objectClass: posixAccount
objectClass: shadowAccount
cn: john
uid: john
uidNumber: 10001
gidNumber: 10001
homeDirectory: /home/john
userPassword: <password>
loginShell: /bin/bash

When you are done, save your file and use the ldapadd command in order to add your entry to the LDAP directory tree.

$ sudo ldapadd -D "cn=admin,dc=devconnected,dc=com" -W -H ldapi:/// -f new_users.ldif

Enter LDAP Password:
added new entry "cn=john,ou=People,dc=devconnected,dc=com"

Congratulations, you now have your first user stored in OpenLDAP.

You can read the user information by issuing a LDAP search command. Note that you won’t be able to read the user password as you are restricted by ACLs.

$ sudo ldapsearch -x -b "ou=People,dc=devconnected,dc=com"

new-users

Awesome, now that your LDAP server is configured, let’s configure a client in order to configure central authentication.

Configuring LDAP clients for centralized authentication

In the last section of this OpenLDAP server setup, we are going to see how you can configure LDAP clients (i.e your host machines) in order for them to connect using LDAP information.

How LDAP client authentication works

Before issuing any commands, it is important for you to have a global understanding of what we are actually building.

Before LDAP (and NIS), if you wanted to configure users and group permissions over multiple computers of a network, you would have to connect to them one by one and change their settings.

LDAP comes as a great solution for this : LDAP will centralize user information in one single place on your network.

central

When a client connects to any machine of your domain, the host will first contact the LDAP server and verify that the user password provided is correct.

The client library will bind (or authenticate) to the remote LDAP server using the admin account and retrieve the information associated with the user trying to connect.

Next, it will retrieve the password associated with the account and compare it with the password you typed when you logged in.

If the passwords match, you will be logged in your account, otherwise you will be denied.

hosts-openldap

Setup Client LDAP authentication on Debian

In order to setup client LDAP authentication, you will need to install the “libnss-ldap” package on your client.

$ sudo apt-get install libnss-ldap

When installing this package, you will be prompted with many different questions in order to configure client centralized authentication.

First, you are asked to provide the URL of your LDAP server : it is recommended to setup an IP address (configured as static obviously) in order to avoid problems in DNS resolutions.

On the server, identify your IP address with the ip command and fill the corresponding field on the client.

# On the server

$ ip a

client-12

Note : make sure that you are using the LDAP protocol and not the LDAPI protocol. For some reason, your server won’t be reachable if you use the LDAPI protocol.

Next, you are asked to provide the root distinguished name of your LDAP server. If you are not sure, you should run a ldapsearch command on the server to get this information.

client-2

On the next screen, you are asked the LDAP version that you want to use : choose the LDAP version 3 for now.

client-3

Next, you are asked if you want to make the local root the database admin.

You want to type “Yes” to this option as you want to change the user password directly from the host machine.

With this option, you will be able to run the “passwd” and have the password modified directly in the LDAP directory, which is pretty useful.

client-4

By default, the LDAP database does not require a login, so you can type “No” on this option.

Note : the LDAP database has no login but you have an admin account at the top of your LDAP directory. Those are two different concepts that are very different one from another.

client-5

Next, type the LDAP administrator account to be used for bindinds.

As a reminder, this is the account that will be used in order to get the user password information from the server.

client-6

Finally, type the password associated with the admin account on the LDAP server.

client-7

Done, you should now be able to query your LDAP server.

Linking client information to LDAP

In order to link your client information (such as username and password) to the LDAP directory, you need to modify the nsswitch file.

As a reminder, the nsswitch file is used in order to link some information on your system (such as users, groups or hosts) to various different sources (local, LDAP, NIS or others).

Edit the /etc/nsswitch.conf file and add a “ldap” entry to the first four sections : passwd, group, shadow, gshadow.

$ sudo nano /etc/nsswitch.conf

Linking client information to LDAP client-8

Save your file and you should now be able to list users from the LDAP server.

$ getent passwd
Note : if you are not familiar with the getent command, here are all the commands used to list users on Linux.

client-9

Awesome!

Now that your user can be retrieved via LDAP, you will be able to log to this account by using the user password you have specified in the LDAP directory.

$ su - john

<Type password specified in LDAP>

john@client:/home/john

Conclusion

In this tutorial, you learnt how you can easily setup a simple OpenLDAP server on Debian 10 using the slapd utility.

You also learnt about the LDAP utilities that you can use in order to add and search entries in your LDAP directory.

Finally, you have seen how you can configure client machines in order to use LDAP authentication to connect to your machines.

This is an architecture that can be used in most company IT architecture : note that you will have to setup TLS encryption in order to passwords not to be transmitted over the network in clear text.

If you are interested in Linux System administration, we have a complete section dedicated to it on the website, so make sure to check it out!