It is very crucial for DevOps developers to keep their mind and soul in learning Docker Logs as they give insightful knowledge regarding what appeared on your container in case they crashed or if you want to monitor them.
Also, examining the Docker logs on a daily basis in your containerized environments is also essential for everyone learning about the Docker tool. Want to explore more about the main topic then just have a look at this ultimate Docker Logs Complete Guide entirely also find some of the best practices & docker logging strategies.
- What Are Docker Container Logs?
- Where are Docker logs?
- Docker Logging Strategies and Best Practices
- Docker Daemon Logs
- View Docker Logs using the logs option
- View Docker logs since a specific date
- View Docker logs until a specific date
- Tail Docker Logs using the tail option
- Exporting Docker Logs using logging drivers
- What are logging drivers?
- Defining a default logging driver
- Redirecting container logs to syslog
- Redirecting container logs to journald
- View Docker Compose Logs
- Conclusion
What Are Docker Container Logs?
On Docker, container logs can either be inspected by using the “logs” command or they can be stored on an external system (like Logstash or Syslog) in order to be analyzed later on.
When they are sent to an external system, you will need to have a logging driver installed for Docker to send its container logs.
Some particularities may exist depending on the image used.
One good example is the NGINX image actually redirecting access and error logs to some specific devices on your Linux system (/dev/stdout and /dev/stderr).
Similarly, the Apache Web Server will redirect the logs directly to specific file descriptors (/proc/self/fd/1) on your system.
However, in most cases, using the “logs” command is enough.
- How To List Docker Images | What is Docker Image | docker image ls command
- Syslog: The Complete System Administrator Guide
- Docker Exec Command With Examples | How to Run a Docker Exec Command inside a Docker Container?
Where are Docker logs?
When it comes to Docker logs, you either want to inspect your container logs or the logs for the Docker daemon.
Do Refer:
- How To Install Prometheus with Docker on Ubuntu 18.04
- How To Install InfluxDB Telegraf and Grafana on Docker
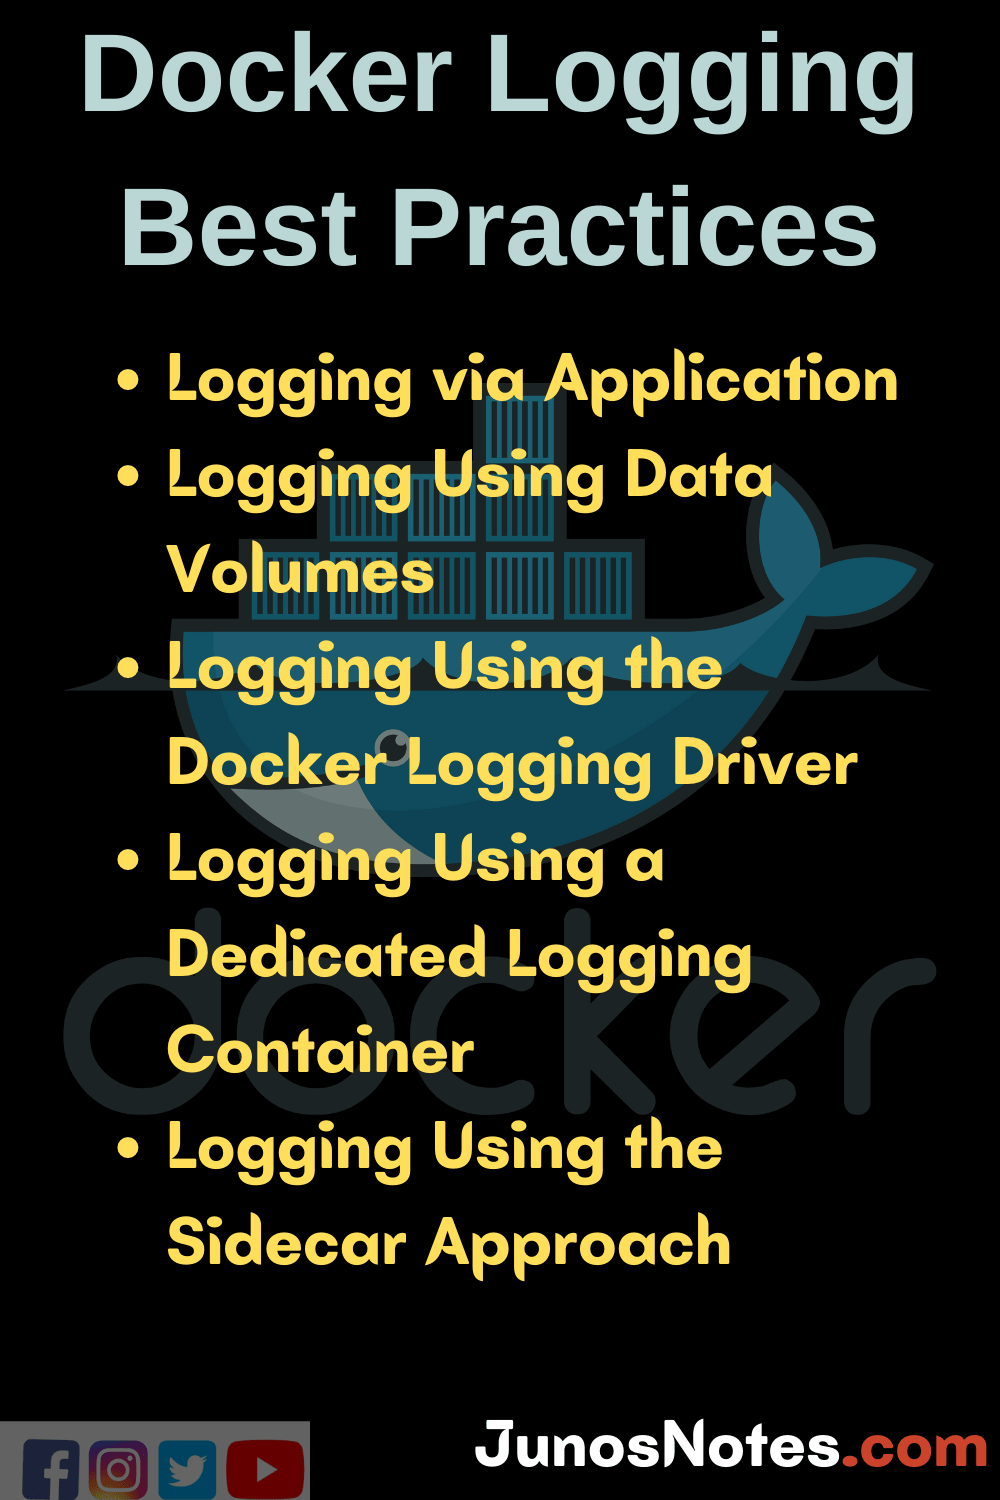
Docker Logging Strategies and Best Practices
One of the biggest challenging tasks on docker is logging. So, to handle it very easily we have compiled a few best practices of docker logging that you should memorize while working with containerized applications. These Docker logging best practices are listed in a shareable image to pass on to everyone easily:
Docker Daemon Logs
On the other hand, the Docker daemon is also producing some logs for you to inspect.
Depending on the system you are running Docker on, you will find the Docker daemon logs in different places :
- /var/log/daemon.log : for Debian distributions;
- /var/log/messages : for RHEL and Oracle Linux;
- journalctl -u docker.service: for Ubuntu 16.04+ and CentOS 7/8
- /var/log/upstart/docker.log : for Ubuntu distributions still using upstart;
- AppData/Local: for Windows operating systems;
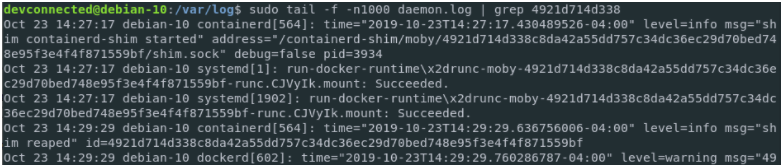
As a small example, if you installed Docker on Ubuntu or Debian, you would run this command to inspect your Docker daemon logs.
$ tail -f -n 1000 /var/log/daemon.log | grep --color docker
Alternatively, if you are using systemd to manage your services, you can inspect Docker daemon logs with the journalctl command.
$ sudo journalctl -u docker.service | less
View Docker Logs using the logs option
In order to view and inspect logs on Docker, you have to use the “docker logs” command with custom options.
$ docker logs <container_id>

$ docker logs <container_name>
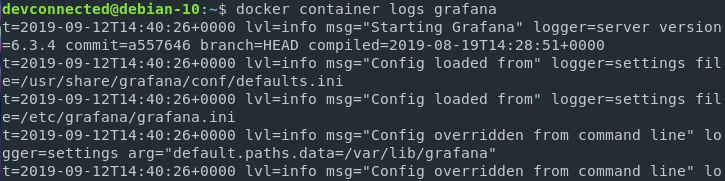
For example, in order to see the Docker logs from a Grafana server started from a Docker image, you would run
$ docker logs grafana
View Docker logs since a specific date
When you are inspecting your Docker logs, you often want to limit the output to a given number of lines, not to be flooded with information.
In order to view Docker logs since a specific date or duration, use the “–since” option with a date or a duration.
For example, to see Docker container logs for 10 minutes, you would write
$ docker logs --since 10m <container_id>
You can also write a date format as long as it is provided in ISO format
$ docker logs --since 2019-10-20T10:00:00 <container_id>
Note that the logs will be shown given the current date of your system and not the date of the Docker logs.
View Docker logs until a specific date
Similar to the since option, you can choose to inspect your container logs until a specific date.
You can also specify absolute dates (like an ISO date for example) or relative like 10 minutes, 30 minutes or 50 minutes.
To view logs until a specific date, use the “–until” option with a date or a duration.
$ docker logs --until 10m <container_id>
You can also provide a date format like you did before for the since option.
$ docker logs --until 2019-10-20T10:00:00 <container_id>
Tail Docker Logs using the tail option
In some cases, you want to restrict the number of lines printed on your screen from the Docker logs.
In order to achieve this result, you will have to use the “–tail” option in the following way.
$ docker logs --tail <number> <container_id|name>
For example, in order to show 100 lines from your Grafana for Docker logs, you will have to write
$ docker logs --tail 100 grafana

$ docker logs --tail 100 4921d714d338
Exporting Docker Logs using logging drivers
In some cases, you may want to export your Docker logs in order to analyze them later on.
For simple debugging needs, having the logs printed to stdout or stderr is enough.
However, if you plan on running a more complex analysis, you will need to have them stored in logging systems such as Syslog or Logstash.
This is where the concept of logging drivers comes into play.
What are logging drivers?
In Docker, logging drivers are a set of custom plugins that one can activate or install in order to export logs to an external tool such as syslog, Logstash, or custom datasources.
For example, you can choose to export your Docker logs to :
- syslog: Docker will write its logs to the syslog daemon. Later on, those logs can be centralized and analyzed in an external system such as Kibana;
- journald: on modern distributions, journald is the default logging option. As a consequence, Docker can export logs to it;
- gelf: for administrators using Graylog and the GELF (Graylog Extended Log Format) format;
- awslogs: in order to export logs to Amazon CloudWatch Logs;
- none: if you choose not to have logs for your containers;
- etwlogs: used to write logs to the Event Tracing for Windows;
- fluentd: in order to write Docker logs to the fluentd daemon;
- local: in order to store logs in a minimal format.
Now that you have an idea about logging drivers, you might be wondering what logging driver you are currently using on your system.
To find the default logging driver used in Docker, use the “docker info” command.
$ docker info | grep Logging
  Logging Driver: json-file
In most instances, the default logging driver is “json-file” unless you already modified this parameter before.
Defining a default logging driver
In order to define a default logging driver on Linux, you will need to overwrite the log-driver option located in your daemon.log configuration file.
The daemon.log file is located in the /etc/docker configuration folder on your system.
If the “daemon.log” is not existing, make sure to create it and paste the following content in it.
{
  "log-driver": "syslog"
}
Those default settings will be applied whenever you create a new container.
However, you can also create containers with “docker run” and specify the logging driver to be used instead of the default one.
Save your file and restart your Docker service for the changes to be applied.
$ sudo systemctl restart docker
$ sudo systemctl status docker
Finally, run the “docker info” command again in order to check if your logging preferences were changed.
$ docker info | grep Logging
  Logging Driver: syslog
In order to inspect the logs, you will have to navigate to the default log location on Linux : /var/log
By default, your Docker daemon will send its logs to the daemon.log in /var/log.
In order to see the logs associated to the Docker daemon, you can run the following command
$ sudo tail -f daemon.log | grep docker
However, note that defining the default logging driver does not imply that your containers will automatically send their logs to the source you specified.
Redirecting container logs to syslog
In order to make sure that logs are correctly redirected, you have to inspect your containers and the logging driver associated with them.
$ docker inspect <container_id|container_name> | grep -A 5 LogConfig

"LogConfig": {
  "Type": "syslog"
  "Config": {}
}
As you can see, the logging driver is defined to syslog, but what if I used an old container using another logging driver?
To redirect container logs to syslog, you have two options :
- Creating another container, making sure that you defined the logging driver in the previous section
- Run “docker run” and specify the logging driver that you want to use.
To define the logging driver for a container, you have to use “docker run” with the “–log-driver” option.
$ docker container run -it -d --log-driver syslog <image>
Then, make sure that your logging driver was correctly set by running the inspect command again.
$ docker inspect <container_id|container_name> | grep -A 5 LogConfig
In order to view Docker logs, you have to inspect the “daemon.log” file and search for your container id.
$ sudo tail -f -n1000 daemon.log | grep <container_id>
Redirecting container logs to journald
On modern distributions, there is also a way to inspect system logs: by using the journald utility from the systemd environment.
Some administrators may prefer to have Syslog in order to implement a centralized logging system for example.
Others may choose to have journald because of the handy commands it exposes.
In order to redirect container logs to journald, you can either define it in the daemon.log configuration or you can specify it at runtime with the “–log-driver” option.
$ docker container run -it -d --log-driver journald <image>
Next, verify that your logging driver was correctly set for the container.
$ docker inspect <container_id|container_name> | grep -A 5 LogConfig

"LogConfig": {
  "Type": "journald"
  "Config": {}
}
In order to inspect logs sent to journald, you have to run the following command
$ sudo journalctl CONTAINER_NAME=<container_name>
For example, for a container named “mycontainer”, you would run
$ sudo journalctl CONTAINER_NAME=mycontainer<

As you can see, this is not very handy as the data shown in the journal is not fully displayed.
To avoid having “blob data” presented when running journalctl, append the “–all” option to your command.
$ sudo journalctl --all CONTAINER_NAME=mycontainer

Great!
You successfully exporter your Docker container logs to journald.
View Docker Compose Logs
In order to inspect Docker Compose logs, you can also run a simple command to have them shown on the standard output.
$ docker-compose logs
You can also choose to have the logs displayed for one service and not for your entire Docker Compose stack.
$ docker-compose logs <app>
Note that the options detailed before are also available using docker-compose.
For example, if you want to have only 100 lines of logs written for your service in docker-compose, you would write
$ docker-compose logs --tail 100 <app>
Conclusion
In this tutorial, you learned more about Docker logs and how they can be inspected, and how you can use options in order to monitor them.
You also learned about logging drivers and how they can be used in order to export Docker logs to an external logging system such as Syslog or journald.
If you are curious about Linux logging, we have a complete section on the website dedicated to Logging.