How To Add and Update Git Submodules

How To Add and Update Git Submodules | Definition of Submodule

If you are developing a large project then you need to be familiar with this important concept called Git submodules. Git submodules permit you to have a git repository as a subdirectory of different git repositories. Just these are a reference to another repository at a particular snapshot in time.

Do Check: GIT Commands

Also, Git submodules allow a Git repository to incorporate another versioned project within an existing project and track the version history of external code. In this tutorial, we are discussing how easily add, update and remove Git submodules on your main project can be done. Apart from this, we will describe concepts about Git submodules

What is a Submodule?

A Submodule is a Git Repository inside another Git Repository. This embedded Git Repository can be run separately and will have its individual Git workflow. This embedded repository can also be used as a Submodule for various other repositories without generating new files from scratch for each repository.

When should you use a git submodule?

By using the Git submodules, you can easily maintain strict version management over your external dependencies. The furnished points are some of the best use cases for git submodules:

  • When you have a component that isn’t updated very often and you want to track it as a vendor dependency.
  • When an external component or subproject is changing too fast or upcoming changes will break the API, you can lock the code to a specific commit for your own safety.
  • When you are delegating a piece of the project to a third party and you want to integrate their work at a specific time or release. Again this works when updates are not too frequent.

Do Refer: How To Create and Apply Git Patch Files

Add a Git Submodule

The first thing you want to do is to add a Git submodule to your main project.

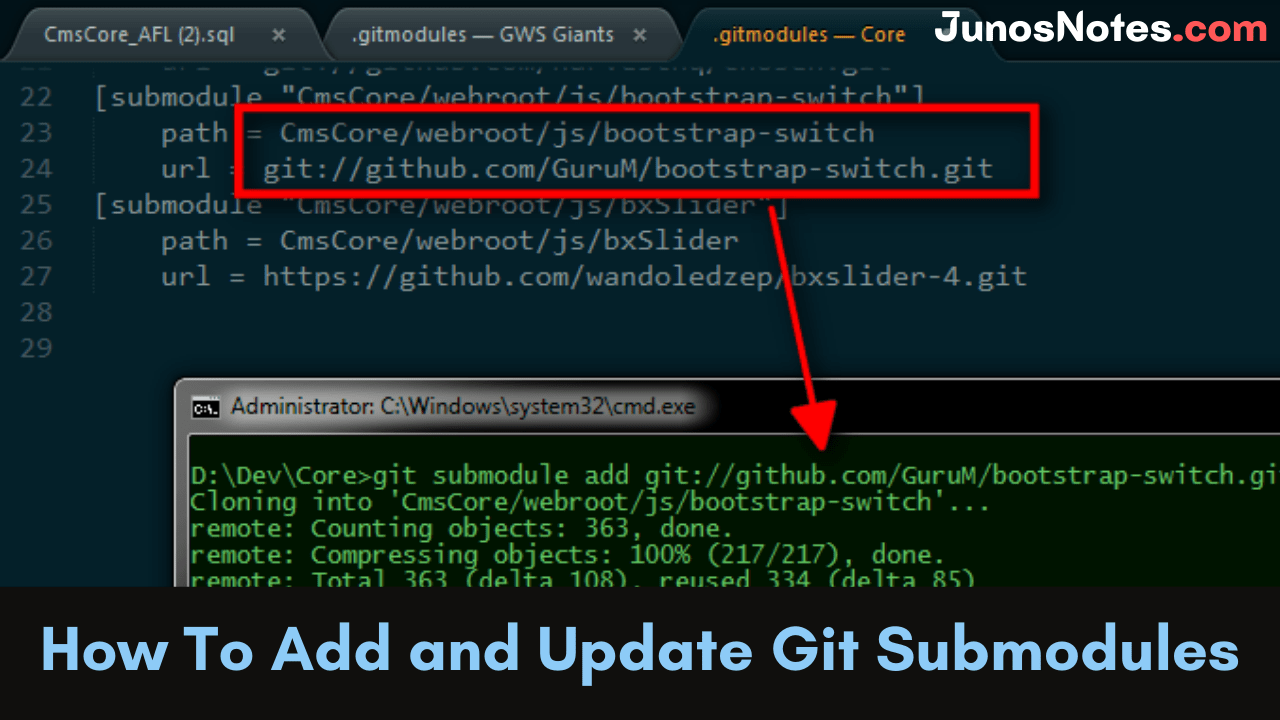
In order to add a Git submodule, use the “git submodule add” command and specify the URL of the Git remote repository to be included as a submodule.

Optionally, you can also specify the target directory (it will be included in a directory named like the remote repository name if not provided)

$ git submodule add <remote_url> <destination_folder>

When adding a Git submodule, your submodule will be staged. As a consequence, you will need to commit your submodule by using the “git commit” command.

$ git commit -m "Added the submodule to the project."

$ git push

As an example, let’s pretend that you want to add the “project” repository as a submodule on your project into a folder named “vendors”.

To add “project” as a submodule, you would run the following command at the root of your repository

$ git submodule add https://github.com/project/project.git vendors

Cloning into '/home/user/main/project'...
remote: Enumerating objects: 5257, done.
remote: Total 5257 (delta 0), reused 0 (delta 0), pack-reused 5257
Receiving objects: 100% (5257/5257), 3.03 MiB | 3.38 MiB/s, done.
Resolving deltas: 100% (3319/3319), done.

When adding a new Git submodule into your project, multiple actions will be performed for you:

  • A folder is created in your Git repository named after the submodule that you chose to add (in this case “vendors”);
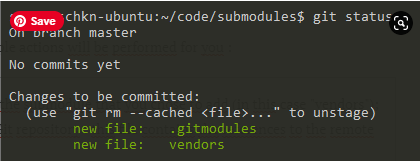
  • A hidden file named “.gitmodules” is created in your Git repository: this file contains the references to the remote repositories that you cloned as submodules;
  • Your Git configuration (located at .git/config) was also modified in order to include the submodule you just added;
  • The submodule you just added is marked as a change to be committed in your repository.

Add a Git Submodule add-submodule-1

Pull a Git Submodule

In this section, we are going to see how you can pull a Git submodule as another developer on the project.

Whenever you are cloning a Git repository having submodules, you need to execute an extra command in order for the submodules to be pulled.

If you don’t execute this command, you will fetch the submodule folder, but you won’t have any content in it.

To pull a Git submodule, use the “git submodule update” command with the “–init” and the “–recursive” options.

$ git submodule update --init --recursive

Going back to the example we described before: let’s pretend that we are in a complete new Git repository created by our colleague.

In its Git repository, our colleague first starts by cloning the repository, however, it is not cloning the content of the Git submodule.

To update its own Git configuration, it has to execute the “git submodule update” command.

$ git submodule update --init --recursive

Submodule 'vendors' (https://github.com/project/project.git) registered for path 'vendors'
Cloning into '/home/colleague/submodules/vendors'...
Submodule path 'vendors': checked out '43d08138766b3592352c9d4cbeea9c9948537359'

As you can see, pulling a Git submodule in our colleague Git repository detached the HEAD at a given commit.

The submodule is always set to have its HEAD detached at a given commit by default: as the main repository is not tracking the changes of the submodule, it is only seen as a specific commit from the submodule repository.

Steps on how to Update Git Submodules

For updating the Git submodules in your workspace with the latest commits on the server please follow the below steps carefully:

  • Clone the remote repository, if you haven’t already.
  • Issue a git submodule update –remote command.
  • Add any new files pulled from the repository to the Git index.
  • Perform a git commit.
  • Push back to origin.

Update a Git Submodule

In some cases, you are not pulling a Git submodule but you are simply looking to update your existing Git submodule in the project.

In order to update an existing Git submodule, you need to execute the “git submodule update” with the “–remote” and the “–merge” option.

$ git submodule update --remote --merge

Using the “–remote” command, you will be able to update your existing Git submodules without having to run “git pull” commands in each submodule of your project.

When using this command, your detached HEAD will be updated to the newest commit in the submodule repository.

Given the example that we used before when updating the submodule, we would get the following output:

$ git submodule update --remote --merge

Updating 43d0813..93360a2
Fast-forward
 README.md | 6 +++++-
 1 file changed, 5 insertions(+), 1 deletion(-)
Submodule path 'vendors': merged in '93360a21dc79011ff632b68741ac0b9811b60526'

Git Submodules Update Example

For executing the update git submodules example on your local machine, you can make use of the following commands:

submodule@example:~$ git clone --recurse-submodules https://gitlab.com/cameronmcnz/surface.git
submodule@example:~$ cd sur*
submodule@example:~$ git submodule update --remote
submodule@example:~$ git add .
submodule@example:~$ git commit -m "git submodule updated"
submodule@example:~$ git push origin

Fetch new submodule commits

In this section, you are looking to update your Git repository with your commits coming from the submodule repository.

First, you may want to fetch new commits that were done in the submodule repository.

Let’s say for example that you want to fetch two new commits that were added to the submodule repository.

To fetch new commits done in the submodule repository, head into your submodule folder and run the “git fetch” command first (you will get the new submodule commits)

$ cd repository/submodule 

$ git fetch

Now, if you run the “git log” command again, you will be able to see the new commits you are looking to integrate.

$ git log --oneline origin/master -3

93360a2 (origin/master, origin/HEAD) Second commit
88db523 First commit
43d0813 (HEAD -> master) Initial commit

Now, in order for your submodule to be in line with the newest commits, you can run the “git checkout” command and specify the SHA that you want to update your submodule to (in this case 93360a2)

$ git checkout -q 93360a2

Great! Your HEAD is now aligned with the newest commits from the submodule repository.

You can now go back to your main repository and commit your changes for other developers to fetch those new commits.

$ cd repository

$ git add.

$ git commit -m "Added new commits from the submodule repository"

$ git push

Remove Git submodules

In this section, we are going to see how you can effectively remove a Git submodule from your repository.

In order to remove a Git submodule from your repository, use the “git submodule deinit” command followed by the “git rm” command and specify the name of the submodule folder.

$ git submodule deinit <submodule>

$ git rm <submodule>

When executing the “git submodule deinit” command, you will delete the local submodule configuration stored in your repository.

As a consequence, the line referencing the submodule will be deleted from your .git/config file.

The “git rm” command is used in order to delete submodules files from the working directory and remaining .git folders.

Configuring submodules for your repository

In some cases, you may want to have additional logging lines whenever you are executing “git status” commands.

Luckily for you, there are configuration properties that you can tweak in order to have more information about your submodules.

Submodule summary

In order to have a submodule summary when executing “git status”, execute the “git config” command and add the “status.submoduleSummary” option.

$ git config --global status.submoduleSummary true

As a consequence, you will be presented with more information when executing “git status” commands.

$ git status
On branch master
Your branch is up-to-date with 'origin/master'.
Changes to be committed:
  (use "git reset HEAD <file>..." to unstage)

  new file:   .gitmodules
  new file:   <submodule>

Submodule changes to be committed:

* <submodule> 0000000...ae14a2 (1):
  > Change submodule name

Detailed diff for submodules

If you configured your Git to have the submodule summary as explained in the previous section, you should now have a customized way to see the differences between submodules.

However, in some cases, you want to get more information about the commits that might have been done in your submodules folder.

For the “git diff” command to have detailed information about your submodules, use the “git config” command with the “diff.submodule” parameter set to true.

$ git config --global diff.submodule log

Now, whenever you are executing the “git diff” command, you will be able to see the commits that were done in the submodules folder.

$ git diff

Submodule <submodule> 0000000...ae14a2:
  > Submodule commit n°1
  > Submodule commit n°2

Conclusion

In this tutorial, you learned what submodules are and how you can use them in order to have external repositories in your main project repository. Also, more about how to add and update Git submodules using the dedicated “git submodule” commands: “git submodule add” and “git submodule update“.

Finally, you have seen that it is possible to tweak your Git configuration in order to get more information about your Git repository.
How To Set Upstream Branch on Git

How To Set Upstream Branch on Git | What is a Git Upstream Branch? | Git Set Upstream Branch without Push

Once you clone a Git repository or build new features via branches, you should have an idea about how set-upstream branches and work properly.

This tutorial helps you all in learning what are upstreams, what is git upstream branch, how to set up a Git upstream branch, how to change it, and how to have an overview of which Git branch is tracking which upstream branch.

Do Refer: Git Commands 

However, while creating a new branch, or when working with existing branches, it can be pretty useful to know how to set upstream branch in Git.

What are Upstreams?

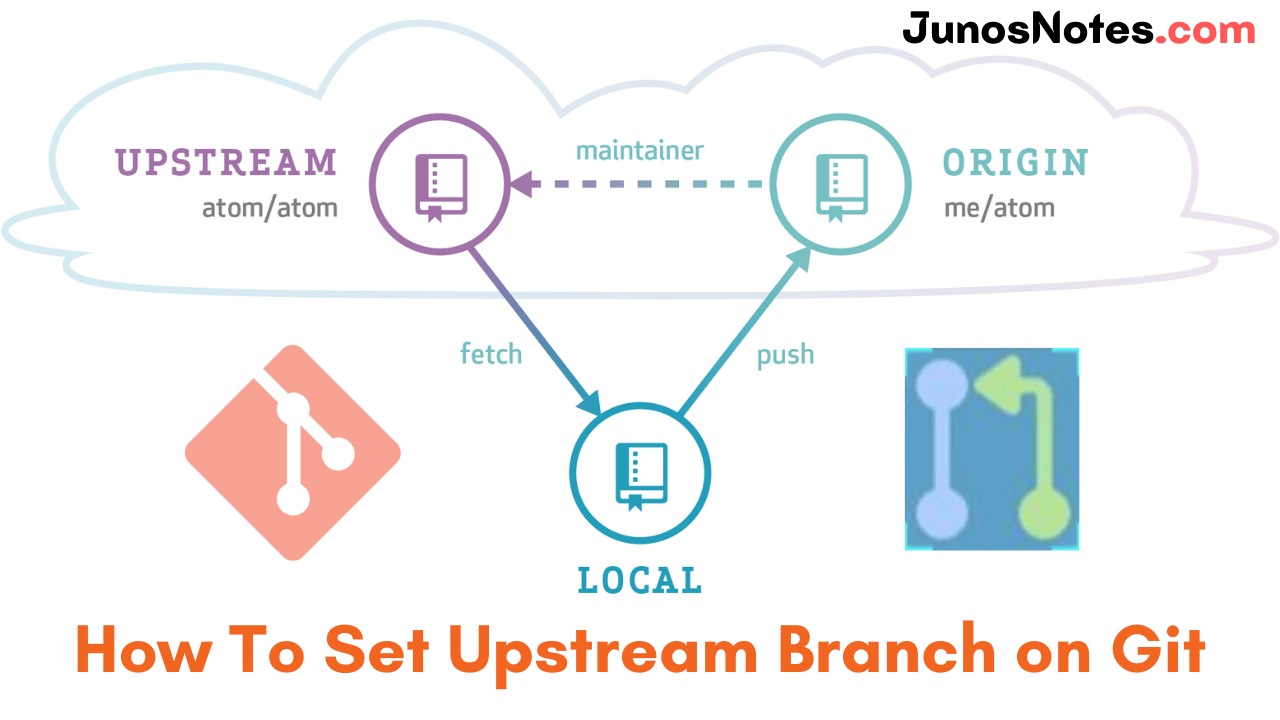
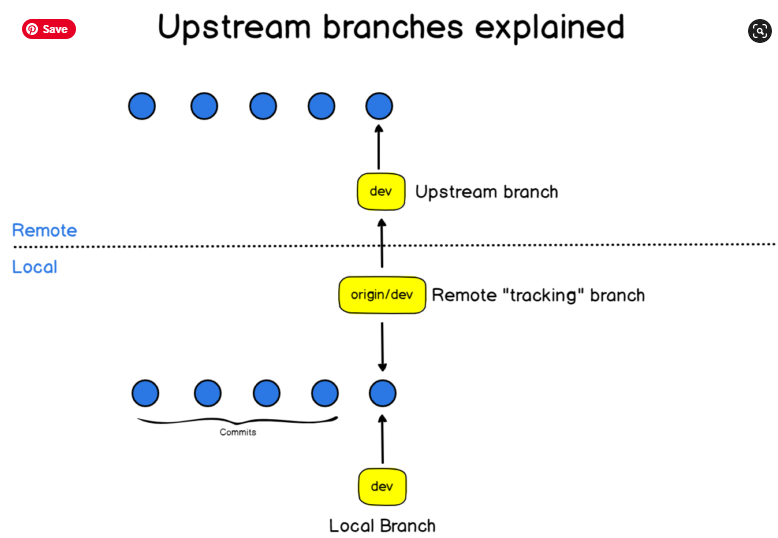
Upstream branches specify the branch tracked on the remote repository via your local remote branch (known as a remote-tracking branch). It is also closely connected with remote branches. Usually, upstream is from where you clone the repository.

What is a Git Upstream Branch?

Using a river analogy to explain the flow of data, upstream is transmitting your data back to where the river stream is originating from. When you transfer something upstream, you are transferring it back to the original authors of the repository.

By git set-upstream, you can determine where your current local branch will flow. It lets you change the default remote branch.
How To Set Upstream Branch on Git upstream

Prerequisites

  • Git installed and configured
  • A cloned Git repository or your own Git project set up locally

Also Read: How To Install Git On Debian 10 Buster

Why are upstream branches so useful in Git?

Upstream branches are beneficial because:

  • You get references to your remote repositories and you essentially know if you are ahead of them or not.

When performing a “git fetch” command, you can bring the new commits from your remote repository and you can choose to merge them at will.

  • You can perform pull and push easily

When you set your upstream (or tracking) branches, you can simply execute pulls and pushes without having to specify the target branch.

Git automatically knows that it has to fetch the new commits to the remote-tracking branch. Similarly, Git already knows that it has to push new commits to the upstream branch.

But where does Git keep a reference of the upstream branches associated with local branches?

Git keeps references to upstream branches via its config file in the “.git” directory.

How to Set Upstream Branch in Git?

Mainly, you can see two methods to set an upstream branch on git. They are as follows:

  1. With git push: This is the fastest way to set a single upstream branch
  2. With a short alias command: It makes a lot of sense if you frequently change the flow of your current branch.

Set upstream branch using git push

The most straightforward & fastest way to set the upstream branch is to use the “git push” command with the “-u” option for an upstream branch.

$ git push -u <remote> <branch>

Alternatively, you can use the “–set-upstream” option that is equivalent to the “-u” option.

$ git push --set-upstream <remote> <branch>

As an example, let’s say that you created a branch named “branch” using the checkout command.

$ git checkout -b branch
Switched to a new branch 'branch'

You can check tracking branches by running the “git branch” command with the “-vv” option.

$ git branch -vv
* branch  808b598 Initial commit
 master  808b598 [origin/master] Initial commit

As you can see, compared to master, the branch “branch” has no tracking branches yet (and no upstream branches as a consequence)

We can set the upstream branch using the “git push” command.

$ git push -u origin branch
Total 0 (delta 0), reused 0 (delta 0)
 * [new branch]      branch -> branch
Branch 'branch' set up to track remote branch 'branch' from 'origin'.

Let’s have a look at the tracking branches again with the branch command.

$ git branch -vv
* branch  808b598 [origin/branch] Initial commit
master  808b598 [origin/master] Initial commit

Great!

We have successfully set the upstream branch for our newly created branch.

Set upstream branch using an alias

Another way to set the upstream branch is to define an alias for your “git push” command.

In fact, pushing to HEAD is equivalent to pushing to a remote branch having the same name as your current branch.

$ git push -u origin HEAD

In order to avoid having to define the upstream every time you create a new branch, define an alias for the command we just wrote.

For aliases, you have two choices, you can either create a git alias or a bash alias.

Using a git alias

In order to create a new git alias, use the “git config” command and define a new alias named “pushd”

$ git config --global alias.pushd "push -u origin HEAD"

When you are done adding and committing fiels to your repository, set the upstream branch using your newly defined alias.

$ git pushd
Total 0 (delta 0), reused 0 (delta 0)
 * [new branch]      HEAD -> branch
Branch 'branch' set up to track remote branch 'branch' from 'origin'.

Using a bash alias

Alternatively, you can use a bash alias if you don’t want to modify your existing git commands.

Define a new bash alias using the “alias” command and define a name for it.

$ alias gp='git push -u origin HEAD'

Let’s create a new branch and use our alias in order to push our code and create the upstream branch easily.

$ git checkout -b branch2
Total 0 (delta 0), reused 0 (delta 0)
 * [new branch]      HEAD -> branch2
Branch 'branch2' set up to track remote branch 'branch2' from 'origin'.

Set upstream branch for an existing remote branch

In some cases, you may choose to link your local branches to existing remote branches that you just pulled or cloned from the main repository.

Let’s say for example that you pulled the “dev” branch located on the “origin” remote.

As a consequence, the tracking branch is named “origin/dev”.

Set tracking branches for new local branches

In order to switch to the local “dev” branch, and to set the “origin/dev” as the tracking branch (or upstream branch), use the “–track” option.

$ git checkout --track origin/dev

Branch 'dev' set up to track remote branch 'dev' from 'origin'.
Switched to a new branch 'dev'

To verify that you linked dev to the tracking branch “origin/dev” (which upstream branch is the remote dev), use the “git branch” command.

$ git branch -vv
* dev 808b598 [origin/dev] Initial commit

Set tracking branches for existing local branches

On the other hand, you may have chosen to work on a local branch and to set the upstream branch (or the remote tracking branch later on).

It is perfectly fine, but you will have to use the “git branch” in order to set the existing branch upstream branch.

$ git branch -u <remote>/<branch>

Let’s take the example of the “feature” branch that you just created to start working.

$ git checkout -b feature
Switched to a new branch 'feature'

You created some commits in your branch, you want to set the tracking branch to be master.

$ git branch -u origin/master
Branch 'feature' set up to track remote branch 'master' from 'origin'.

Great! You successfully set the upstream branch for your existing local branch.

Inspecting tracking branches configuration

In order to inspect your current Git configuration, list the hidden files and directories in your current working Git directory.

$ ls -al

total 16
drwxrwxr-x 3 schkn schkn 4096 Nov  5 16:10 .
drwxrwxr-x 7 schkn schkn 4096 Nov  5 16:10 ..
drwxrwxr-x 8 schkn schkn 4096 Nov  6 10:27 .git

Now, inspect the content of the “config” file located in the .git directory.

$ cat .git/config

[core]
        repositoryformatversion = 0
        filemode = true
        bare = false
        logallrefupdates = true
[remote "origin"]
        url = <repo_url>
        fetch = +refs/heads/*:refs/remotes/origin/*
[branch "master"]
        remote = origin
        merge = refs/heads/master

As you can see, Git keeps a reference between your local branch, the name of the remote, and the branch it has to merge with.

Conclusion

In this tutorial, you learned more about upstream branches and how they are related to remote-tracking branches in Git.

You learned different techniques in order to set remote-tracking branches using a command or an alias to set it.

You also learned how you can link your current local branches to existing remote-tracking branches easily with the branch command.

If you are interested in Software Engineering, we have a complete section dedicated to it on the website so make sure to have a look.

How To Clean Up Git Branches

How To Clean Up Git Branches | Git Clean Up Local and Remote Branches

Are you quite exhausted with the unused files in your Git Repository? Usually, we collect several distinct branches for the different features when working with Git. The possible way to resolve all these issues is to clean up your untracked git branches.

In this tutorial, we have explained many ways to clean up unused branches and make your Git workspace to be more organized. As a developer, you have to follow up these kinds of stuff up-to-date and make use of Git commands properly for your projects. This tutorial addresses the below available concepts in detail:

Git Clean

git clean is the built-in command used for cleaning up the untracked files. Be careful with this one, it deletes files permanently!

Always add -n or –dry-run options to preview the damage you’ll do!

  • Run git clean -f, to just clean untracked files.
  • Run git clean -f -d, to remove directories.
  • Run git clean -f -X, just removed an ignored files.
  • Run git clean -f -x, for cleaning ignored as well as non-ignored files.

The Git rebase merge

The four rebase commands needed to synchronize all three branches are:

cleanup@git:~$ git rebase feature develop
cleanup@git:~$ git rebase develop master
cleanup@git:~$ git rebase master feature
cleanup@git:~$ git rebase feature develop

Repeated rebase commands assist to clean up commits and flatten branch histories.

Also Check: 

Clean Up Local Git Branches

First of all, you want to check which branches have already been merged with your current branch.

In this case, we are going to imply that you want to delete local branches merged with master.

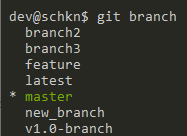
To check merged branches, use the “git branch” command with the “–merged” option.

$ git checkout master

$ git branch --merged <commit>

  feature
* master

If you omit to provide the commit hash, the command will imply that you are referring to HEAD (also known as the last commit of your current branch).

Now that you have the local branches already merged with master, you will need to delete them.

The easiest way to delete local Git branches is to use the “git branch” command with the “-d” option.

$ git branch -d <branch>

The “-d” option stands for “–delete” and it can be used whenever the branch you want to clean up is completely merged with your upstream branch.

If your branch is named “feature” for example, to clean up this branch, you would run

$ git branch -d release

Deleted branch feature (was bd6903f).

Force Delete Unmerged Git Branches

The other way of cleaning up local branches on Git is to use the “git branch” command with the “-D” option.

In this case, the “-D” option stands for “–delete -force” and it is used when your local branches are not merged yet with your remote tracking branches.

$ git branch -D <branch>

As you probably already know it, you have a local branch but you also have a remote-tracking which is a branch set to represent the state of your remote branch (also called the upstream branch).

As a consequence, if you perform a commit on your local branch without pushing it to the remote branch, your remote-tracking branch will be behind your local branch, thus unmerged.

To see differences between your local branch and your remote-tracking branch, execute the “git diff” command.

$ git diff <branch>..origin/<branch>

If there are any differences between the branches, you will have to use the “-D” option to delete the branch locally.

$ git branch -d <branch>

error: The branch 'branch' is not fully merged.
If you are sure you want to delete it, run 'git branch -D branch'.

$ git branch -D <branch>
Deleted branch feature (was 022519a).

Now that your local branches are cleaned-up, let’s see how you can delete the remote tracking branches from your Git repository.
One-line command

In some cases, it might be useful to have a one-liner in order to delete local unused branches.

For those who are curious, here is how you can delete unused local branches in one single line.

$ git branch --merged | egrep -v "(^\*|master|dev)" | xargs git branch -d

Before executing this, let’s have a quick explanation about this command :

  • git branch –merged : first, you are simply listing all the branches currently merged with your current checked out branch;
  • egrep -v “(^*|master|dev)” : you are using the invert matching feature of grep in order to exclude any branches that may be called “master” or “dev”, just in case;
  • xargs git branch -d : you are deleting every single branch listed before.

Note: You can modify the egrep command in order to include your own branches.

Clean Up Remote Tracking Branches

As a reminder, a tracking-branch is a local branch set to track changes done on the remote branch of your Git server.

Those tracking branches are created in order to track changes but they may become obsolete if remote branches were deleted on the server.

In this case, let’s say that you have a local “feature” branch, a remote-tracking branch named “origin/feature”, but the “feature” branch has been deleted on the remote.

Git Remote Prune

In order to clean up remote tracking branches, meaning deleting references to non-existing remote branches, use the “git remote prune” command and specify the remote name.

$ git remote prune <remote>

In order to find the name of your current configured remotes, run the “git remote” command with the “-v” option.

$ git remote -v

origin  https://gitserver.com/user/repository.git (fetch)

In this example, the remote name is “origin”.

In order to delete remote tracking branches, we would then execute

$ git remote prune origin

Pruning origin
URL: https://gitserver.com/user/repository.git
 * [pruned] origin/feature

Prune while fetching

In some Git workflows, branches are deleted on the remote whenever they are integrated with the master branch.

Instead of prune your remotes periodically, you can also fetch the new references and prune your branches simultaneously.

In order to clean up remote-tracking branches while fetching, use the “git fetch” command with the “–prune” option.

$ git fetch --prune <remote>

Alternatively, you can simply use the “-p” shortcut instead of typing “prune” every time.

$ git fetch -p <remote>

In the case of the origin remote, this would give

$ git fetch --prune origin

From https://gitserver.com/user/repository.git
 - [deleted]         (none)     -> origin/feature

However, specifying the prune option may be a bit tiring.

Luckily for you, you can configure your Git workspace in order to execute the prune operation every time you perform a fetch or a pull operation.

To configure Git to execute prune for every fetch, execute the following command

$ git config --global fetch.prune true

Defining your Gitflow Workflow

When working with remote-tracking and local branches, it is important for you and your team to define a Git flow that you can stick to.

If you are working with somebody in order to review changes and approve them into your codebase, it might also be necessary for the reviewer to delete the branch on the remote afterwards.

This way, you will be able to prune your unused remote-tracking branches and your local branches as seen in the first section.

Defining this step is important as it can become quite messy to deal with dozens of different branches on your local Git repository.

Now that you have a clearer idea on how to delete unused remote-tracking branches, let’s see how you can perform the same trick for remote branches.

Clean Up Remote Branches

In our last chapter, we are going to see how we can delete remote branches when they are not used anymore.

Before performing any deletion operations on your Git repository, make sure that you are up-to-date with recent commits or merges done on your repository.

$ git pull

Now that you are up-to-date, you can starting deleting your old remote branches.

To clean up old remote branches, use the “git branch” command with the “-r” and “–merged” options.

As always, you need to be on the target branch to see branches already merged with this branch.

$ git checkout master

$ git branch -r --merged <commit>

origin/feature
origin/master

Note: if you don’t specify the commit, the command will simply imply that you are referring to HEAD (also known as the last commit on the branch)

Now that you know the remote branches already merged with master, you can use the “git push” command in order to delete remote branches.

$ git push <remote> --delete <branch>

In the example given previously, this command would give

$ git push origin --delete feature

To https://gitserver.com/user/repository.git
 - [deleted]         feature

One-line command

The command provided is actually very similar to the one used in order to delete local Git branches.

To delete unused remote branches, you can use the following one-liner

$ git branch -r --merged | egrep -v "(^\*|master|dev)" | xargs -n 1 git push --delete origin

Again, let’s have a quick explanation of the different parts of this command :

  • git branch -r –merged : in this case, you are listing remote branches that are currently merged with your current checked out branch. As a consequence, make sure that you are on the correct branch, remember that the “git branch –merged” command takes the HEAD when not provided with a commit SHA;
  • egrep -v “(^*|master|dev)” : in this part, you are using the invert-matching feature of grep in order to exclude the dev and the master branches;
  • xargs -n 1 git push –delete origin : in this case, you are taking every single branch listed and deleting it on the remote.

Conclusion

From the above stuff, you will learn all the ways of cleaning up unused branches on Git, whether they are local, remote tracking branches or remote branches. If you want to check more Git related articles then keep visiting our JunosNotes.com website.

How To Create a Git Branch

How To Create a Git Branch | Learn Git Create New Branch from Current Branch

It is very easy to create and manage branches on Git for developers. As a matter of fact, the flexibility and power of its branching model is the major advantage of git. In Git, branches are a part of your everyday development process. Git branches are effectively a pointer to a snapshot of your modifications.

When you want to add a new feature or fix a bug, you need to create a new branch to encapsulate your changes. In this tutorial, you can get a deeper knowledge of Git branches and easily can understand why they chose to express this behavior in such a non-obvious manner. Also, take a look at the main concept of today’s guide ie., How to create a Git Branch along with Git Commands.

What is a branch?

A branch in Git is simply a lightweight movable pointer to [a commit]. The default branch name in Git is master.

What is Git Branching?

Git branching allows developers to diverge from the production version of code to fix a bug or add a feature. However, developers create branches to work with a copy of the code without changing the current version.

What does the “git branch” command do?

There are a variety of tasks that can perform by using the “git branch” command. They are as follows:

  • creating new local branches
  • deleting existing local or remote branches
  • listing local and/or remote branches
  • listing branches that e.g. haven’t been merged yet

How do I create a new branch based on the current HEAD?

If you want to create a new branch as per your currently checked out (HEAD) branch, just use “git branch” with the name of the new branch as the only parameter shown below:

$ git branch <new-branch>

Creating a Git branch using checkout

The easiest way to create a Git branch is to use the “git checkout” command with the “-b” option for a new branch. Next, you just have to specify the name of the branch you want to create.

$ git checkout -b <branch-name>

As an example, let’s say that you want to create a new Git branch from the master branch named “feature”

To achieve that, you will run the “git checkout” command with the “-b” option and add “feature” as the branch name.

$ git checkout -b feature
Switched to new branch 'feature'

As you can see, by using the “git checkout” command, you are creating a new branch and you are switching to this new branch automatically.

But what if you wanted to create a Git branch without switching to the new branch automatically?

Create Git Branch without switching

In order to create a new Git branch, without switching to this new branch, you have to use the “git branch” command and specify the name of the Git branch to be created.

$ git branch <branch_name>

Later on, you can switch to your new Git branch by using the “git checkout” function.

$ git checkout <branch_name>

Going back to our previous example, let’s say that you want to create a branch named “feature”.

$ git branch feature

You can inspect existing branches by running the “git branch” command with the “-a” option for all branches.

$ git branch -a

Create Git Branch without switching create-branch

Awesome, you have successfully created a new Git branch and you switched to it using the checkout command.

Create Git Branch from Commit

In the last sections, we have seen how you can create a new Git branch from the HEAD commit of the current branch.

In some cases, you want to create a Git branch from a specific commit in your Git history.

To create a Git branch from a commit, use the “git checkout” command with the “-b” option and specify the branch name as well as the commit to creating your branch from.

$ git checkout -b <branch_name> <commit_sha>

Alternatively, you can use the “git branch” command with the branch name and the commit SHA for the new branch.

$ git branch <branch_name> <commit_sha>

Going back to our previous example, let’s say that you want to create a Git branch from a specific commit in your Git history.

To get commits SHA from your history, you have to use the “git log” with the “–oneline” option.

$ git log --oneline --graph

* 9127753 (HEAD -> master) Commit 3
* f2fcb99 Commit 2
* cab6e1b (origin/master) master : initial commit

To create a new Git branch from the second commit (f2fcb99), you would run the following command

$ git checkout -b feature f2fcb99
Switched to a new branch named 'feature'

Using the “git log” command, you can verify that your branch was created from the second commit of your history.

$ git log --oneline --graph

* f2fcb99 (HEAD -> feature) Commit 2
* cab6e1b (origin/master) master : initial commit

Awesome, you have successfully created a new Git branch from a specific commit!

Create Git Branch from Tag

In previous tutorials, we have seen that Git tags are pretty useful: they can be used as reference points in your development.

As a consequence, it can be quite useful to create Git branches from existing tags.

In order to create a new Git branch from a tag, use the “git checkout” command with the “-b” option and specify the branch name as well the tag name for your new branch.

$ git checkout -b <branch_name> <tag_name>

Alternatively, if you don’t want to switch to your new branch, you can use the “git branch” with the branch name and the tag name.

$ git branch <branch_name> <tag_name>

Back to our previous example, let’s say that you want to create a new Git branch from a tag named “v1.0” in your history.

In order to list your existing tags, you can use the “git tag” command. Alternatively, you can use the “git log” command to identify a tag associated with a commit.

$ git tag
v1.0

Now that you have identified your tag, you can create a new branch from it using the “git checkout” command.

$ git checkout -b feature v1.0

Next, you can inspect your Git history in order to make sure that your new branch was indeed created from the tag.

Create Git Branch from Tag create-tag

Alternatively, you could have used the “git branch” in order to create this branch.

$ git branch feature v1.0

How to create a new branch from a remote branch?

If you require to take a remote branch based on your new local branch, you can utilize the “–track” option:

$ git branch --track <new-branch> origin/<base-branch>

On the other hand, you can also use the “checkout” command to perform this. If you want to name the local branch like the remote one, you only have to define the remote branch’s name:

$ git checkout --track origin/<base-branch>

How to create a new branch in a remote repository?

Once you are done with working on a new local branch for some time, you may require to publish it in your remote repository, in order to share it with your team:

$ git push -u origin <local-branch>

The “-u” flag tells Git to establish a “tracking connection”, which will make pushing and pulling much easier in the future.

Note on Ambiguous Names

When you are creating new Git objects (whether they are branches, tags, or commits), you might run into this error

fatal: Ambiguous object name: <object>

So why does this error happens?

This exception occurs whenever two objects are named in the exact same way: a branch and a tag for example.

Whenever you are running a command involving one of those objects, Git can not tell the difference between the two and it returns this exception.

You might run into this error when running the “checkout” command.

If you are creating a new branch from a tag named “v1.0”, but one of your branches is already named “v1.0”, you will be presented with this error

$ git checkout -b feature v1.0
warning: refname 'v1.0' is ambiguous.
fatal: Ambiguous object name: 'v1.0'.

In order to solve this issue, you have to specify that your last argument is a tag and not the branch name.

To solve ambiguous notation, simply append the refs notation to the object that is ambiguous

$ git checkout -b feature refs/tags/v1.0
Switched to a new branch 'feature'

Conclusion

In this tutorial, you learned how you can easily create Git branches using the “git checkout” command.

You also learned that you can the “git branch” command if you don’t want to switch automatically to your new branch.

Finally, you have seen more advanced use-cases: creating branches from specific commits or from specific tags in your Git history.

Curious about Git, you can check our latest tutorials:

If you are interested in Git or in software engineering, we have a complete section dedicated to it on the website, so make sure to check it out!

How To Create and Apply Git Patch Files

How To Create and Apply Git Patch Files | Creating & Applying Git Patch Files with Different Git Commands

Patches are a substitute way to exchange code changes and exchanging code via patches is rare. Also, it is a valuable tool in specific circumstances. With creating a patch, you can basically export one or more commits into plain text files, that you can quickly share with someone else for integration.

Traditionally, Git Patch is linked to the Unix Patch command that was utilized in old Unix versions to store differences between files or binaries. In this ultimate tutorial, we are going to talk completely about how to create and apply git patch files and what are the commands used to make it happen. Also, check our Git Commands Tutorial to find all commands in one place.

Create Git Patch Files using git format-patch

To create a Git patch file, you have to use the “git format-patch” command, specify the branch and the target directory where you want your patches to be stored.

$ git format-patch <branch> &lt;options>

So will the format-patch command do when executed?

The “git format-patch” command will check for commits that are in the branch specified but not in the current checked-out branch.

As a consequence, running a “git format-patch” command on your current checkout branch won’t output anything at all.

Also Read: How To Generate Git SSH Keys

Creating a Git patch with git diff

If you want to see commits differences between the target branch and the current checked-out branch, use the “git diff” command and specify the target and the destination branch.

$ git diff --oneline --graph <branch>..<current_branch>

* 391172d (HEAD -> <current_branch>) Commit 2
* 87c800f Commit 1

If you create patches for the destination branch, you will be provided with two separate patch files, one for the first commit and one for the second commit.

For example, let’s say that you have your “master” branch and a “feature” branch that is two commits ahead of your master branch.

When running the “git diff” command, you will be presented with the two commits added to your feature branch.

$ git diff --oneline --graph master..feature

* 391172d (HEAD -> feature) My feature commit 2
* 87c800f My feature commit 1

Now, let’s try creating patch files from commits coming from the master branch.

$ git format-patch master

0001-My-feature-commit-1.patch
0002-My-feature-commit-2.patch

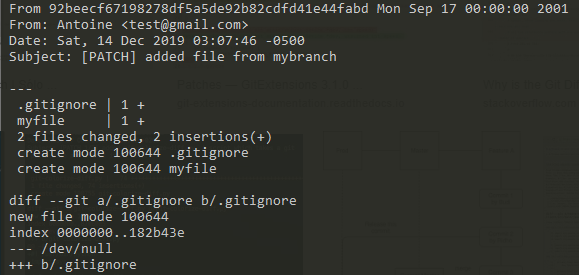
How To Create and Apply Git Patch Files patchfile

You successfully created two patch files using the “git format-patch” command.

Creating Git Patch Files in a Directory

As you probably noticed from the previous section, patch files were created directory in the directory where the command was run.

This might not be the best thing because the patch files will be seen as untracked files by Git.

$ git status

Untracked files:
  (use "git add <file>..." to include in what will be committed)

        0001-My-feature-commit-1.patch
        0002-My-feature-commit-2.patch

In order to create Git patch files in a given directory, use the “git format-patch” command and provide the “-o” option and the target directory.

$ git format-patch <branch> -o <directory>

Back to our previous example, let’s create Git patch files in a directory named “patches”.

This would give us the following command

$ git format-patch master -o patches

patches/0001-My-feature-commit-1.patch
patches/0002-My-feature-commit-2.patch

In this case, we provided the “git format-patch” will a local directory but you can provide any directory on the filesystem out of your Git repository.

Create Git Patch for Specific Commit

In some cases, you are not interested in all the existing differences between the two branches.

You are interested in one or two commits maximum.

You could obviously cherry-pick your Git commits, but we are going to perform the same action using Git patches.

In order to create a Git patch file for a specific commit, use the “git format-patch” command with the “-1” option and the commit SHA.

$ git format-patch -1 <commit_sha>

In order to get the commit SHA, you have to use the “git log” command and look for the corresponding commit SHA.

For example, given the example we just used, let’s inspect the differences between master and feature using the “git log” command.

$ git log master..feature

commit 391172da58dbfa27bc995eda538012ae1fbc5383 (HEAD -> feature)
Author: Bob <test@gmail.com>
Date:   Wed Dec 11 16:24:46 2019 -0500

    My feature commit 2

commit 87c800f87c09c395237afdb45c98c20259c20152
Author: Bob <test@gmail.com>
Date:   Wed Dec 11 16:03:15 2019 -0500

    My feature commit 1

In this case, we are not interested in the second commit (with SHA 391172..) but in the first commit (with SHA 87c800..)

Copy the commit SHA and run the “git format-patch” command again.

You can optionally provide the output directory similarly to the example we provided in the previous section.

$ git format-patch -1 87c800f87c09c395237afdb45c98c20259c20152 -o patches

patches/0001-My-feature-commit-1.patch

Awesome! You successfully created a Git patch file for one single commit on your repository.

Apply Git Patch Files

Now that you have created a patch file from your branch, it is time for you to apply your patch file.

Using git am to Apply a Patch

In order to apply a Git patch file, use the “git am” command and specify the Git patch file to be used.

$ git am <patch_file>

Referring to our previous example, make sure to check out the branch where you want your patch file to be applied.

$ git checkout feature

Switched to branch 'feature'
Your branch is up to date with 'origin/feature'.

Now that you are on your branch, apply your Git patch file with the “git am” command.

$ git am patches/0001-My-feature-commit-1.patch

Applying: My feature commit 1

Now, taking a look at your Git log history, you should see a brand new commit created for your patch operation.

$ git log --oneline --graph

* b1c4c91 (HEAD -> feature) My feature commit 1

When applying a Git patch, Git creates a new commit and starts recording changes from this new commit.

Awesome! You have successfully applied your Git patch file using “git am”.

Git Patch Troubleshooting

In some cases, you might run into errors when trying to apply Git patch files.

Let’s say for example that you have checked out a new branch on your Git repository and tried to apply a Git patch file to this branch.

When applying the Git patch, you are running into those errors.

Git Apply Patch failed: file already exists in Index

This case is easy to solve. You tried to apply a Git patch file that contained file creations (say you created two new files in this patch) but the files are already added into your new branch.

In order to see files already stored in your index, use the “git ls-files” command with the “–stage” option.

$ git ls-files --stage <directory>

100644 eaa5fa8755fc20f08d0b3da347a5d1868404e462 0       file.txt
100644 61780798228d17af2d34fce4cfbdf35556832472 0       file2.txt

If your patch was trying to add the “file” and “file2” files into your index, then it will result in the “file already exists in index” error.

To solve this issue, you can simply ignore the error and skip the patch operation.

To skip a Git patch apply operation and ignore conflicts, use “git am” with the “–skip” option.

$ git am --skip

Git Apply Patch failed: error in file

In some cases, you might run into some “merging” errors that may happen when applying a patch.

This is exactly the same error as when trying to merge one branch with another, Git will essentially fail to automatically merge the two branches.

To solve Git apply merging errors, identify the files that are causing problems, edit them, and run the “git am” command with the “–continue” option.

$ git am --continue

Conclusion

In this tutorial, you learned how you can create Git patch files using the “git format-patch” command. Also, you have understood that it is possible to create Git patch files for single commits and to apply them to the target branch easily using the “git am” command.

How To Setup SSH Keys on GitHub

How To Setup SSH Keys on GitHub | How to Generate SSH Keys Windows & Linux?

Are you using GitHub without setting up SSH Keys? Then, you’re actually missing out on more security and convenience. SSH Keys are the best two authentication methods used on GitHub for secure log-in and address modifications to repositories. Well, this tutorial will help you Setup SSH keys on GitHub easily and in a simpler way for administration.

If you want to check whether you have installed and configured Git on your Windows or Linux OS then make use of this Git Commands tutorial & dig deep into your main requirement.

Why use an SSH Key?

If you want to access your account in a convenient and secured way then it can be possible by using an SSH Key. It’s helpful because you don’t need to memorize a long password. Also, you can get your actual password so brutally long and secure that no human or bot could guess it. The SSH key works as an actual key that only you control.

How to Create SSH keys for Github

Depending on the operating system you are using, there are two ways of creating SSH keys for GitHub.

Do Check: How To Generate Git SSH Keys

Create SSH keys on Linux using ssh-keygen

First of all, let’s have a look at creating SSH keys on Linux operating systems.

To create SSH keys on Linux, use the ssh-keygen command with an RSA algorithm (using the “-t” option)

$ cd ~/.ssh/ && ssh-keygen -t rsa -b 4096 -C "email@example.com"

Note: It is recommended to setup your SSH keys into the .ssh directory of your home directory. Storing them there is more convenient if multiple developers are working on the same repository.

You will be prompted with multiple questions.

You can choose to store your key in a custom file by typing a custom filename.

You can also choose to leave it blank in order for it to be added to the “id_rsa” existing file.

Generating public/private rsa key pair.
Enter file in which to save the key (/home/schkn/.ssh/id_rsa): custom_id_rsa
Enter passphrase (empty for no passphrase):
Enter same passphrase again:
Your identification has been saved in custom_id_rsa.
Your public key has been saved in custom_id_rsa.pub.
The key fingerprint is:
SHA256:6yBEAZCCAZCAfdeokgo256452574ffaaz+F6dedefr23222CUXTQc email@example.com
The key's randomart image is:
+---[RSA 4096]----+
|@*o+=+.   E..    |
|*+.+o    o .     |
|... =.  ....     |
| . + =. ..o      |
|  . *.o.S  .     |
|   . o.= =  .    |
|    . o o.+.     |
|     . o.oo      |
|        =*o      |
+----[SHA256]-----+

Similarly, you can leave the passphrase blank, otherwise, you will be asked for it as a password when performing operations on your repositories.

The ssh-keygen utility created two files for you :

  • file_id_rsa: the private key used in the SSH authentication process. You should not share this private key by any means.
  • file_id_rsa.pub: the extension gives the hint that this is the public key of your SSH authentication process. This is the key you are going to copy to Github in order to perform operations on your repos.

Configure your SSH keys

If you chose to create the GitHub public key in a separate file, named “custom_id_rsa” for example, you need to configure your SSH client in order to take into account this separate file.

Create a new file named “config” in your .ssh directory and paste the following content into it.

$ sudo nano ~/.ssh/config

Host *
    Hostname github.com
    User git
    IdentityFile ~/.ssh/custom_id_rsa

If you chose a different name, make sure to change the file name in the IdentifyFile line.

Save your file – you should not have to restart your SSH client for the changes to be applied.

Now that your files are ready, you can skip the next section dedicated to Windows hosts and start importing your keys to GitHub.

Create SSH keys on Windows using ssh-keygen

In order to use ssh-keygen on Windows, you need to have the OpenSSH client enabled.

Enabling OpenSSH client on Windows 10

In order to enable the OpenSSH client, you essentially have two options: by using Powershell or by using the graphical interface.

To enable the OpenSSH client via Powershell, use the “Add-WindowsCapability” option and specify the OpenSSH Client.

$ Add-WindowsCapability -Online -Name OpenSSH.Client*

Path          :
Online        : True
RestartNeeded : False
Note : you need to be administrator in order to enable OpenSSH on your computer.

You can also enable the OpenSSH client via the graphical interface :

  • Click on “Start” and search for “Manage Optional Features
  • Click on “Add a Feature
  • Search for OpenSSH and install the OpenSSH client

Installing the OpenSSH client on Windows 10 will allow you to perform multiple commands via the Powershell: ssh-add, ssh-keygen (the one we are interested in), ssh-agent, ssh-keyscan, and the ssh executable.

On Windows, for versions greater than Windows 7, you can use ssh-keygen in order to connect to your remote Git repositories.

Open Powershell and type the following commands

$ ssh-keygen

Enter file in which to save the key (C:\Users\schkn/.ssh/id_rsa): C:\Users\schkn/.ssh/custom_id_rsa
Enter passphrase (empty for no passphrase):
Enter same passphrase again:
Your identification has been saved in custom_id_rsa.
Your public key has been saved in custom_id_rsa.pub.
The key fingerprint is:
SHA256:WTQ schkn@DESKTOP-PH31996
The key's randomart image is:
+---[RSA 2048]----+
|          o...   |
|         . ...   |
|      . + . .    |
|     E + * =     |
|    .   S B o.   |
|     ..= * .. . .|
|    ..=o* . .o.o.|
|     +oo+*  ..ooo|
|     .=B+.oo..oo |
+----[SHA256]-----+

In the first prompt, you can choose to save your public key in a separate file, but you will need to specify the entire path to the file.

If you chose to create your keys in a separate file, you will need to create a file named “config” into your .ssh directory

Note: The “config” file needs to have no extension at all, it cannot be named “config.txt” for example.

Configure your SSH keys

In order to configure your SSH keys, run the “New-Item” command to create a new file using Powershell.

$ New-Item -Path 'C:/Users/user/.ssh/config' -ItemType File

Note: You have to replace “user” with the actual user using the account

In the configuration file, paste the following content in order to select the correct key when performing Git commands.

Host *
    Hostname github.com
    User git
    IdentityFile ~/.ssh/custom_id_rsa

Save your file, and you should be good to go.

Add SSH key to your GitHub Account

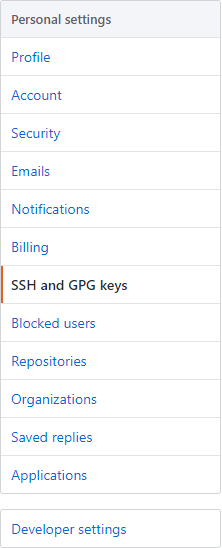
In order to add an SSH key to your GitHub account, head over to the settings of your account and select the “SSH and GPG keys” option in the left menu.

Add SSH key to your GitHub Account ssh-gpg

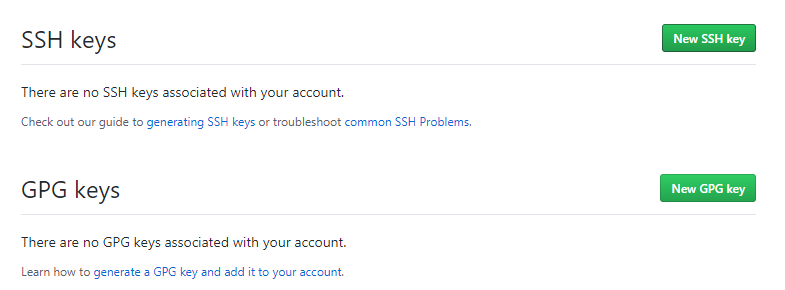
On the right panel, click on the “New SSH key” button in order to create a new SSH key for Github.

Add SSH key to your GitHub Account ssh-key-create

When clicking on “New SSH key“, you will be asked to choose a name for your key and to paste the public key you saved before.

To get the content of your public key on Linux, use the cat command on your public key file.

$ cat ~/.ssh/custom_id_rsa.pub

ssh-rsa AAAAB3NzaC1yc2EAAAADAQABAAACAQC+HvRnxwPJyUiUO/UCPKrW6mFPgJF8LxsC2lbBePtn+UDv4Xy+eMJRgG5fbaqy2i0tvP+7T7bjVWtO9AAIlclkIVeu5LmV7RaE8H78VXxGVQLcWXvlS0SGlwIxXXd9hBeGh6qPmrya63Ezrt/J1fNy6Ro9s5+ndLogBG2G0JKdAoytbCIBgPmm6sK9nvv3kHrjSK4S0rRz0nb9oaxCQF6V+T75hPgYp+JMOl8yZZMGLN3GPadE2ye2/lskJXzYjlHyjAE6a0g+vrHmMjOULPUrO+aHEA84f   email@example.com

Note: You can also use the “cat” command in Powershell

Paste the content of your public key to the dedicated key text area on GitHub.

Click on “Add SSH key” in order to complete the process.

A new entry should be added to your SSH keys with the key fingerprint as well as the permissions given by the key (read and write by default)

Congratulations, you have successfully added your SSH keys to GitHub.

In order to validate the entire process, we are going to clone a Git repository to our local system.

This is where you might have authentication failures but multiple solutions will be provided in order to solve those issues.

Test GitHub SSH keys

In order to test our GitHub SSH keys, let’s try to clone one of our repositories on our local server.

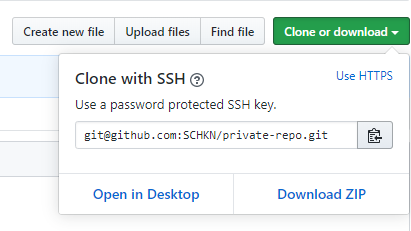
In order to find the SSH URL, you have to use, head over to your repository and click on the “Clone or download” green button.

Make sure that you are using the SSH method by clicking on “Use SSH” if not already selected.

Test GitHub SSH keys clone-download

To clone the Github repository, use the “git clone” command with the URL provided in the previous box.

$ git clone git@github.com:SCHKN/private-repo.git

Cloning into 'private-repo'...
remote: Enumerating objects: 3, done.
remote: Counting objects: 100% (3/3), done.
remote: Total 3 (delta 0), reused 0 (delta 0), pack-reused 0
Receiving objects: 100% (3/3), done.

Awesome!

The repository was correctly fetched from GitHub and you can start working on the codebase.

Troubleshooting

In some cases, you may not be able to fetch your repositories from GitHub when setting up SSH authentication.

You will probably get the following error when performing simple git commands on your client

git@github.com: Permission denied (publickey)

This may be happening because of multiple reasons :

  • Your public key is not correctly set on GitHub

Make sure in your account settings that your public key is set and that the permissions are also set properly.

  • You are using a different file from the “id_rsa” default file to store your keys and you did not create the “config” file into your .ssh directory.

Refer to the previous sections to set your “config” file properly.

  • You are not using the correct URL in order to fetch your repositories.

Make sure that you are executing your commands as the “git” user and not with the GitHub username you are using on the website.

$ git clone git@github.com:SCHKN/private-repo.git   <--- Correct

$ git clone user@github.com:SCHKN/private-repo.git  <--- Incorrect

Conclusion

In this tutorial, you learned how you can set up SSH keys for Github accounts and how you will have to configure them to use custom keys.

If you are curious about Git or about software engineering in general, we have a complete section dedicated to it on the website, so make sure to read our latest guides.

How To Create Git Tags

How To Create Git Tags | Types of Tags in Git | Creating Git Tags with Examples

In Git History, tags are ref’s that point to specific points. Generally, Tagging is done to capture a point in history that is utilized for a marked version release (i.e. v1.0.1). A tag is like a branch that doesn’t change. If your want to have a reference to a given release of your software should create a new tag.

Are you new to Git and not familiar with the Git tags & Git Commands? Check out this entire tutorial and learn How to Create Git Tags easily along with naming the Git tags following the best practices of “Semantic Versioning”.

How do you Create Git Tag?

In order to create a new tag, you have to use the “git tag” command and specify the tag name that you want to create.

$ git tag <tag_name>

As an example, let’s say that you want to create a new tag on the latest commit of your master branch.

To achieve that, execute the “git tag” command and specify the tag name.

$ git tag v2.0

Usually, you want to name your tag following the successive versions of your software.

Using this command, the latest commit (also called HEAD) of your current branch will be tagged.

Create Git Tag create-tag-1

To verify that your Git tag was successfully created, you can run the “git tag” command to list your existing tags.

$ git tag

v1.0
v2.0

Good job!

You have successfully created a tag on Git.

Create Tag with Message

Creating tags is great but you will need to add a description to your tag in order for other contributors to understand why you created it.

You would not create a commit without a commit message, you would not create a Git tag without a message.

To create a Git tag with a message, use the “git tag” command with the “-a” option for “annotated” and the “-m” option for message.

$ git tag -a <tag_name> -m "message"

Note: If you don’t provide the “-m” option, your default text editor will open in order for you to type the tag message.

As an example, let’s say that you want to create a new annotated tag on your master branch with the message “New release for v3.0”

To achieve that, you would run the following command

$ git tag -a v3.0 -m "New release for v3.0"

You can verify that your Git tag was successfully created by running the “git tag” command with the “-n” option.

$ git tag -n

Create Tag with Message create-tag-2

Git Tag Types

As of now we know we have learned about git tag and how to create easily, let’s discuss the type of tags that supported by git. You can have two types of Git tags, one is Lightweight Tags and another is Annotated Tags.

Lightweight Tags

As the name suggests Lightweight Tags is the simpler and trimmed down version of creating a tag without any meta-information about the tag. Here is the syntax of the Git Lightweight tags.

$ git tag <tag_name>

Annotation Tags

Annotation Tags is a process of creating a Git tag with some extra meta information. To create an annotation tag you just need to add “-a” with the git tag command and “-m” to specify the message.

$ git tag -a v1.0 -m “Release v1.0 create.”

Now, you can apply the “git show” command to view all the data attached with the tag we simply created with annotation.

Naming tags with Semantic Versioning

When naming tags, the Git CLI does not put any constraints on the name of your Git tag.

However, there are some best practices when it comes to naming Git tags: using semantic versioning.

Semantic versioning is quite easy to understand: you want to name tags as versions of your software in the form of

v<major>.<minor>.<patch>

Where

  • major: is a version number where you introduced breaking modifications (modifications of your new version are NOT compatible with previous versions);
  • minor: is a version number that is compatible with previous versions;
  • patch: is an increment for a bug fix or a patch fix done on your software.

For example, let’s say that you are currently working on version 1.0.0 of your software.

In your latest commit, you introduced a code-breaking change, as a consequence you are going to increment the major version number.

$ git tag v2.0.0

Push your created tags

By default, the “git push” command does not automatically push your tags to your remote repository.

To push your newly created tags, use the “git push” command and specify the “–tags” to explicitly push tags to your remote Git repository.
$ git push --tags

For example, given the tags that you created in the previous section, you would get the following output

$ git push --tags

To <user>/<repository>.git
* [new tag]         v1.0 -> v1.0
* [new tag]         v2.0 -> v2.0

Great, now your tags are pushed to your remote repository and your colleagues can start fetching it.

Create Git Tag for Commit

In some cases, you may want to create a Git tag for a specific commit of your Git history.

In order to create a Git tag for a specific commit, use the “git tag” command with the tag name and the commit SHA for the tag to be created.

$ git tag <tag_name> <commit_sha>

If you want to create an annotated tag for a specific commit, you can use the “-a” and “-m” options we described in the previous section.

$ git tag -a <tag_name> <commit_sha> -m "message"

As an example, let’s say that you want to create an annotated commit for the first commit of your Git history.

First, list the commits SHA by using the “git log” command with the “–oneline” option to get short commits SHA.

$ git log --oneline

9127753 (HEAD -> master) Commit 3
f2fcb99 (feature) Commit 2
cab6e1b (origin/master) master : initial commit

In order to create an annotated tag for the first commit in your Git history, you would execute the following command

$ git tag -a v1.0 cab6e1b -m "Tagged the first commit with v1.0"

Next, run the “git log” command again to make sure that your commit was correctly tagged.

$ git log --oneline

9127753 (HEAD -> master) Commit 3
f2fcb99 (feature) Commit 2
cab6e1b (tag: v1.0, origin/master) master : initial commit

Awesome, you have successfully created a tag for a specific commit in your Git history.

Create Tag For Last Commit

If you want to create a Git tag from the last commit, there is a shorter syntax that you can use: the HEAD syntax.

In order to create a Git tag for the last commit of your current checked-out branch, use the “git tag” command with the tag name and specify “HEAD” as the commit to create the tag from.

$ git tag <tag_name> HEAD   (for the last commit)

$ git tag <tag_name> HEAD~1  (for the commit before HEAD)

$ git tag <tag_name> HEAD~1  (for two commits before HEAD)

Similarly, if you want your tag to be annotated, you can still use the “-a” and “-m” options to annotate your tag.

$ git tag -a <tag_name> HEAD -m "message"

Like in the previous sections, you can verify that your tag was successfully created by running the “git tag” command with the “-n” option.

$ git tag -n

v1.0
v2.0
v3.0

Congratulations, you have successfully created a new tag for the last commit of your repository.

Conclusion

In this tutorial, you learned how you can easily create Git tags for your projects.

You also discovered advanced usages of tags with annotated messages but also about naming your git tags correctly using semantic versioning.

If you are interested in Git, you should have a look at our previous tutorials :

Also, if you are passionate about software engineering, we have a complete section dedicated to it on the website, so make sure to check it out!

How To Git Stash Changes

How To Git Stash Changes | Learn Git Stash Apply, Pop, Clear, Show, Drop

Guys who are new to Git should aware of the git stash command as it is the most important command in Git. It is performed to protect all the changes made with the current working directory and to go back to the last commit done on the branch (also known as HEAD).

In this tutorial, we guys will definitely come to know about git stash commands and how to do git stash changes in practical cases. Just make use of the available links and jump into the exact stuff you required to learn about Git stashing.

Introduction to Git Stash

In some cases, you need to change the branches however you are operating an unfinished part of your current project. In that situation, you don’t want to do a commit to half-done work. Here, Git stashing permits you to do so. The git stash command allows you to change branches without committing the current branch.

Also Check: Git Commands

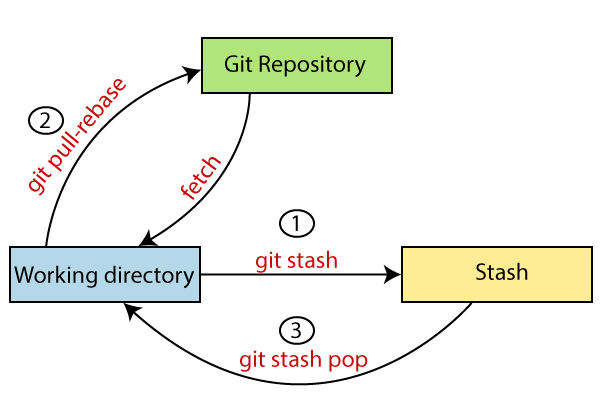
The following image shows the properties and role of stashing concerning the repository and working directory.

git stash image

Usually, the meaning of stash is “store something safely in a hidden place.” The sense in Git is also the same for stash; Git temporarily saves your data safely without committing.

What is Stashing?

Stashing takes the messy state of your working directory, and temporarily saves it for further use. Several options are available with git stash. Some of the helpful options are provided here:

  • Git stash
  • Git stash save
  • Git stash list
  • Git stash apply
  • Git stash changes
  • Git stash pop
  • Git stash drop
  • Git stash clear
  • Git stash branch

Stashing changes come with a special set of Git commands intended to createdelete and apply stashes at will.

Do Check: How To Set Upstream Branch on Git

Create a Git stash

The easiest way to create a git stash is to simply run the “git stash” command without any parameters.

$ git stash

As a consequence, all the changes staged for commit in your current working directory will be saved on the side for later use.

$ git stash
Saved working directory and index state WIP on branch1: 808b598 Initial commit

As you can see, my working directory as well as my index was saved for the “branch1” which is the current name of my branch.

After the colons, you can see the hash of the HEAD commit as well as the commit message: this is the name of your stash.

In this case, no names were assigned to our stash which might not be very handy if you want to pop your stash later on.

Create a Git stash with a name

In order to create a git stash with a name, use the “save” command and specify the name of your stash.

$ git stash save "my_stash_name"

Back to the example, we gave before on the branch named “branch1”, we would run

$ git stash save "modified README.md"
Saved working directory and index state On branch1: modified README.md

Now, Git did not provide a default name (made by the last HEAD commit message) but it assigned a custom name to it.

Alternatively, you can use the “git stash push” command in order to create a stash with a name.

$ git stash push -m "modified the README.md" again
Saved working directory and index state On branch1: modified again the READ.me

Stashing your work

The git stash command takes your uncommitted changes (both staged and unstaged), saves them away for later use, and then reverts them from your working copy. For instance:

$ git status
On branch main
Changes to be committed:
   new file: style.css
Changes not staged for commit:
   modified: index.html

$ git stash
Saved working directory and index state WIP on main: 5002d47 our new homepage
HEAD is now at 5002d47 our new homepage

$ git status
On branch main
nothing to commit, working tree clean

Currently, you’re free to make changes, create new commits, switch branches, and perform any other Git operations; then come back and re-apply your stash when you’re ready.

Remark that the stash is local to your Git repository; stashes are not given to the server when you push.

Stash a specific file

Using the previous commands, you have stashed all the tracked files in your current working directory.

In some cases, you may want to stash a specific file in order to retrieve it later on.

To stash a specific file, use the “git stash push” command and specify the file you want to stash.

$ git stash push -m "message" <file>

For example, in order to stash the “README.md” file in our current working directory but keep changes done to the other files, we would run

$ git stash push -m "modified the README.md" README.md
Saved working directory and index state On branch1: modified README.md

However, the other tracked files that may be modified in your current working directory are untouched.

Stash untracked files

As you probably noticed before when creating stashes, stash only saves tracked files of your working directory by default.

But what if you wanted to stash untracked files of your current working directory?

In order to stash untracked files, add the “–include-untracked” option to your “git stash” initial command.

Alternatively, you can simply use the “-u” which is equivalent to the untracked longer version.

$ git stash --include-untracked
Saved working directory and index state WIP on branch1: 808b598 Initial commit

$ git stash -u

Specific Git Stash Branch

In some cases, you may want to stash your current changes into a specific branch.

Let’s say for example that you worked on the “master” branch for modifications, but you decide that your work may need a specific branch for integration.

This can be done with the “git stash branch” command.

$ git stash branch <branch_name>

$ git stash branch <branch_name> stash@{stash_index}

Let’s say for example that you want to stash your current changes in a branch named “branch1”, you would execute.

$ git stash branch branch1 stash@{0}

Switched to a new branch 'branch1'
On branch branch5
Changes not staged for commit:
  (use "git add <file>..." to update what will be committed)
  (use "git checkout -- <file>..." to discard changes in working directory)

        modified:   README.md

no changes added to commit (use "git add" and/or "git commit -a")
Dropped stash@{0} (8bf64dd0e0045069bf3b3e7d9e34f5e5227aefa7)

As you can see, the stash is dropped at the end of the process, essentially removing it completely from the stash stack.

Git Stash Changes

We can trace the stashes and their changes. To view & understand the changes in the file before stash and after stash operation, execute the below command:

Syntax:

$ git stash show

This command will help you display the file that is stashed and changes made on them. Take a look at the following output:

git stash changes output

This result explains that there are two files that are stashed, and performed two insertions on them.

Tracking Git Stash Changes

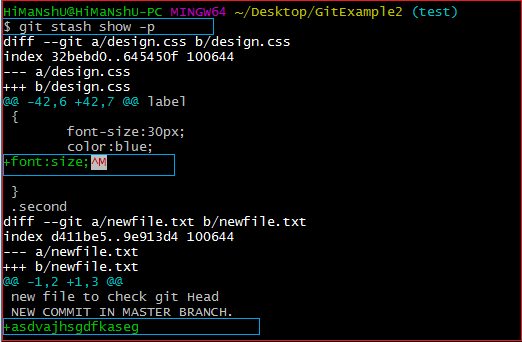
Also, we can precisely track what changes are performed on the file. To show the changed content of the file, execute the below command:

Syntax:

$ git stash show -p

Here, -p stands for the partial stash. The given syntax will display the edited files and content, view the below output:

git stash track

The above output is bestowing the file name with changed content. It runs as same as the git diff command and also gives the exact output.

Also, look at the below video tutorial to gain more knowledge on how to git stash changes:

List Git stashes

Now that you have created some stashes, it is time for you to list the stashes that you just created.

In order to list Git stashes, use the “git stash list” command.

$ git stash list

stash@{0}: WIP on branch1: 808b598 Initial commit
stash@{1}: On branch1: modified README.md
stash@{2}: On branch1: modified again the READ.me

As you can see, stashes are given an index starting at zero.

When creating new stashes, items are added to the stack meaning that the most recent stash has the index 0 while the oldest stash is at the bottom of the stack.

This is closely related to the concept of a stack in software engineering. A link to an in-depth article is included if you are curious about stacks.

Apply Git stashes

Now that you have saved your Git stashes on the side, you might want to “take them out from the stack” and apply them to your current working directory.

In order to apply your Git stash to your current working directory, use the “git stash apply” command and specify the stash you want to apply.

If you don’t specify any arguments to the apply command, the top of the stack will be applied.

$ git stash apply stash@{stash_index}

$ git stash apply (shortcut for git stash apply stash@{0})

For example, in order to apply the changes done in the stash with index 1, we would run

$ git stash apply stash@{1}

Already up to date!
On branch branch1
Your branch is up to date with 'origin/branch1'.

Changes not staged for commit:
  (use "git add <file>..." to update what will be committed)
  (use "git checkout -- <file>..." to discard changes in working directory)

        modified:   README.md

Untracked files:
  (use "git add <file>..." to include in what will be committed)

        file

By default, the stash applies command will list your current working directory after applying the corresponding stashes.

Now if you were to list your stashes, you would notice that applying your stash did not delete or remove the stash from the list.

$ git stash list

stash@{0}: WIP on branch1: 808b598 Initial commit
stash@{1}: On branch1: modified README.md
stash@{2}: On branch1: modified again the READ.me

If you want your stashes to be removed after applying them, you need to use the “git stash pop” command.

Pop Git stashes

So what is the difference between git stash pop and git stash apply?

The main difference is in the fact that the “git stash pop” applies your changes to your current working directory but it also deletes the stash from the stash stack.

To pop Git stashes, simply use the “git stash pop” command and specify the stash index you want to pop.

$ git stash pop stash@{stash_index}

Back to our previous stash example, this would give us

$ git stash pop stash@{1}

Already up to date!
On branch branch1
Your branch is up to date with 'origin/branch1'.

Changes not staged for commit:
  (use "git add <file>..." to update what will be committed)
  (use "git checkout -- <file>..." to discard changes in working directory)

        modified:   README.md

Untracked files:
  (use "git add <file>..." to include in what will be committed)

        file

Dropped stash@{1} (1adaf79224dca78aa6568b1e8154cbc4f747042f)

See the difference in the last line of the example?

The stash was dropped and removed from the stack.

Show Git stash differences

When you create a stash, it is most likely to perform some commits before going back to your stashed content.

As a consequence, you may want to see the differences between your stash and the most recent commit of your branch (also called HEAD)

To show the differences between a stash and the most recent commit, use the “git stash show” command.

$ git stash show stash@{stash_index}

README.md | 4 +++-
1 file changed, 3 insertions(+), 1 deletion(-)

As a consequence, you will be listed with the differences between files, the insertions, and the deletions done.

To see all the differences including content, add the “-p” option.

$ git stash show -p stash@{stash_index}

diff --git a/README.md b/README.md
index f25b874..1088f9a 100644
--- a/README.md
+++ b/README.md
@@ -1 +1,3 @@
-# private-repo
\ No newline at end of file
+The file was modified!

Drop Git stashes

In some cases, you may want to delete a Git stash entry from your stack.

In order to drop stashes, you have two options: with a drop or clear.

If you want to drop a specific stash from your stack, use the drop option and specify the stash index.

$ git stash drop stash@{stash_index}

For example, in order to delete stash with an index 1 from the previous example, you would run

$ git stash drop stash@{1}
Dropped stash@{1} (c11c6ae6c347d23dff8fbbf79d54a9e6e2e79b1c)

Drop all stashes using clear

If you want to delete all the Git stashes in your stack, you have to use the clear command.

$ git stash clear

Make sure that all your stashes were deleted with the list command.

$ git stash list

Conclusion

In this tutorial, you acquired basic knowledge about git stash such as how you can create stashes, delete stashes, and pop them in order to recover your work.

Git stash is pretty useful, but there are many other commands that you may find useful when using Git :

  • You can learn how to set the upstream branch on Git;
  • If you are just starting out, you can start by cloning repositories into your system.

If you are interested in software engineering, we have a complete section dedicated to it on the website, so make sure to check it out!

How To Unstage Files on Git | Different Ways to Unstage Files in Git

As developers, using & working with Git is mandatory. Git Users every time deals with many files in the local repository. If any user accidentally added any file to your Git then you can remove it from your index by performing the unstage files on Git. Unstaging file is very beneficial, it can be used to separate files in different commits or to do work on some other modifications.

If you are a beginner, then take help from the Junos Notes provided Git Commands Tutorial. However, this tutorial is completely on How to unstage files on Git and it addresses various methods to unstage all files or particular files or committed files elaborately in the below modules.

Prerequisites

  • Firstly, Installation of Git is the required
  • A Git project
  • Create a local and remote repository
  • A terminal window/command line
    • Linux: Activities > Search > Terminal
    • Windows: right-click Start > Command prompt (or Windows PowerShell)

Unstage a File in Git

In Git, unstaging a file can be done in two ways.

1) git rm –cached <file-name>
2) git reset Head <file-name>

1. Unstage Files using git `rm` command

One of the methods to unstage git files is using the ‘rm’ command. It can be used in two ways:

1) On the brand new file which is not on Github.
2) On the existing file which exists on Github.

Let’s check the process of using the git rm command in both scenarios.

Case 1: rm –cached on new file which is not committed.

rm –cached <brand-new-file-name> is useful to remove only the file(s) from the staging area where this file is not available on GitHub ever. After executing this command, the file rests in the local machine, it just unstaged from the staging area.

Example:

$ git add filetwo.txt
$ git status

On branch master
Changes to be committed:
(use "git reset HEAD <file>..." to unstage)
new file: filetwo.txt

$ git rm --cached filetwo.txt
$ git status

On branch master
Untracked files:
(use "git add <file>..." to include in what will be committed)
filetwo.txt
nothing added to commit but untracked files present (use "git add" to track)

Case 2: rm –cached on existing file.

If ‘rm –cached <existing-file-name>.’command is utilized on the existing file on git then this file will be considered for delete and endures as untracked on the machine. If we make a commit after this command then the file on Github will be deleted forever. We should be very careful while using this command. So, this case is not advised for unstaging a file.

Do Refer: How To Clean Up Git Branches

2. Unstage Files using git reset

The most effortless way to unstage files on Git is by using the “git reset” command and specify the file you want to unstage.

git reset <commit> -- <path>

By default, the commit parameter is optional: if you don’t specify it, it will be referring to HEAD.

What does the git reset command do?

This command will reset the index entries (the ones you added to your staging area) to their state at the specified commit (or HEAD if you didn’t specify any commits).

Also, we use the double dashes as argument disambiguation meaning that the argument that you are specifying may be related to two distinct objects: branches and directories for example.

As a quick example, let’s pretend that you added a file named “README” to your staging area, but now you want to unstage this file.

$ git status

On branch master
Your branch is up to date with 'origin/master'.

Changes to be committed:
  (use "git reset HEAD <file>..." to unstage)

        new file:   README

In order to unstage the README file, you would execute the following command

$ git reset -- README

You can now check the status of your working directory again with “git status”

$ git status

On branch master
Your branch is up to date with 'origin/master'.

Untracked files:
  (use "git add <file>..." to include in what will be committed)

        README

nothing added to commit but untracked files present (use "git add" to track)

As you probably understood by now, the “git reset” command is doing the exact opposite of the “git add” command: it removes files from the index.

Unstage all files on Git

Previously, we have seen how you can unstage a file by specifying a path or a file to be reset.

In some cases, you may want to unstage all your files from your index.

To unstage all files also you can use the “git reset” command without specifying any files or paths.

$ git reset

Again, let’s pretend that you have created two files and one directory and that you added them to your staging area.

$ git status

On branch master
Your branch is up to date with 'origin/master'.

Changes to be committed:
  (use "git reset HEAD <file>..." to unstage)

        new file:   README
        new file:   directory/file

In order to unstage all files and directories, execute “git reset” and they will be removed from the staging area back to your working directory.

$ git reset 

$ git status

On branch master
Your branch is up to date with 'origin/master'.

Untracked files:
  (use "git add <file>..." to include in what will be committed)

        README
        directory/

nothing added to commit but untracked files present (use "git add" to track)

Remove unstaged changes on Git

In some cases, after unstaging files from your staging area, you may want to remove them completely.

In order to remove unstaged changes, use the “git checkout” command and specify the paths to be removed.

$ git checkout -- <path>

Again, let’s say that you have one file that is currently unstaged in your working directory.

$ git status

On branch master
Your branch is up to date with 'origin/master'.

Changes not staged for commit:
  (use "git add <file>..." to update what will be committed)
  (use "git checkout -- <file>..." to discard changes in working directory)

        modified:   README

no changes added to commit (use "git add" and/or "git commit -a")

In order to discard changes done to this unstaged file, execute the “git checkout” command and specify the filename.

$ git checkout -- README

$ git status

On branch master
Your branch is up to date with 'origin/master'.

nothing to commit, working tree clean

Alternatively, if you want to discard your entire working directory, head back to the root of your project and execute the following command.

$ git checkout -- .

$ git status

On branch master
Your branch is up to date with 'origin/master'.

nothing to commit, working tree clean

Unstage Committed Files on Git

In some cases, you actually committed files to your git directory (or repository) but you want to unstage them in order to make some modifications to your commit.

Luckily for you, there’s also a command for that.

Unstage Commits Soft

To unstage commits on Git, use the “git reset” command with the “–soft” option and specify the commit hash.

$ git reset --soft <commit>

Alternatively, if you want to unstage your last commit, you can the “HEAD” notation in order to revert it easily.

$ git reset --soft HEAD~1

Using the “–soft” argument, changes are kept in your working directory and index.

As a consequence, your modifications are kept, they are just not in the Git repository anymore.

Inspecting your repository after a soft reset would give you the following output, given that you unstaged the last commit.

$ git status

On branch master
Your branch is up to date with 'origin/master'.

Changes to be committed:
  (use "git reset HEAD <file>..." to unstage)

        modified:   README

What happens if you were to hard reset your commit?

In this case, all changes would be discarded and you would lose your changes.

Unstage Commits Hard

To unstage commits on Git and discard all changes, use the “git reset” command with the “–hard” argument.

$ git reset --hard <commit>

Note: Be careful when using the reset hard command, you will lose all your changes when hard resetting.

Conclusion

In this tutorial, you learned how you can unstage files easily on Git using the “git reset” command.

You learned that you can either specify a path or a single file to unstage files and keep on working on your files until you commit them to your repository.

If you are curious about Git, we have a whole section dedicated to it on the website, make sure to have a look!

How To Switch Branch on Git

How To Switch Branch on Git | What is Git Switch? | Git Switch vs Checkout

Apparently, managing various branches in your Git Repository when working on a project is difficult. So, switching from one branch to another branch or else to the master branch should be done frequently for better performance. In Git, changing branches can be performed by checkout command whereas to switch branches in old versions.

Now, we have the Git Switch command to easily switch branches on Git also various Git Commands can support you in performing Git tasks. In this tutorial, you will learn how to switch branches on Git using Checkout & Switch command along with How do you switch between local Git branches?

What is Git Switch?

A simple alternative to ‘checkout’ is the “switch” command in git. It lets you switch your current HEAD branch. It was added newly in Git v2.23. Before the switch, the amending branches had to be done with the checkout command.

By using the checkout command you can not only use it to switch branches, but also to discard changes, restore files, and much more. Git switch has a very clear and limited purpose like switching and creating branches!

Switch Branch using git checkout

The simplest way to switch branches on Git is to use the “git checkout” command and specify the name of the branch you want to switch to.

If the destination branch does not exist, you have to append the “-b” option, otherwise, you won’t be able to switch to that branch.

$ git checkout <existing_branch>

$ git checkout -b <new_branch>

As an example, let’s say that you want to switch from the master branch to another branch named “feature” in your repository.

First, make sure that the target branch exists by running the “git branch” command.

$ git branch

Switch Branch using git checkout git-branch

Now that you made sure that your branch exists, you can switch from the master branch to the “feature” branch by executing the “git checkout” command.

$ git checkout feature

Switch Branch using git checkout git-checkout

That’s it!

You have successfully switched to your “feature” branch with the checkout command.

Do Check: How To Create a Git Branch

How to switch to a non-existing branch in Git?

On the other hand, if you try to switch to a non-existing branch, you will the following error message

$ git checkout non-existing-branch

error: pathspec 'non-existing-branch' did not match any file(s) known to git

To solve this error, you will have to append the “-b” (for “new branch”) option to the checkout command.

$ git checkout -b non-existing-branch

Switched to a new branch 'non-existing'

Now that you know more about the “checkout” command, let’s see another useful command to change branches using Git.

Switch branch using git switch

A quick way of switching branches on Git is to use the “git switch” command and specify the name of the branch you want to switch to.

If the destination branch does not exist, you have to specify the “-c” option (for “create branch“), otherwise, you will get an error message when switching to that branch.

$ git switch <existing_branch>

$ git switch -c <non_existing_branch>

Again, as an example, let’s say that you want to switch to the “feature” branch from the “master” branch.

In order to switch from the “master” branch to the “feature” branch, use the “git switch” command and specify the destination branch (which is “feature” in this case)

$ git switch feature

Switch Branch using git checkout git-checkout

On the other hand, if you try to switch to a nonexisting branch, you will get the following error message

$ git switch non-existing-branch

fatal: invalid reference: non-existing-branch

To solve this error, make sure to append the “-c” option to the “git switch” command to specify that you want to switch to a new branch.

$ git switch -c non-existing-branch

Switched to a new branch 'non-existing-branch'

Congratulations, you have now successfully switched to another branch and you can start working on it.

How do you switch between local Git branches?

First, you need to begin with running the git branch command to view a list of your local branches so that you understand which branches you have to work with and which branch you currently have checked out.

Later, you will utilize the git checkout command to checkout, or switch to, a different local branch. It should look something like this:

$ git checkout <name-of-branch-you-want-to-switch-to>

Checkout Remote Branch on Git

In some cases, you may be interested in checking out remote branches from your distant repository.

In order to switch to a remote branch, make sure to fetch your remote branch with “git fetch” first. You can then switch to it by executing “git checkout” with the “-t” option and the name of the branch.

$ git fetch

$ git checkout -t <remote_name>/<branch_name>

The “-t” option in checkout stands for “track” and it is used to create your branch and setting up the upstream branch automatically to the remote branch.

As an example, let’s say that you have a branch named “remote-branch” on the “origin” remote.

In order to check out the remote branch, you will need to execute the checkout command and specify the information specified above.

$ git checkout -t origin/remote-branch

Branch 'remote-branch' set up to track remote branch 'remote-branch' from 'origin'.
Switched to a new branch 'remote-branch'

As you can see, the remote tracking information was set automatically: as a consequence, if you commit any modifications, you will automatically push them to the upstream branch.

Checkout New Branch from Specific Commit

In some cases, you may need to switch to a new branch, but you want it to start from a specific commit on the branch.

In order to checkout a new branch from a specific start point, you have to execute the “git checkout” command and specify the “-B” option, as well as the branch and its start point.

$ git checkout -B <branch> <start_point>

In order to checkout to a specific start point, you will have to list the commits done in your repository using the “git log” command.

$ git log --oneline --graph

* 98a14be Version 2 commit (master, HEAD)
* 53a7dcf Version 1.0 commit
* 0a9e448 added files
* bd6903f first commit

As you can see, the HEAD of the master branch is at 98a14be but we want to checkout to the commit just before HEAD (which is 53a7dcf).

In order to switch to the master branch, on this specific commit, we are going to execute the “git checkout” command and specify the “master” branch as well as the commit SHA.

$ git checkout -B master 53a7dcf 

Switched to and reset branch 'master'

In order to check that you are correct on a specific commit, you can use the “git log” command again.

$ git log --oneline --graph

Checkout New Branch from Specific Commit git-log

Awesome, you have successfully switched to another branch on a specific commit.

Conclusion

In this tutorial, you learned how you can easily switch to a branch on Git using the checkout command or the switch command.

You also learned that you can switch to a branch that does not exist yet by specifying the “-b” option or the “-c” option.

Finally, you have discovered advanced tips related to switching branches: checking out a remote branch and checking out a branch from a specific starting point.