How To Change Branch Name on Git

How To Change Branch Name on Git | How To Rename a Local and Remote Git Branch

Git Branches are mainly used for the development of the main project smoothly and in a decided workflow. At some times, developers may think to change the branch names in git for pushing the changes in that specific branch. Choosing the branch name will always depend upon what you are working on.

Renaming the branch name in Git is very simple using the related git commands. If you want to change your git branch names then take a look at the entire tutorial on How do you Change Branch Name on Git easily.

This guide will help you rename git branches locally and remotely. So, check out the available stuff regarding Git Rename Branch from here.

Change Branch Git Name

In order to change a branch name on Git, you have to use the “git branch” command followed by the “-m” option. Next, you just have to specify the name of the new branch.

# Optional command (if you are not on the target branch)
$ git checkout <branch>

$ git branch -m <new_branch_name>

Note: Before changing the branch name, make sure to switch to the branch that you want to rename.
It is important to mention that this command changes the name of your local branch.

If you want your changes to be available on the remote side, you have to push your branch to the remote.

To achieve that, you have to use the “git push” command and specify the old branch name as well as the new branch name.

$ git push <remote> :<old_branch_name> <new_branch_name>

Finally, you have to set the upstream branch for the newly created branch using the “git upstream” command.

$ git push <remote> -u <new_branch_name>

In order to illustrate this method, let’s observe a quick example from the below modules.

Also Read: How To Change Git Remote Origin

Git Rename Branch

The git branch command allows you to change a branch. For renaming a branch, the command that should run is git branch -m <old> <new>. “old” is the name of the branch you want to rename and “new” is the new name for the branch.

Look at the following syntax for the Git rename branch command:

git branch -m <old> <new>

Examples on Git Rename Branch

In the below examples, we are going to rename one of our branches currently named “feature”.

First of all, we are going to check on which branch we are at the moment with the “git branch” command.

$ git branch

Example changing a branch name git-branch-command

In this case, we are already on the “feature” branch, so we do not need to switch to any other branches.

Git Rename Local Branch Example

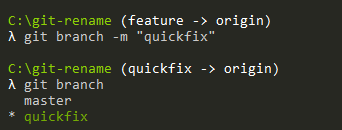
Now that we are on our “feature” branch, we are going to change the branch name to “quickfix” using the branch command.

$ git branch -m "quickfix"

Example changing a branch name git-change-branch-name

As you can see, the “local” branch name was changed to “quickfix“, but this does not mean that your branch name was updated on the remote!

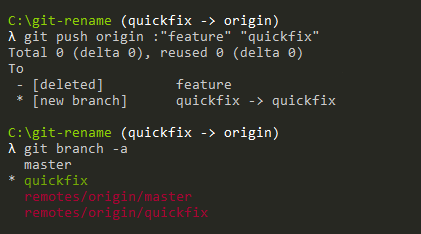
Actually, if you run the “git branch” with the “-a” option (for “all”), you can see that the upstream branch is still pointing to the “feature” branch.
Example changing a branch name git-display-all-branches

Git Rename Remote Branch Example

To change the name of the remote, you are going to push the updated references to your remote.

$ git push origin :"feature" "quickfix"

Example changing a branch name git-update-remote-1

As you can see, two operations were actually performed here :

  • the “feature” branch was deleted from the remote
  • the “quickfix” branch was created on the remote.

However, updating your references does not mean that the upstream branch was actually updated.

To update your new upstream branch, you need to use the “push” command.

$ git push origin -u quickfix

How To Change Branch Name on Git set-upstream-branch-git

Done!

Congratulations, you successfully changed the name of your branch on Git!

Conclusion

In this tutorial, you learned how you can change the name of your branch on Git easily.

You learned that you have to change the name of your branch locally and on the remote, otherwise you might run into some inconsistencies on your repository.

If you are interested in software engineering, we have a complete section dedicated to it on the website, so make sure to check it out!

How To Compare Two Git Branches | Comparing Two Branches Using git diff and git merge

Particularly before performing any branches merge or delete in Git, it is important to compare it to another one. As a consequence, it provides you an overview of current changes and assists you to define if they must be integrated or deleted.

Comparing two branches is very helpful as it can be utilized as an easy way to view if any merging conflicts. In this tutorial, we’ll be talking about the different ways to compare branches in Git along with comparing commits, actual changes, or also a specific file on two branches using Git commands.

Comparing Actual Changes Between Two Branches

Let’s say you’d like to take a look at a feature branch named “feature/login”. You need to view all changes that are different from “main” – to get an idea of what would be integrated if you performed e.g. a git merge now. There are various ways to compare git branches and some of them are listed & explained here in detail.

  • Compare two branches using git diff
    • With Double Dot Notation
    • With Triple Dot Syntax
  • Compare two branches in Git using git-merge

Compare two branches using git diff with Double Dot Notation

For comparing two branches easily, you have to use the “git diff” command and provide the branch names separated by dots.

$ git diff branch1..branch2

Using this command, Git will compare the tip of both branches (also called the HEAD) and display a “diff” recap that you can use to see modifications.
Compare two branches using git diff git-diff-double-dot

In short, it will show you all the commits that “branch2” has that are not in “branch1”.

Let’s say for example that you are looking to see the differences between a feature branch (being one commit ahead of master) and the master branch.

In order to see what has been modified between master and feature, you would run the following command.

$ git diff master..feature

diff --git a/file-feature b/file-feature
new file mode 100644
index 0000000..add9a1c
--- /dev/null
+++ b/file-feature
@@ -0,0 +1 @@
+this is a feature file

As you can see, one file has been added to the branch.

Git is using a color code in order to display differences done between two branches: lines in green are lines added to the files and lines in red are the ones that are deleted from the files.

Also See: How To Switch Branch on Git

Comparing two branches using Triple Dot Syntax

In order to compare two branches, you can also use the “git diff” command and provide the branch names separated by three dots.

$ git diff branch1...branch2

So what’s the difference with the previous command?

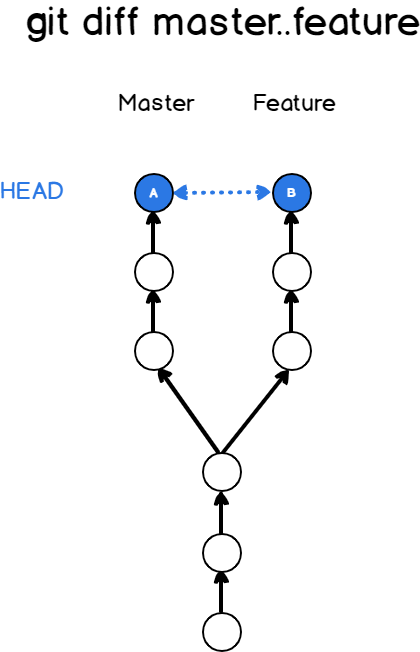
Using “git diff” with three dots compares the top of the right branch (the HEAD) with the common ancestor of the two branches.

As always, a diagram speaks a hundred words, so here is the description of the diff command with three dots.

Comparing two branches using triple dot syntax triple-dot

So which method should you use in order to compare the two branches?

Most of the time, you want to stick with the first method, meaning using only two dots in order to compare two branches.

Why?

When you are developing a new feature, you are most of the time doing it on your own branch. However, developing on your own branch does not prevent the branch you checked out from having other commits.

This is particularly true whenever you are checking out a new branch from the master branch: other commits might be integrated to master while you are working on your feature.

As a consequence, in order to compare the two branches, you almost always want to stick with the first method we described.

$ git diff branch1..branch2

Compare two branches in Git using git-merge

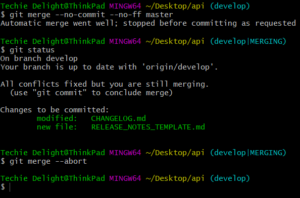
As an alternative, you can make a git-merge with the –no-ff and –no-commit option. This assures that the current branch is not modified or updated by the merge command.

For example, the below will merge the master branch to the current branch without committing the changes.

git merge –no-commit –no-ff master

Once the merge is done, you can use Git visual tools such as gitk and git-gui to envision the differences. Once you’re finished, you can abort the merge with the –abort option. This will replace the pre-merge state.

git merge –abort

git merge command for comparing two git branches

Compare Specific File Between Two Branches

You may want to see all changes done to a specific file on the current branch you are working on in some cases.

To see the differences done to a file between two branches, use the “git diff” command, specify the two branches and the filename.

$ git diff master..feature -- <file>

For example that the file that you modified between those two branches is called “README”.

In order to see the differences done to this file, you would run the following command

$ git diff master..feature -- README

diff --git a/README b/README
new file mode 100644
index 0000000..add9a1c
--- /dev/null
+++ b/README
@@ -0,0 +1 @@
+this is the README file

Note that you can use the triple-dot syntax we saw earlier in order to compare those files.

$ git diff master...feature -- <file>

Compare commits between two branches

In some cases, you may be interested in knowing the commit differences between the two branches.

In order to see the commit differences between two branches, use the “git log” command and specify the branches that you want to compare.

$ git log branch1..branch2

Note that this command won’t show you the actual file differences between the two branches but only the commits.

Back to the example, we provided before comparing the commit differences between the master and the feature branch would be written

$ git log master..feature

commit 802a2abed7f88d67e0ab9a0e780b858651c5813b (HEAD -> feature, origin/feature)
Author: SCHKN <test@gmail.com>
Date:   Wed Dec 4 13:10:01 2019 -0500

    feature commit

If you are not interested in all the information provided by this command, there is a way to get shorter commit lines.

In order to compare two branches using commit abbreviations, use the “git log” command with the following options.

$ git log --oneline --graph --decorate --abbrev-commit branch1..branch2

Using the example we provided before, this command would give us the following output

$ git log --oneline --graph --decorate --abbrev-commit master..feature
* 802a2ab (HEAD -> feature, origin/feature) feature commit

Compare two branches using Sourcetree

In some cases, you might be interested in viewing differences in a Git graphical client.

For this example, I am going to use the popular Sourcetree Git GUI in order to display the differences between the two branches.

Given the repository view, you have access to all your branches in the left side menu.

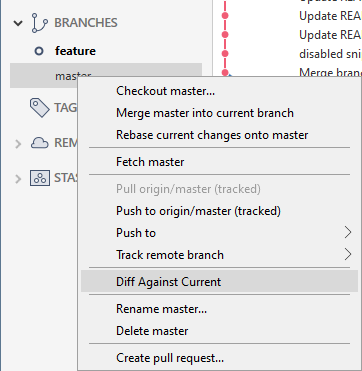
In order to see the differences between two branches, on the Sourcetree left menu, click on the branch that you want to compare and click “Diff Against Current”

Compare two branches using Sourcetree diff-against

After clicking on “Diff Against Current”, you will be presented with the list of differences between your files, whether they are in your working tree or if they are in your index already.

Compare two branches using Sourcetree differences-sourcetree

Conclusion

In this tutorial, you discovered how you can compare two branches easily using Git commands (specifically the git diff and git log commands). Also, You learned that it is possible to use graphical tools such as Sourcetree in order to compare your branches and commits easily. If you are passionate about Git, then make use of this website fully by viewing the complete section dedicated to Git.

How To Remove Files From Git Commit

How to Remove Files from Git Commit | Git Remove File from Commit Stage

In some working situations, developers add files or stages for commit on git repo. For better performance, you will need to remove files from Git commit to do more changes.

Git runs with three main spaces, they are the workspace (where you edit your files), the index (where you stage your files for commits), and the repository.

Do Check: GIT Commands

Let’s check this short & ultimate tutorial, to understand and learn how effectively & easily you can remove files from your Git commits, without losing your modifications.

Remove Files From Git Commit or Staging Area

In order to remove some files from a Git commit, use the “git reset” command with the “–soft” option and specify the commit before HEAD.

$ git reset --soft HEAD~1

When running this command, you will be presented with the files from the most recent commit (HEAD) and you will be able to commit them.

Now that your files are in the staging area, you can remove them (or unstage them) using the “git reset” command again.

$ git reset HEAD <file>

Note: This time, you are resetting from HEAD as you simply want to exclude files from your staging area

If you are simply not interested in this file anymore, you can use the “git rm” command in order to delete the file from the index (also called the staging area).

$ git rm --cached <file>

When you are done with the modifications, you can simply commit your changes again with the “–amend” option.

$ git commit --amend

To verify that the files were correctly removed from the repository, you can run the “git ls-files” command and check that the file does not appear in the file (if it was a new one of course)

$ git ls-files

<file1>
<file2>

Remove Single File from Committed Area

Removing file from the committed area needs 3 commands to be run, they are as follows-

git reset --soft HEAD^1

This command will undo the latest commit. Once you do git status, you will see files in the staging area. Now, we can easily remove it from the staging area, as mentioned in the previous point.

git rm --cached <file-name>

By performing the above command, the file will seem in the untracked file section. Now, we removed the single file, also you can commit back those remaining files by running the below command. So, let’s do it:

git commit -m "<your-message>"

Do Check: How To Delete File on Git

Remove File From Commit using Git Restore

Since Git 2.23, there is a new way to remove files from commit, but you will have to make sure that you are using a Git version greater or equal than 2.23.

$ git --version

git version 2.24.1

Note: Git 2.23 was released in August 2019 and you may not have this version already available on your computer. To install newer versions of Git, you can check this tutorial.

To remove files from commits, use the “git restore” command, specify the source using the “–source” option, and the file to be removed from the repository.

For example, in order to remove the file named “myfile” from the HEAD, you would write the following command

$ git restore --source=HEAD^ --staged  -- <file>

As an example, let’s pretend that you edited a file in your most recent commit on your “master” branch.

The file is correctly committed but you want to remove it from your Git repository.

To remove your file from the Git repository, you want first to restore it.

$ git restore --source=HEAD^ --staged  -- newfile

$ git status

On branch master
Your branch is ahead of 'origin/master' by 1 commit.
  (use "git push" to publish your local commits)

Changes to be committed:
  (use "git restore --staged <file>..." to unstage)
        modified:   newfile

Changes not staged for commit:
  (use "git add <file>..." to update what will be committed)
  (use "git restore <file>..." to discard changes in working directory)
        modified:   newfile

As you can see, your file is back in the staging area.

From there, you have two choices, you can choose to edit your file in order to re-commit it again, or to simply delete it from your Git repository.

Remove File from Git Repository

In this section, we are going to describe the steps in order to remove the file from your Git repository.

First, you need to unstage your file as you won’t be able to remove it if it is staged.

To unstage a file, use the “git reset” command and specify the HEAD as the source.

$ git reset HEAD newfile

When your file is correctly unstaged, use the “git rm” command with the “–cached” option in order to remove this file from the Git index (this won’t delete the file on disk)

$ git rm --cached newfile

rm 'newfile'

Now if you check the repository status, you will be able to see that Git staged a deletion commit.

$ git status

On branch master
Your branch is ahead of 'origin/master' by 1 commit.
  (use "git push" to publish your local commits)

Changes to be committed:
  (use "git restore --staged <file>..." to unstage)
        deleted:    newfile

Now that your file is staged, simply use the “git commit” with the “–amend” option in order to amend the most recent commit from your repository.

$ git commit --amend

[master 90f8bb1] Commit from HEAD
 Date: Fri Dec 20 03:29:50 2019 -0500
 1 file changed, 2 deletions(-)
 delete mode 100644 newfile

As you can see, this won’t create a new commit but it will essentially modify the most recent commit in order to include your changes.

Remove Specific File from Git Commit

In some cases, you don’t want all the files to be staged again: you only one to modify one very specific file of your repository.

In order to remove a specific file from a Git commit, use the “git reset” command with the “–soft” option, specify the commit before HEAD and the file that you want to remove.

$ git reset HEAD^ -- <file>

When you are done with the modifications, your file will be back in the staging area.

First, you can choose to remove the file from the staging area by using the “git reset” command and specify that you want to reset from the HEAD.

$ git reset HEAD <file>

Note: It does not mean that you will lose the changes on this file, just that the file will be removed from the staging area.

If you want to completely remove the file from the index, you will have to use the “git rm” command with the “–cached” option.

$ git rm --cached <file>

In order to make sure that your file was correctly removed from the staging area, use the “git ls-files” command to list files that belong to the index.

$ git ls-files

When you are completely done with your modifications, you can amend the commit you removed the files from by using the “git commit” command with the “–amend” option.

$ git commit --amend

Conclusion

In this tutorial, you learned how you can easily remove files from commit using the “git reset” command. You also learned to remove files on newer versions of Git using the “git restore” command but you will have to make sure that you have the most recent Git version (>= 2.23).

How To Delete a GitHub Repository

How To Delete a GitHub Repository | Step-by-Step Tutorial on Deleting a Repository in GitHub

As a developer once you are done with the software development process, the application should be decommissioned. In such cases, developers may see themselves in a situation where they need to delete a GitHub repository. 

Deletion of a Github Repository is not an easy task as well as not a difficult task for developers if they follow the steps prevailing here. In this tutorial, we have explained how you can easily delete a repository in GitHub. Also, you can discover some more information like warnings about git repository deletion from the below modules.

Steps to Delete a GitHub Repository

Deleting GitHub repositories is pretty straightforward. The process is the same whether you are dealing with public or private repositories. To delete a GitHub repository, just follow the steps outlined here:

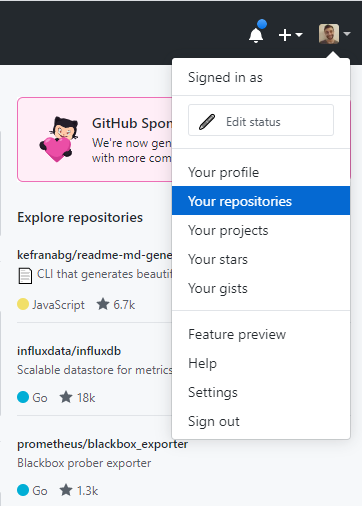
  1. Tap on your profile picture at the top right corner of the GitHub interface and hit on “Your repositories“.
  2. On your repository list, choose the GitHub repository that you want to remove.
  3. On the repository page, press the “Settings” icon in the menu.
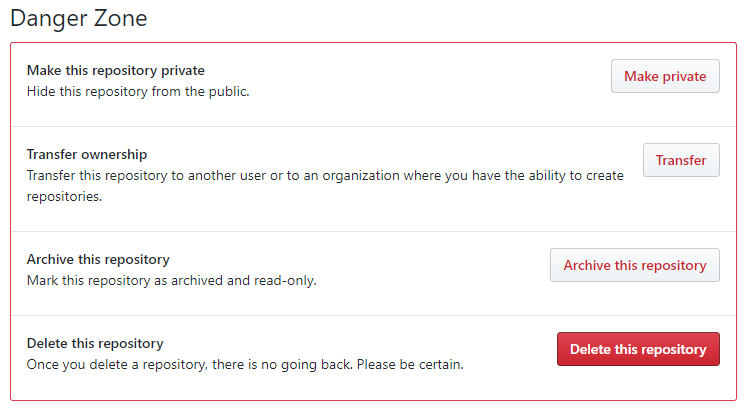
  4. In the repository settings, scroll down until you see the “Danger zone“.
  5. In the “danger zone”, tap on “Delete this repository
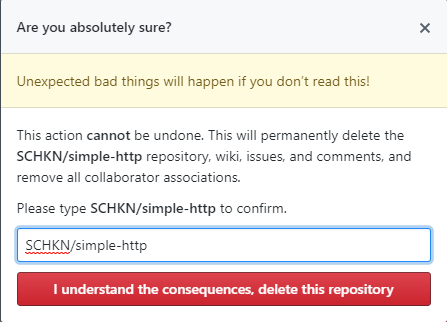
  6. To confirm the GitHub repository deletion, you have to type the repository name. When you are done, just press “I understand the consequences, delete this repository“.
  7. Congratulations, you have successfully deleted your GitHub repository!

How to Delete a Repository in GitHub with Screenshots?

In case you had trouble following the steps described above, here are all the screenshots that will guide you in deleting your GitHub repository.

1. Click on your profile picture and select the “Your repositories” option.

Delete GitHub repository with screenshots repository

2. Given the list of repositories that you own, select the one that you want to delete.

Delete GitHub repository github-repository

3. When you have navigated to the repository main page, click on “Settings” in the repository menu.

Delete GitHub repository settings

4. Now that you clicked on “Settings”, scroll down until you reach the “Danger zone” of your repository.

In this zone, you have the option to delete your GitHub repository, click on it to proceed.

How To Delete a GitHub Repository delete-repository

5. When clicking on “Delete this repository“, you will be asked to provide the repository name in a field in order to confirm that you want to delete this repository.

Type the repository name and click on “I understand the consequences, delete this repository“.

How To Delete a GitHub Repository delete-2

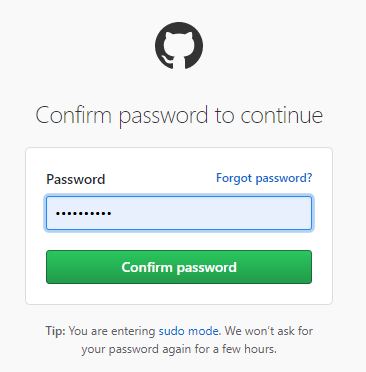
6. In some cases, you are asked to provide your user password in order to confirm the deletion.

Type your user password and click on “Continue”

How To Delete a GitHub Repository confirm

7. Back to the home page, an information message will appear to notify you that you have successfully deleted the Github repository.

How To Delete a GitHub Repository confirmation

Delete Local GitHub Repository

In some cases, you don’t want to delete a remote GitHub repository but you only want to delete the copy you got by cloning the remote repository.

In order to delete a local GitHub repository, use the “rm -rf” on the “.git” file located at the root of your Git repository.

$ rm -rf <repo_folder>/.git

By deleting the “.git” file, you will delete the Github repository but you won’t delete the files that are located in your project folder.

As a consequence, you will be able to initialize a new Git (or Github) repository using “git init”, add a remote using “git remote add” and start committing new files!

$ git init

$ git remote add origin git@github.com:<user>/<repository>.git

$ git push -u origin master

Careful, if you use the “git push” command without the “-u” option (for the upstream branch), you will be asked to provide the upstream branch.

Make sure to read our dedicated tutorial if you want to find more information about upstream branches.

Check More Articles on Git: 

Information About Deleting a Repository in GitHub

You can delete any repository, if you’re the owner of the organization or if you own admin permissions for that repository or fork. A few things to remember, though:

  • Deleting a fork does not have any effect on the upstream repository.
  • Deleting a private repository will delete all associated forks, but deleting a public repository will not have any effect on the forks.
  • Deleting a repository will remove all wikis, issues, and comments associated with the repository. Once deleted, there is no way to restore a repository. So, always keep in mind.

Conclusion

In this tutorial, you have discovered how you can easily delete Github repositories along with the detailed steps to get rid of your Github repository remotely, but also locally by using the “rm” command.

If you are interested in Git, GitHub, and software engineering, we have a complete section dedicated to it on the website like Git Commands, so make sure to check it out!
How To Clone a Git Repository | Clone a Git Repository with Command Line & Sourcetree

Developers who are excited to learn more about the most popular Version Control System (VCS) ie., Git and cloning the Git repository can refer to this tutorial until the end. To start working with Git, you need to create your own Git repository or you can clone an existing Git repository.

This tutorial will help you concentrate on understanding what is cloning, about the git clone repository, and how to clone an existing Git repository. Moreover, you can observe various methods to clone a specific branch, clone git repository using the command line or Git commands, with sourcetree, clone using an SSH key, and determine access denied issues.

What is cloning?

Basically, Cloning is the process of downloading an existing repository hosted on a remote server to your own computer.

Git Clone Repository

Cloning a repo permit you to make local modifications to the repository before committing and pushing them to the remote. Especially, it is beneficial for beginner developers as cloning offers you a sandbox to experiment without affecting the original codebase.

Do Check: How To Install Git On Debian 10 Buster

Prerequisites

To clone a git repository, clearly, you should have Git installed on your computer. If you want to check that Git is correctly installed on Windows or on Linux, the following command should be executed:

$ git --version
git version 2.22.0

If Git is correctly installed, you are ready to start cloning your first Git repository.

Clone a Git repository using the command line (git clone)

To clone a git repository, use the “git clone” command with the URL of your Git repository.

$ git clone <url>

For instance, let’s assume that you want to clone a public repository from Github, you are going to execute the following command:

$ git clone https://github.com/username/project.git

Cloning into 'project'...
remote: Enumerating objects: 813, done.
remote: Total 813 (delta 0), reused 0 (delta 0), pack-reused 813
Receiving objects: 100% (813/813), 3.66 MiB | 5.52 MiB/s, done.
Resolving deltas: 100% (391/391), done.

As you can see, by default, Git is going to clone your Git repository into a folder named by the name of the project.

However, you can choose to clone your Git repository into a different folder.

Clone a Git repository with Sourcetree

By using Sourcetree, you can clone your repository. Are you new to the sourcetree? Make use of our provided alternative method using the command line. If you are interested to do this method, then follow the below instructions to clone your git repository.

  • Firstly, download the application of sourcetree, if you don’t have it earlier.
  • Choose the Clone button from the repository
  • In the Clone this repository dialog, choose the Clone in Sourcetree button.
  • If needed, update the Destination Path or Bookmark Name.
  • The Destination Path is the folder where your clone saves to your local system.
  • The Bookmark Name is the name of that folder.
  • Select the Clone button.

It also builds the folder on your local system and even more, you can make use of Sourcetree to interact with the repository.

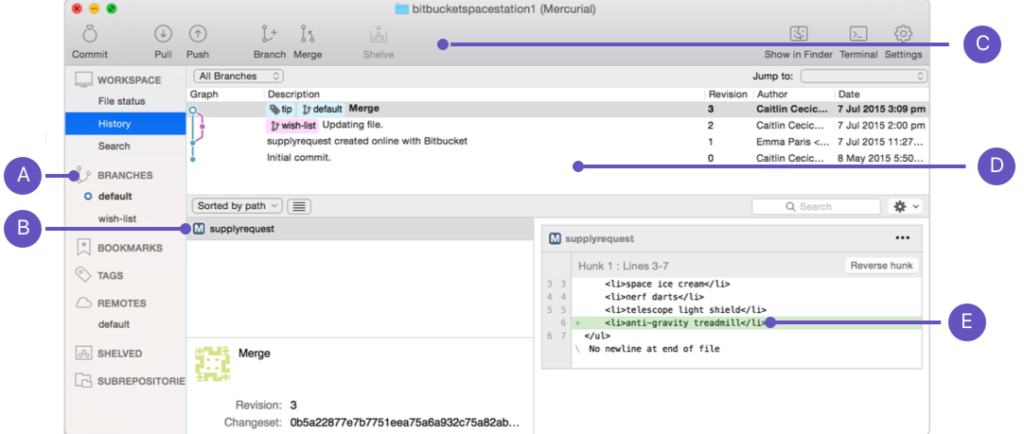
clone with sourcetree view

A. Branches list: Lists your Git branches.
B. Files list: Includes all the files in your repository.
C. Action buttons: This allows you to interact with the repository.
D. Commits list: Includes a list of commits to the repository and details of each commit.
E. Selected file: Shows a diff of the selected file.

Clone a Git repository into a specific folder

In order to clone a git repository into a specific folder, execute the “git clone” command and specify the destination folder at the end.

$ git clone <url> <directory>

For example, given the Github project we fetched in the previous section, if we want to clone it into a folder named “myproject” we would run

$ git clone https://github.com/username/project.git myproject

Cloning into 'myproject'...
remote: Enumerating objects: 813, done.
remote: Total 813 (delta 0), reused 0 (delta 0), pack-reused 813
Receiving objects: 100% (813/813), 3.66 MiB | 5.65 MiB/s, done.
Resolving deltas: 100% (391/391), done.

Now, verify that your git project was correctly cloned to the destination folder.

$ ls -l
total 4
drwxrwxr-x 5 schkn schkn 4096 Nov  1 10:39 myproject

Awesome!

You successfully cloned a Git repository into a specific folder on your server.

In this case, you cloned the master branch from your Git remote repository.

You can check the current branch cloned by running the “git branch” command.

$ git branch
* master

However, in some cases, you may want to clone a specific branch in order to start working.

Your team may have chosen to let the “master” branch a bit behind and to have the most recent commits directly to the “dev” branch for example.

Git clone a specific branch

In order to clone a specific branch, you have to execute the “git branch” with the “-b” and specify the branch you want to clone.

$ git clone -b <branch> <remote_repo>

For example, in order to clone the “dev” branch of your Github repository, you would run

$ git clone -b dev https://github.com/username/project.git

Cloning into 'project'...
remote: Enumerating objects: 813, done.
remote: Total 813 (delta 0), reused 0 (delta 0), pack-reused 813
Receiving objects: 100% (813/813), 3.66 MiB | 5.65 MiB/s, done.
Resolving deltas: 100% (391/391), done.

To verify that you correctly cloned the “dev” branch, make sure to run the “git branch” command.

$ git branch
* dev

Using the “-b” option, you are fetching all the branches but you are checking out the branch you chose.

It means that if you run the “git branch” with the “-a” (for all) option, you are going to see that all your branches were fetched.

Note : you have to execute this command into the Git repository you just cloned.
$ git branch -a

* dev
  remotes/origin/HEAD -> origin/master
  remotes/origin/dev
  remotes/origin/master
  remotes/origin/feature

Git clone exclusively one branch

In order to clone and fetch exclusively the branch you chose, you have to specify the “–single-branch” option.

$ git clone --single-branch --branch <branchn> <repository>

Make sure that only the branch chosen was fetched on your local repository.

Note: you have to execute this command into the Git repository you just cloned.

$ git branch -a

* dev
  remotes/origin/dev

This option works for Git versions greater than 1.17.10, so make sure that this is the case before issuing the command.

$ git --version

git version 2.22.0

In the previous sections, we saw the various ways to clone public repositories to your local server.

It means that you did not need to provide any username or password in order to clone the repositories.

However, in some cases, you may have private Git servers that only authorized team members can access.

Clone a private Git repository

When cloning a Git repository, there are two ways of authenticating with the server: with a user/password set or using SSH keys.

In this section, we are going to see how you can authenticate to your Git server using both methods.

Clone using SSH

In most cases, you want to secure your Git repositories with SSH keys in order to avoid having to type your password every single time.

In order to clone from a private repository using SSH, your SSH keys need to be correctly set and configured on your server.

Go into your personal “.ssh” directory and create a new SSH key named “repo_id_rsa” where repo stands for the name of the repository you are trying to clone.

$ cd ~/.ssh && ssh-keygen -t rsa -b 4096 -C "email@example.com"

Generating public/private rsa key pair.
Enter file in which to save the key (/home/schkn/.ssh/id_rsa):
Enter passphrase (empty for no passphrase):
Enter same passphrase again:
Your identification has been saved in repo_id_rsa.
Your public key has been saved in repo_id_rsa.pub.
The key fingerprint is:
SHA256:Lu0CV79iccFGzDLs4x6RXZbUOyimXRsIlNc0o30T+u4 email@example.com
The key's randomart image is:
+---[RSA 4096]----+
|       o.+ +=o.  |
|        * =o=+.. |
|       . X.+o.o. |
|        * O +oo. |
|       oSO + o.. |
|    . .o= + ..   |
|     o..o+ .  .  |
|      .o+ .  .   |
|       o..    E  |
+----[SHA256]-----+

Your public key has been correctly generated.

Print down the public key content using the “cat” command.

ssh-rsa AAAAB3NzaC1yc2EAAAADAQABAAACAQDKRsXF9r2DSgSHxYe6QkJE0Otekn5F9E5e+VQfFtzJAr/xsgr8vCuJbWWsPo6Fibbw54jYjEGjVhnMFOQl9nWA8KxubX6HUHtXxlw9VRVKob6OyO4Qt0F8nw== email@example.com

On the server, head over to the “authorized_keys” file and add the content of your public key to the server.

$ sudo nano /home/git/.ssh/authorized_keys

ssh-rsa AAAAB3NzaC1yc2EAAAADAQABAAACAQDKRsXF9r2DSgSHxYe6QkJE0Otekn5F9E5e+VQfFtzJAr/xsgr8vCuJbWWsPo6Fibbw54jYjEGjVhnMFOQl9nWA8KxubX6HUHtXxlw9VRVKob6OyO4Qt0F8nw== email@example.com

Next, you should be able to clone the git repository using your newly created SSH keys.

$ git clone <username>@<hostname>:<repository>.git

Cloning into 'private-repo'...
remote: Enumerating objects: 3, done.
remote: Counting objects: 100% (3/3), done.
remote: Total 3 (delta 0), reused 0 (delta 0), pack-reused 0
Receiving objects: 100% (3/3), done.

Specifying the SSH key to use

In some cases, you might not use the “id_rsa” key in order to store your Git public keys.

To create a specific SSH key for your Git repositories, simply specify a name when prompted by the “ssh-keygen” utility.

$ cd ~/.ssh && ssh-keygen -t rsa -b 4096 -C "email@example.com"

Generating public/private rsa key pair.
Enter file in which to save the key (/home/schkn/.ssh/id_rsa): repo_id_rsa

In this case, if you try to clone the repository, you might not be able to do so because you need to tell SSH which key to use for the server.

To specify the SSH key to use, add the following content to your ~/.ssh/config file (you need to create it if it does not already exist)

Host *
    Hostname <server_ip>
    User git
    IdentityFile ~/.ssh/repo_id_rsa

If you were to use Github as a git server, it would give the following configuration.

Host *
    Hostname github.com
    User git
    IdentityFile ~/.ssh/repo_id_rsa

Restart your SSH service.

$ sudo systemctl restart ssh

Then, you should be able to clone your git repository seamlessly.

$ git clone <username>@<hostname>:<repository>.git

Clone using a password

The other way to authenticate to a Git server is to use a password in order to connect.

To git clone using a password, simply provide the username for the git account, and you will be prompted with the password.

git clone https://username@<repository_url>

Cloning into 'private-repo'
Password for 'https://<username>@<repository_url>:
remote: Enumerating objects: 3, done.
remote: Counting objects: 100% (3/3), done.
remote: Total 3 (delta 0), reused 0 (delta 0), pack-reused 0
Receiving objects: 100% (3/3), done.

For example, if you want to clone your repository from Github using a password, simply type the following command.

git clone https://<username>@github.com/<username>/<repository>.git

Password for 'https://<username>@github.com':

Store your password using git credentials

Using the previous method, you will have to specify the account password every time you want to push your code to the server or when you want to pull it from the server.

This is not very handy.

Luckily for you, you can set your password in order not to be prompted again.

To enable the credentials helper, simply run “git config” with the “credential.helper” option.

$ git config --global credential.helper store

When cloning a new repository, you will still be asked to provide the password the first time.

However, you won’t be asked to provide it again on push and pull operations.

Your credentials will be stored in the git-credentials file in your home directory.

$ cat ~/.git-credentials

https://<username>:<password>@<server>

Git Clone Authentication Failure

In some cases, you may be facing authentication failures when performing git clones.

Here are some hints on what you may check in order to solve this issue :

  • Make sure that you are writing the correct password when cloning a repository.

In the section dedicated to git clone with a password, you may need to inspect the git-credentials file. If your password is changed on the server, make sure to change it in your git-credentials file for the changes to be applied.

  • Make sure that the user account is correctly configured on the Git server.

In some cases, you may have an account on the Git server but you may not have enough rights to perform read or write operations to the server.

Depending on the git server you are using (Gitlab, Gittea, Bitbucket), you need to check the account sections to see if the user account is correctly configured.

  • When using authentication with SSH, you may need to check that your SSH client is actually using the SSH key to connect to your server.

In order to check if OpenSSH is using your SSH key, use “ssh” with the “-vT” option.

$ ssh -vT git@github.com:<user>/<repository>.git

OpenSSH_7.6p1 Ubuntu-4ubuntu0.3, OpenSSL 1.0.2n  7 Dec 2017
debug1: Reading configuration data /home/schkn/.ssh/config
debug1: /home/schkn/.ssh/config line 1: Applying options for *
debug1: Reading configuration data /etc/ssh/ssh_config
debug1: /etc/ssh/ssh_config line 19: Applying options for *
debug1: Connecting to github.com [140.82.118.3] port 22.
debug1: Connection established.
  • When using SSH key-based authentication, verify that your server contains the public key of your client.

In order to check authorized keys on the server, make sure to inspect the authorized_keys in the .ssh directory.

$ cat ~/.ssh/authorized_keys

ssh-rsa AAAABfzaC1yc2EAAAADAfgzrgegtexoq6FuKMPSs9cpeoCv+HUaL3fijO2otTw54451cfzfxpcdrtRLfYZp34qztJGC1AwNiU5yezfzi/D2afzfzzFls3wvwn+DNA email@example.com

Conclusion

In this tutorial, you learned more about the git clone and how it can be used in order to start working on different projects on your codebase.

You also learned more about the two main authentication methods: SSH key-based authentication and password.

If you are interested in software engineering, we have a complete section dedicated to it on the website, so make sure to have a look.

How To Clear Git Cache

How To Clear Git Cache | Learn Git Clear Cache in Different Ways

Are you worried about adding some new lines to your gitignore files while working with Git? And do you realize such files are still shown in git? Then, Git Clear Cache comes into the frame. Furthermore, you may also get to know some Git commands that help to clear a git repo’s cache from here.

In this tutorial, we are going to discuss how to clear git cache in different ways. By using the commands, you can easily clear the git cache. Moreover, we are also explaining thoroughly how to actively remove files you needed to ignore in the first place.

Commands to Clear a Git Repository’s Cache

Here are the commands for clearing out your git repo’s cache in order for the changes to take place.

git rm -r --cached .
git add .
git commit -am 'git cache cleared'
git push

Clear Git Cache using rm

Usually, you want to clear your Git cache because you added new entries in your gitignore files and you want them to be taken into account.

The easiest way to clear your Git cache is to use the “git rm” command with the “–cached” option.

You can choose to remove one file or to remove an entire working directory.

$ git rm --cached filename

Concrete example

Note : do not forget the cached option or your file will be deleted from the filesystem.

For this example, the .gitignore file is set to ignore all files ending in “.conf

Content of .gitignore:

*.conf

However, the file named “file.conf” is already in the staging area of my Git repository, this is also called the index.

On branch master
Your branch is ahead of 'origin/master' by 2 commits.
  (use "git push" to publish your local commits)

Changes to be committed:
  (use "git reset HEAD <file>..." to unstage)

        new file:   file.conf

In this case, you want your file to go from the staging area back to the working directory (essentially the untracked part of Git).

Also Check: How To Delete Local and Remote Tags on Git

To clear the cache, you use the git rm command.

When provided with the “–cached” option, it will only delete files from the staging area, not from the working directory.

$ git rm --cached file.conf

$ git status

On branch master
Your branch is ahead of 'origin/master' by 2 commits.
  (use "git push" to publish your local commits)

Untracked files:
  (use "git add <file>..." to include in what will be committed)

        file.conf

nothing added to commit but untracked files present (use "git add" to track)

Clear Entire Git Cache

In some cases, you may want to clear the cache of your entire Git staging area.

This is particularly useful when you added multiple files that you want now to be ignored via your .gitignore file.

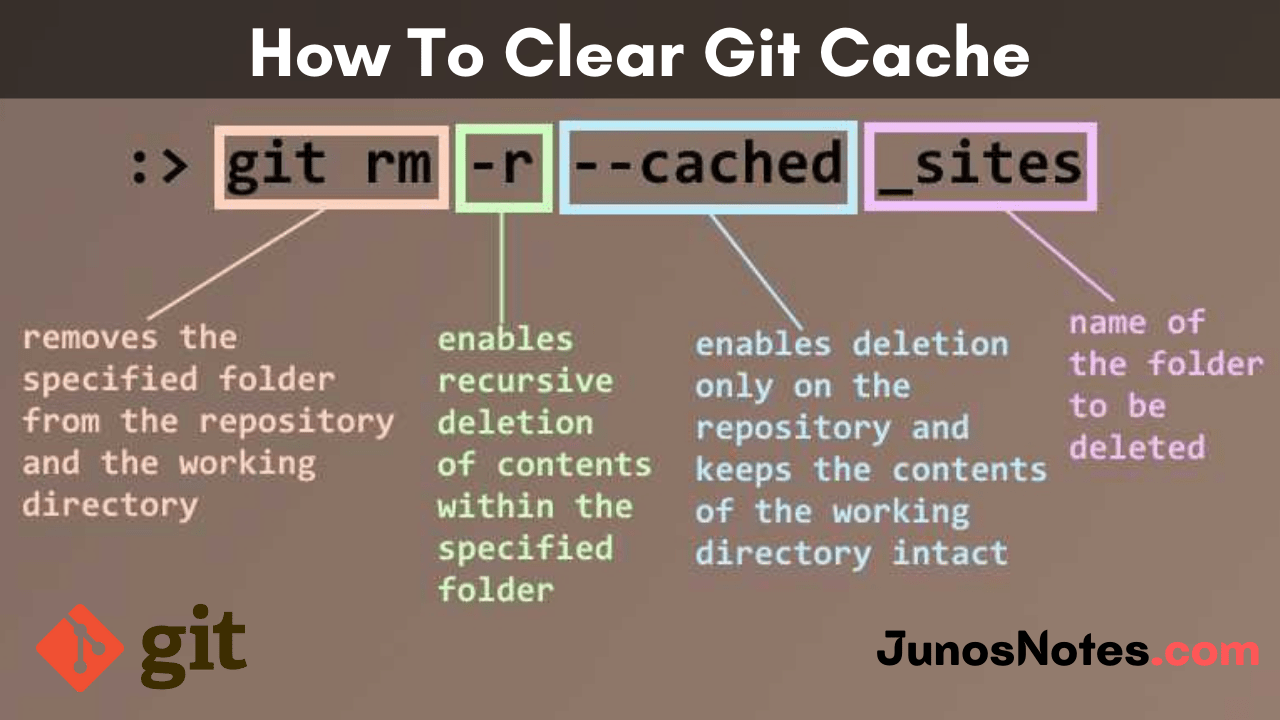
To clear your entire Git cache, use the “git rm” command with the “-r” option for recursive.

$ git rm -r --cached .

When all files are removed from the index, you can add the regular files back (the ones you did not want to ignore)

$ git add .
$ git commit -am 'Removed files from the index (now ignored)'

Concrete Example

For this example, the .gitignore file is set to ignore files ending in .conf.

Content of .gitignore:

*.conf

In the staging area, we have two files ending in .conf and three regular files ending in .js.

On branch master
Your branch is ahead of 'origin/master' by 2 commits.
  (use "git push" to publish your local commits)

Changes to be committed:
  (use "git reset HEAD <file>..." to unstage)

        new file:   file.conf
        new file:   file2.conf
        new file:   index.js
        new file:   script.js

Changes not staged for commit:
  (use "git add <file>..." to update what will be committed)
  (use "git checkout -- <file>..." to discard changes in working directory)

        modified:   .gitignore

First, let’s remove all the files that are currently tracked.

$ git rm -r --cached .
rm '.gitignore'
rm 'README.md'
rm 'file.conf'
rm 'file2.conf'
rm 'index.js'
rm 'script.js'

Now some of the files may be marked as deleted and some others are back in the working directory.

Now, you want to add them back to the staging area while taking into account the content of your .gitignore file.

$ git add .

$ git status

On branch master
Your branch is ahead of 'origin/master' by 2 commits.
  (use "git push" to publish your local commits)

Changes to be committed:
  (use "git reset HEAD <file>..." to unstage)

        modified:   .gitignore
        new file:   index.js
        new file:   script.js

Awesome!

The configuration files are not in the staging area anymore.

You can now commit and push them to your repository.

$ git commit -am 'Removed files from the index (now ignored)'

$ git push

Note: Do not forget to set your upstream branch when pushing your changes.

Clear specific files from Git Cache

Let’s discuss how to clear the git cache for specific files here. After using the following commands, it will remove the specific file from git.

git rm --cached database.php
git add --all
git commit -m "Remove the database config file cache"
git push origin branch_name

Ultimately, you have learned how to remove the cache for specific files using the git command. It will assist when you add a new file on the gitignore file and it’s not excluded from git.

Conclusion

In this tutorial, you learned how you can clear your Git cache easily and how it can help when you updated your .gitignore file.

You also learned more about the “git rm” command and how it can be used in order to remove some files from the staging area back to the working directory.

If you are curious about Git or software engineering, we have a complete section dedicated to it on the website.

Make sure to check it out!

How To Delete File on Git

How To Delete File on Git | Removing Files from Git Repository using git rm Command

We all know how important to add many files into a git repository for developing the project. But developers should realize and work on deleting unused files on git. Always, delete files on git is so confusing as it is a big question mark to delete them from my repository or delete them from the filesystem?

Also, Have a look at the Git Commands for gaining enough knowledge & practice on Git.

To clear your confusion, we have come up with this new Git Tutorial on How to Delete File on Git. Here, we have explained completely how you can easily delete files on Git, whether it is only from your Git repository or from the filesystem. Let’s dive into it without any further do.

The git rm Command

Whenever you are planning to delete or remove a file or multiple files from a git repository, then this command ie., git rm is used. Not only it deletes but also remove files from the staging index and the working directory. If you wish then it could also delete files from the filesystem.

Deleting a file from the actual Git repository is a separate task that is done easily by the git rm command. But removing the file from the filesystem can be made in several other applications, e.g. a text editor, IDE, or file browser.

Also Check: How To Delete a GitHub Repository

Delete Files using git rm

The easiest way to delete a file in your Git repository is to execute the “git rm” command and specify the file to be deleted.

$ git rm <file>

$ git commit -m "Deleted the file from the git repository"

$ git push

Delete Files using git rm git-rm

Note that by using the “git rm” command, the file will also be deleted from the filesystem.

Also, you will have to commit your changes, “git rm” does not remove the file from the Git index unless you commit it.

As always, let’s have a quick example in order to illustrate the commands we just described.

In my current repository, I have three files named “file1”, “file2” and “file3” and I want to delete the “file1” file from my Git repository.

By using the “git ls-tree” command, I am able to see the files tracked on my current branch.

$ git ls-tree -r master

Delete Files using git rm git-list-tracked-files

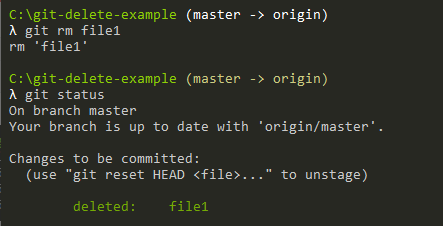
In order to delete the file “file1” from the Git repository and from the filesystem, we are going to execute the “git rm” command with the name of the file.

$ git rm file1
rm 'file1'

You should get a small confirmation message saying that the “rm” command was executed on this file.

How To Delete File on Git git-rm-example

So what happened here?

As you can see, by executing the “git rm” command, a “deleted” action was added to the changes to be committed.

It means that the file was removed from the filesystem but it was not deleted from the index just yet.

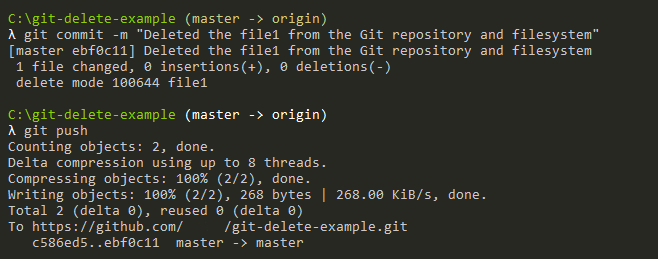
In order for the changes to be effective, you will have to commit your changes and push them to your remote repository.

How To Delete File on Git git-rm-commit-changes

Now the file should be deleted from the filesystem and from the index, you can verify it by re-executing the “git ls-tree” command in order to list files in the current index.

How To Delete File on Git git-list-files-index

Congratulations, you successfully deleted a file from your Git repository.

Removing Multiple Files

Deleting multiple files from a repo is the same as the early use-case of removing a single file using git rm. On the basis of your preferred method, there are some ways to do this. For instance, you can just explicitly list all files to be deleted like below:

$ git rm lib/db.js lib/api.js
rm 'lib/api.js'
rm 'lib/db.js'

Or, if there are more files than you feel like listing, you can always use the wildcard character:

$ git rm lib/*.js
rm 'lib/api.js'
rm 'lib/db.js'

Be noted that by deleting all of the contents from the lib directory, Git will also remove the actual directory itself. This is done because Git only tracks files, not directories:

$ git ls-files
.gitignore
index.js
package.json

Delete Files Recursively on Git

In order to delete files recursively on Git, you have to use the “git rm” command with the “-r” option for recursive and specify the list of files to be deleted.

$ git rm -r <folder>

$ git commit -m "Deleted the folder from the repository"

$ git push

This is particularly handy when you need to delete an entire directory or a subset of files inside a directory.

As an example, let’s say that our Git repository has a folder named “folder1” that contains two files.

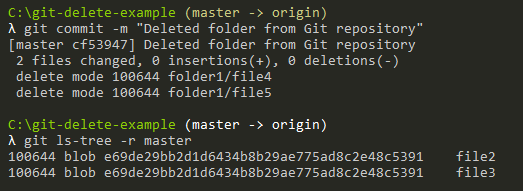
In order to delete this folder, and the files contained in it, we are going to execute the “git rm” command with the “-r” option.

$ git rm -r folder1

Delete Files Recursively on Git git-rm-recursive
Again, do not forget that the changes are effective when you commit them, not before.
Delete Files Recursively on Git git-delete-folder

Congratulations, you successfully removed an entire folder from your Git repository.

Delete Files From Git Repository Only

In some cases, you want to delete files from the Git repository but not from the filesystem, you have to execute the “git rm” command with the “–cached” option.

$ git rm --cached <file>

$ git commit -m "Deleted file from repository only"

$ git push

Back to our example, we currently have two files sitting in our working folder: file2 and file3.

Let’s pretend that we want to delete the file “file2” from the repository but we want to keep it on the filesystem.

To achieve that, we simply execute the “git rm” command with the “–cached” option.

$ git rm --cached file2

Delete Files From Git Repository only git-rm-cached

As you can see, after executing the “git rm” command, the file is still on the filesystem.

Awesome, you simply have to commit and push the changes now for them to be effective.

What’s in my git status?

Before committing your changes, you may notice with a “git status” command that the file was added to the changes to be committed, as well as in the list of untracked files.

Delete Files From Git Repository only git-status-command

Quite logic because your file is not tracked anymore as the result of your previous deletion.

Now for the file not to be listed in your Git repository under the “untracked files”, make sure to add it to your Git Ignore file.

$ touch .gitignore

# Content of the gitignore file

file2

What s in my git status gitignore-files

Commit your gitignore file and you should be good to go!

Delete Files From Git History

In some cases, you want to delete files from your entire Git history.

It may be the case for example if you committed a file that contains passwords or some sensitive information, that you want to remove.

In order to delete the file from Git history, you have to use the “git filter-branch” command and specify the command to be executed on all the branches of your Git history.

Finally, you want to specify the revision to execute the changes from we are going to choose HEAD (as a reminder, HEAD is the last commit of your repository).

In this case, the Git command to be executed is the “git rm” command we described earlier.

$ git filter-branch --force --index-filter --prune-empty "git rm --cached --ignore-unmatch <path_to_file>" HEAD

As the command is quite complex, let’s have a breakdown of all the options used :

  • –force: quite self-explanatory, it forces the filter-branch to start even if it may not want to (given the documentation because it can contain temporary directories)
  • –index-filter: option used in order to rewrite the index, exactly what we want in the case of a file deletion
  • “git rm” command: the command to be executed on all branches, revisions, and commits matching in the history, in this case, it will remove the file from the repository and ignore files that don’t match
  • –prune-empty: avoid having empty commits in the repository with zero files, this option will prune commits automatically

In this case, let’s say that we want to delete the file “file1” contained in our repository.

We are going to execute the following command.

$ git filter-branch -f --prune-empty --index-filter "git rm -r --cached --ignore-unmatch ./file1" HEAD

Delete Files From Git History rewrite-history

This command can take a while if your history contains many files, but in the end, the deleted file won’t be in your Git history anymore.

You can check with a “git log” command, but the commits linked to the deleted file should be pruned if necessary.

Conclusion

In this tutorial, you learned how you can easily delete a file from a Git repository, whether you want to delete it from the filesystem or not. Also, learned that it is completely possible to delete a file from an entire Git repository using the “filter-branch”.

Deleting files in Git is associated to file restoration, as a result, you may be interested in the following resources:

How To Git Add All Files

How To Git Add All Files | Git How to Add All Modified File to Commit?

Adding new files or a bunch of files to the repositories is quite common for all developers working on the software project with Git. In various cases, we face a situation where we need to add multiple files to git. To make it possible, Git provides a single command for that i.e. git add command also check other Git Commands from this available quick link.

In case, if you want to add untracked files to your repository then also you can simply refer & utilize the same command. Well, this tutorial is designed to explain how easily add all your files to your Git repository. Also, you can learn how to Git Add All New files, modified files, deleted files, untracked files, etc. from the available links.

Determine your Git version

Depending on the current Git version that you installed on your computer, the “git add” command can differ.

To determine your current Git version, use “git” followed by the “–version” option.

$ git --version

Determine your Git version git-version

Add All Files using Git Add

The easiest way to add all files to your Git repository is to use the “git add” command followed by the “-A” option for “all”.

$ git add -A                       

$ git add .                        (at the root of your project folder)

In this case, the new (or untracked), deleted and modified files will be added to your Git staging area. We also say that they will be staged.

Alternatively, you can use the “git add” followed by a “.” which stands for “current directory”. However, using the “.” syntax implies that you are currently at the top of your project folder hierarchy.

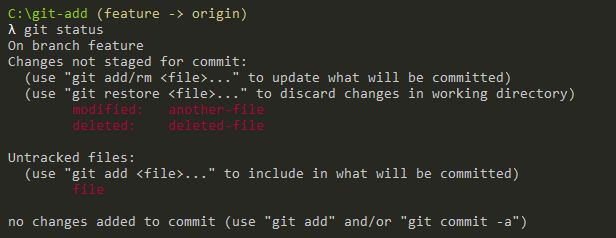
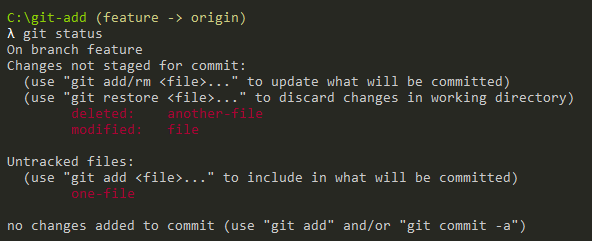
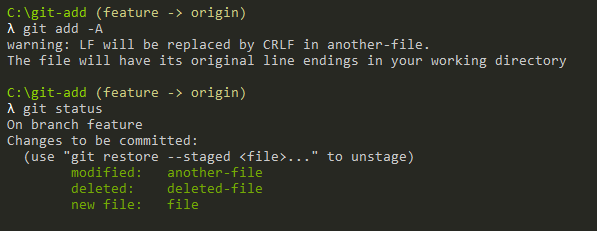
As an example, let’s say that we created a branch named “feature“. On this branch, we have three files: one deleted, one with its content modified, and another one that is untracked.
Add All Files using Git Add git-add-all-files

In order to add all those files to our staging area, we will use the “git add” command followed by the “-A” option.

Add All Files using Git Add adding-all-files

As you can see, the files were correctly added to the staging area, awesome!

You can now commit them to your Git repository in order for the changes to be shared with your colleagues.

The Git Add Command

This command updates the index using the current content found in the working tree, to prepare the content staged for the next commit. It typically adds the current content of existing paths as a whole, but with some options, it can also be used to add content with only part of the changes made to the working tree files applied or remove paths that do not exist in the working tree anymore.

The git add command will not add ignored files by default. If any ignored files were explicitly specified on the command line, git add will fail with a list of ignored files.

The SYNOPSIS of the git add command is as follows:

git add [--verbose | -v] [--dry-run | -n] [--force | -f] [--interactive | -i] [--patch | -p]
[--edit | -e] [--[no-]all | --[no-]ignore-removal | [--update | -u]]
[--intent-to-add | -N] [--refresh] [--ignore-errors] [--ignore-missing] [--renormalize]
[--chmod=(+|-)x] [--pathspec-from-file=<file> [--pathspec-file-nul]]
[--] [<pathspec>…​]

Adding all files by Wildcard

In some cases, you may be interested in adding all files that have a specific extension : *.txt or *.js for example.

To add all files having a specific extension, you have to use the “git add” command followed by a wildcard and the extension to add.

$ git add *.txt

$ git add *.js

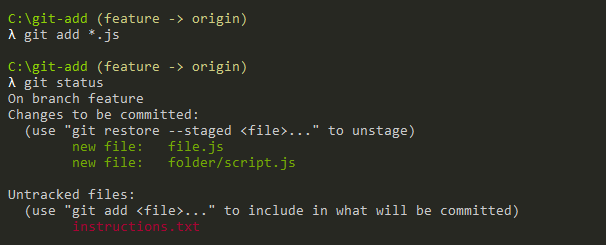
As an example, let’s say that you have created two Javascript files and one text file.

Adding all files by extension add-file-by-extension

In order to add all Javascript files, we are going to use the wildcard syntax followed by “*.js”.

$ git add *.js

Adding all files by extension wildcard-git-add

Congratulations, you successfully added your files having a specific extension!

Using dot with git add

As explained before, the “.” symbol stands for “current directory“.

As a consequence, if you don’t use it at the top of your project hierarchy, you will only add files in the current working directory.

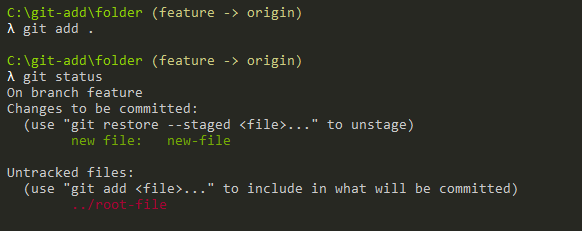
To illustrate this concept, let’s say that you have two new files: “root-file” in your project top folder and “new-file” in a folder named “folder”.

Using dot with git add git-add-dot

If you navigate to your new folder and execute the “git add” command with the dot syntax, you will notice that you only add files located in this directory.

$ cd folder

$ git add .

Using dot with git add git-add-dot-syntax

As a consequence, you might miss some of your files in your commit.

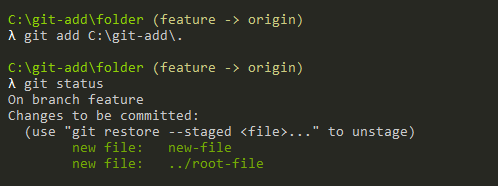
To avoid this problem, you can use the dot syntax combined with the absolute path to your project top folder.

$ git add <path>/.

Using dot with git add git-add-absolute-path

Adding all files on older Git versions

In the first chapter, we use the “–version” option in order to check our current Git version.

This step is quite important because the behaviour of the “git add” command can differ depending on the Git version used.

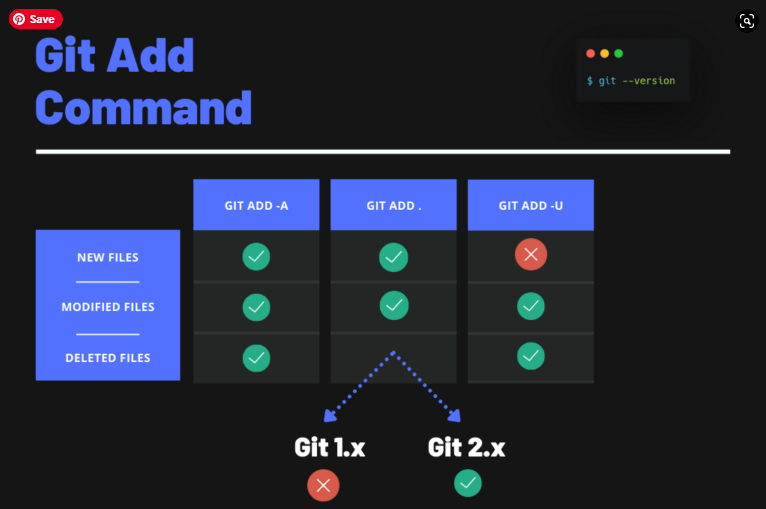
If you use the dot syntax with an old Git version (less than 2.x), the modified and deleted files won’t be automatically added to your commit.

Adding all files on older Git versions git-add-chart

Adding All deleted and modified files

In order to add all deleted and modified files only to your staging area, you have to use the “git add” command followed by the “-u” option.

$ git add -u

As an example, let’s say that we modified one of our files, deleted one, and added one to our working directory.

Using a simple “git status” command, we can inspect the state of our Git working directory.

Adding deleted and modified files only git-add-deleted-files

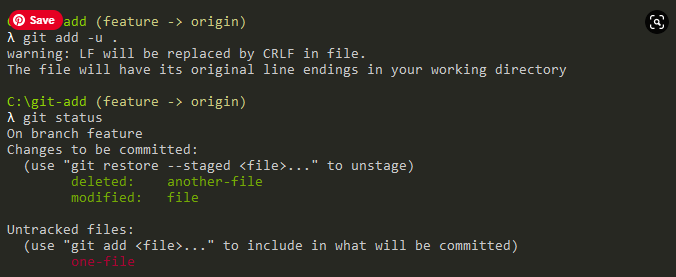
In order to add the deleted and modified files only, we are going to execute “git add” with the “-u” option.

$ git add -u .

Adding deleted and modified files only git-status

Awesome, you successfully added all your deleted and modified files to your current Git repository!

Conclusion

In this tutorial, you learned how you can easily add all your files to your Git repository using the “git add” command. You also learned that you can use specific wildcards or options in order to add only deleted or modified files.

How To Cherry Pick Git Commits

How To Cherry Pick Git Commits | When & How to use a Git Cherry Pick Commit?

If you are working with Git, you may require to add some specific changes to your current branch. For instance, if you require to include a particular commit located on another branch than your current branch,. To perform this case make use of the required git commands ie., git cherry pick. 

It is one of the most useful commands in Git and also it does not change your current Git history rather it adds commits to it. In this tutorial, we will be explaining more about Git Cherry Pick commit and how you can use the Git cherry-pick command for including specific changes to your current branch.

Git Cherry-pick

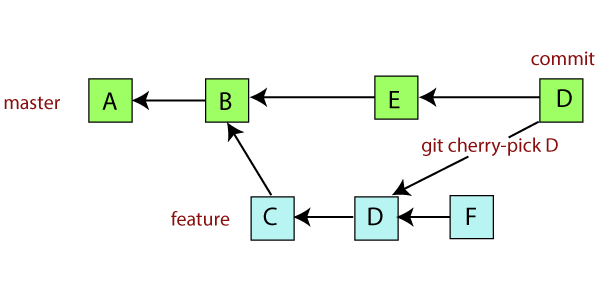
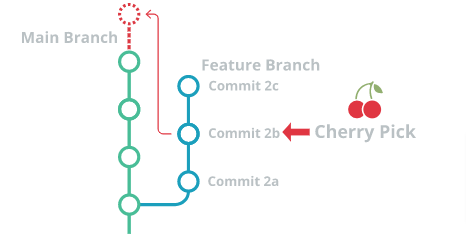
Git cherry-picking refers to applying some commit from one branch into another branch. If you did any error and performed a change into the wrong branch, then you shouldn’t merge the whole branch. You can revert the commit and apply it to another branch.

git cherry pick commit

The principal objective of a cherry-pick is to apply the changes proposed by some current commit. Cherry-pick is a helpful tool, but always it is not a good option. It is in contrast with different ways such as merge and rebase command.

Do Refer: How To Clear Git Cache

How to use git cherry-pick?

If you want to allow the “cherry-pick” only the commits you want from another branch then Git’s cherry-pick command is useful for you. The following steps are very important to understand how to use git cheery pick:

  • Pull down the branch locally. Use your git GUI or pull it down on the command line, whatever you’d like.
  • Get back into the branch you’re merging into. You’ll likely do this by running git checkout master.
  • Find the commits you want to pull into your branch. Go to either the git log or the GitHub UI and grab the unique commit hashes for each of the commits that you want.
  • “Cherry pick” the commits you want into this branch. Run this command: git cherry-pick super-long-hash-here. That will pull just this commit into your current branch.
  • Push up this branch like normal. git push origin master

How do I cherry pick a commit in Git?

In Git, the cherry pick command drives changes from a target commit and puts them on the HEAD of the currently checked out branch.

From here, you can either continue working with these changes in your working directory or you can directly commit the changes onto the new branch.

how do i cherry pick a commit in Git

How to Cherry Pick a Commit?

Cherry-pick using Git commit hash

The easiest way to cherry-pick a commit is to use the “cherry-pick” command with the commit hash.

$ git cherry-pick <hash>

In order to cherry-pick changes, you will need to identify your commit hashes.

In order to see the commit hashes for your current branch, simply run the “git log” command with the “–oneline” option in order to make it more readable.

$ git log --oneline

45ab1a8 (HEAD -> branch2) added gitignore
808b598 (branch) Initial commit

By default, the log command will display the commits from the history beginning until the top of your current branch.

As a consequence, you may not see commits that are not related to your current branch timeline.

If you want to see commits related to a specific branch, specify the branch name when running the “git log” command.

$ git log --oneline master

93ae442 (master) committed changes
44ee0d4 added gitignore
808b598 (branch) Initial commit

As you can see, one additional commit was displayed: you can now use this hash in order to cherry-pick your commit.

$ git cherry-pick 93ae442 

[master 299a73d] added file
 Date: Wed Nov 20 16:04:52 2019 -0500
 1 file changed, 1 insertion(+)
 create mode 100644 file.txt

Great!
You have successfully cherry-picked your commit.

Cherry-pick from another branch

In order to pick commits from another branch, you need to list commits that were performed on this other branch using the “git log” command.

$ git log --oneline <branch>

Let’s say for example that I want to cherry-pick a commit from the feature branch.

$ git log --oneline feature

93ae442 (master) Feature 1
44ee0d4 Feature 2
808b598 (branch) Initial commit

Now, you can go to the branch where you want the commit to be cherry-picked, let’s call it “master” in this case.

$ git checkout master

$ git cherry-pick 93ae442 

[master 299a73d] added file
 Date: Wed Nov 20 16:04:52 2019 -0500
 1 file changed, 1 insertion(+)
 create mode 100644 file.txt

Great!

You successfully cherry-picked commits from another branch into your main branch.

Cherry-pick multiple Git commits

In some cases, you may want to cherry-pick multiple commits at once.

Luckily for you, this option is available since Git 1.7.2.

Since Git 1.7.2, you can cherry-pick a range of commits by using the dot notation.

$ git cherry-pick A..B

Note that using this command, commit A will NOT be included in the cherry-pick.

In order to include commit A, you can use this syntax

$ git cherry-pick A^..B

For example, back to the “master” branch, let’s try to cherry-pick two commits into the feature branch.

$ git checkout master

$ git log --oneline feature
481981f (feature) file 4
6653c90 file3

$ git cherry-pick 6653c90^..481981f

[master 04fbbcf] file3
 Date: Wed Nov 20 16:20:23 2019 -0500
 1 file changed, 1 insertion(+)
 create mode 100644 file3
[master f3ecc5a] file 4
 Date: Wed Nov 20 16:20:36 2019 -0500
 1 file changed, 1 insertion(+)
 create mode 100644 file4

Note that the commits need to be placed into the correct order: commit A needs to be older than commit B otherwise the command will fail silently.

Cherry-pick with original commit reference

In some cases, you may want to keep a reference to the original commit when performing a cherry-pick.

When you are performing a regular cherry-pick, you will get a new commit hash but the commit message will be the same.

However, there is a way to append the origin of a cherry-pick to the commit message: by using the cherry-pick with the “-x” option.

$ git cherry-pick -x <commit>

For example, let’s say that I cherry-picked one commit from the master branch into my “branch2” branch.

$ git cherry-pick -x ed5d4c4

Now when inspecting the commit list, you can pay attention to the commit name.

$ git log

commit de05030c3c03def40c8fa8f23e5283a7b2eaab6a (HEAD -> master)
Author: Antoine <test@gmail.com>
Date:   Wed Nov 20 16:06:10 2019 -0500

    added file 2

    (cherry picked from commit ed5d4c45dda6a6671df7d8bfc63e293ef1de23fa)

As you can see, the commit has the original commit message but it also has an informational message from the original commit

$ (cherry picked from commit <hash>)

This option can be quite handy when you want to track cherry picks done on the branch.

If you don’t specify the “-x”, you won’t be able to tell if the commit was cherry-picked in the past.

Change commit message when cherry-picking

Cherry-picking commits is very useful in order to reuse some existing work.

However, in some branches, the commit may be useful for different reasons.

As a consequence, you may want to change the commit message when cherry-picking.

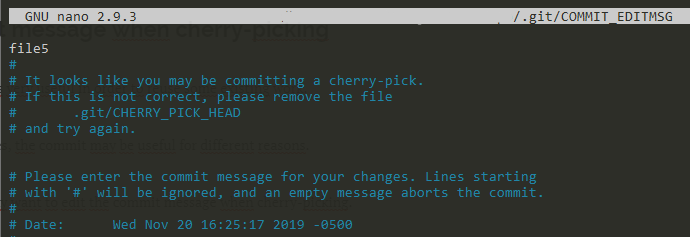
To change the commit message when cherry-picking, use “git cherry-pick” with the “-e” option.

$ git cherry-pick -e <hash>

As illustrated in this example, your default editor will open and it will let you change the commit message.

Change commit message when cherry-picking own-message

When you are satisfied with the edits, save your file and your commit message should be saved successfully.

[master 1aac0e2] file5
 Date: Wed Nov 20 16:25:17 2019 -0500
 1 file changed, 1 insertion(+)
 create mode 100644 file5

Resolving cherry-pick conflicts

In some cases, you may run into cherry-pick conflicts when trying to cherry-pick your commits with the current branch.

$ git cherry-pick 93ae442

error: could not apply 93ae442... committed changes
hint: after resolving the conflicts, mark the corrected paths
hint: with 'git add <paths>' or 'git rm <paths>'
hint: and commit the result with 'git commit'

This error is happening because Git is trying to merge the content of the cherry-picked commit with your current branch.

However, as in a merge operation, the content merging can fail and you will have to solve the conflicts by yourself.

In order to fix the issues, first, take a look at the status of your working directory and staging area.

$ git status

On branch branch2

You are currently cherry-picking commit 93ae442.
  (fix conflicts and run "git cherry-pick --continue")
  (use "git cherry-pick --abort" to cancel the cherry-pick operation)

Changes to be committed:

        new file:   index.js
        new file:   script.js

Unmerged paths:
  (use "git add <file>..." to mark resolution)

        both modified:   .gitignore

As you can see, the status command states that “you are currently cherry-picking commit 93ae442“.

The files to be solved are located in the “unmerged paths” section. In order to solve the cherry-pick conflict, edit the file and modify the file until you are satisfied with the modifications.

$ nano .gitignore

(Previous content)

<<<<<<< HEAD
=======
*.conf
>>>>>>> 93ae442... committed changes

(After conflict modification)

*.conf

When conflicts are solved, add the files to your staging area and continue the cherry-pick process.

$ git add .

$ git cherry-pick --continue

The last command will open your current editor in order to add a message to your current operation.

Resolving cherry-pick conflicts continue

When you are done, save your changes and your changes should be merged.

[branch2 bd8763f] Fixed conflicts on cherry-pick
 Date: Wed Nov 20 12:56:50 2019 -0500
 3 files changed, 1 insertion(+)
 create mode 100644 index.js
 create mode 100644 script.js

Great! You successfully resolved cherry pick conflicts on your current branch.

Conclusion

In this tutorial, you learned more about the git cherry-pick command and how it can be used in many ways to merge specific commits into your current working branch.

How To Git Commit With Message

How To Git Commit With Message | Best Practices & Rules To Write Good Commit Messages in Git

Using Git as a version control system for your projects is very helpful for developers. After performing any changes, you would probably need to add your files to the index and commit them to be saved. While working with Git, it will be always a good practice to create Git commits with a message.

Git commit messages are important to express and distribute with others what you did. Also, it can be helpful when working to hotfix issues appearing on your master branches. In this short tutorial, We will be discussing more on how easily one can create Git commits with messages along with best practices of Git commit messages, other Git Commands used to commit messages to learn and write good ones when required.

What is a commit message?

The usage of the commit command is for saving changes to a local repository after staging in Git. But, before you can save changes in Git, you have to tell Git which changes you want to save as you might have made tons of edits. An excellent way to do that is by adding a commit message to recognize your changes.

Git Commit With Message

The easiest way to create a Git commit with a message is to execute “git commit” with the “-m” option followed by your commit message.

$ git commit -m "Describe your commit here"

When using the Git CLI, note that you should restrict your commit message in order for it not to be wrapped.

Usually, a good practice is to keep Git commit messages under 50 characters or less.

If you want to append a description to your Git commit, you will have to use another method.

Also Check: How To Amend Git Commit Message 

Git Commit With Description

In some cases, you may want to create a Git commit with a larger description.

Furthermore, you want to make your Git commit message fit the character limit on Git.

To create a Git commit message with a large description, you have to execute the “git commit” command without any options.

On Linux or in the Git bash, it will open an editor for you to write your Git commit message.

$ git commit

When leaving the editor and creating your Git commit message, you will be able to see that the short message was taken into account to create the commit.

Git Commit With Description git-commit-2

Similarly, if you try to inspect your Git history, you will be able to see that only the short message is visible to other users.

$ git log --oneline --graph

Git Commit With Description changes
Now that you know the basics of creating Git commit messages, we will see what rules you can use in order to write proper commit messages.

Writing Good Git Commit Messages

Writing good commit messages is crucial to any workflow. Git commits provide insights on the performed work.

As a result, if they are not written properly, you have the risk of not identifying clearly what you have worked on, or what others have worked on.

This can lead to a very messy process where you are not able to perform code integration or reverse-engineer what you did in the past.

Best Practices of Git Commit Messages

Best Practices of Git Commit Messages

Five Rules To Write Great Git Commit Message

Here is a small list of rules that you can follow to write good Git commit messages:

1 – Keep your Git commit messages short and informative

When you are working on a task, you should be able to clearly identify what you are working on.

There is no such task as “creating a website” or “refactoring the entire codebase”.

# Bad habit

$ Created pages for the website

# Good habit

$ Created the sign-up form front-end and added controls

$ Added the Login button to the Login page

Instead, if you divided your big tasks from the beginning, you should have a small set of features that you can work on.

Your Git commit message should reflect the properly divided work you are currently performing.

2 – Git commit messages should reflect your Git flow

When working with Git, choosing a Git flow is essential to ensure that integrations are performed without any regression or additional bugs.

If you are not sure about Git Flow, Atlassian wrote a very useful guide about it : you should read it and choose a Git flow if not done already.

Now that your Git flow is chosen, you can reflect it in your Git commit messages.

For example, if you are working on a feature branch, you can easily write a prefix or a suffix describing the branch you are working on.

$ (on <branch>) Fixed the UI bug when creating a new user

$ Fixed the UI bug when creating a new user (on <branch>)

Note: Whenever you are trying to inspect changes done in the past, you will be able to easily identify all the branches associated with a feature.

3 – You are not working alone

Most of the time, you are not working alone on your project: you are working with other developers.

As an outcome, writing good Git commit messages is also a sign that you care about other developers on your team.

When other developers will pull your changes, they will most likely try to understand what you have done.

It is also very likely that your modifications had some kind of impact on other parts of the code that you are not directly aware of.

Being descriptive is the best way to ease the future work that they will have to do.

It might not make a big difference on one or two commits, but the impact is huge when done over several hundred commits.

# Bad habit

$ Fixed bug on code

# Good habit

$ Fixed the NullPointerException when trying to create a user from login

4 – Use good spelling and syntax for your Git commits

This is a very obvious step but you should try to keep good spelling a proper grammar when writing Git commit messages.

Also, the syntax should be adapted to the Git commit message: avoid exclamation marks and words that add nothing descriptive or useful to the content of your Git message.

# Bad habit

$ Finally fixed the UI page! 😊

# Good habit

$ Fixed the UI page by adding an try-catch clause

Usually, Git commit messages should stay neutral and they should only try to convey the intent of the commit.

5 – Use verbs that fit the modifications done

When creating Git commit messages, one of the hardest parts is coming up with verbs that describe the actions performed in the commit.

Did you fix a bug? Did you refactor a class? Did you delete some methods?

# Bad habit

$ Wrote some new code for the feature

# Good habit

$ Added unit-tests to cover the user creation workflow

Choosing the best verbs is actually crucial: there is an actual difference between fixing a bug and hot-fixing a bug for example.

One can be done on one of your feature branches while the other implies that you have performed a modification directly on one of your production branches.

Conclusion

In this tutorial, you learned how you can write good Git commits with messages.

You saw that it is possible to keep Git commit messages while adding a longer description to your commit.

If you are interested in Git or in Software Engineering in general, we have a complete section dedicated to it on the website, so make sure to check it out!