Particularly before performing any branches merge or delete in Git, it is important to compare it to another one. As a consequence, it provides you an overview of current changes and assists you to define if they must be integrated or deleted.
Comparing two branches is very helpful as it can be utilized as an easy way to view if any merging conflicts. In this tutorial, we’ll be talking about the different ways to compare branches in Git along with comparing commits, actual changes, or also a specific file on two branches using Git commands.
- Comparing Actual Changes Between Two Branches
- Compare two branches using git diff with Double Dot Notation
- Comparing two branches using Triple Dot Syntax
- Compare two branches in Git using git-merge
- Compare Specific File Between Two Branches
- Compare commits between two branches
- Compare two branches using Sourcetree
Comparing Actual Changes Between Two Branches
Let’s say you’d like to take a look at a feature branch named “feature/login”. You need to view all changes that are different from “main” – to get an idea of what would be integrated if you performed e.g. a git merge now. There are various ways to compare git branches and some of them are listed & explained here in detail.
- Compare two branches using git diff
- With Double Dot Notation
- With Triple Dot Syntax
- Compare two branches in Git using git-merge
Compare two branches using git diff with Double Dot Notation
For comparing two branches easily, you have to use the “git diff” command and provide the branch names separated by dots.
$ git diff branch1..branch2
Using this command, Git will compare the tip of both branches (also called the HEAD) and display a “diff” recap that you can use to see modifications.
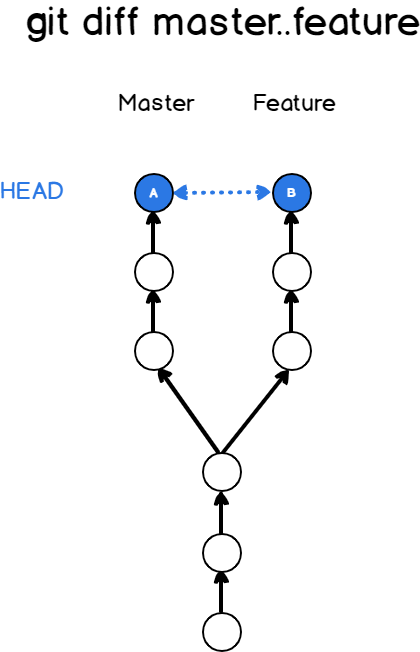
In short, it will show you all the commits that “branch2” has that are not in “branch1”.
- How To Clean Up Git Branches | Git Clean Up Local and Remote Branches
- How To Create and Apply Git Patch Files | Creating & Applying Git Patch Files with Different Git Commands
- How To Set Upstream Branch on Git | What is a Git Upstream Branch? | Git Set Upstream Branch without Push
Let’s say for example that you are looking to see the differences between a feature branch (being one commit ahead of master) and the master branch.
In order to see what has been modified between master and feature, you would run the following command.
$ git diff master..feature

diff --git a/file-feature b/file-feature
new file mode 100644
index 0000000..add9a1c
--- /dev/null
+++ b/file-feature
@@ -0,0 +1 @@
+this is a feature file
As you can see, one file has been added to the branch.
Git is using a color code in order to display differences done between two branches: lines in green are lines added to the files and lines in red are the ones that are deleted from the files.
Also See: How To Switch Branch on Git
Comparing two branches using Triple Dot Syntax
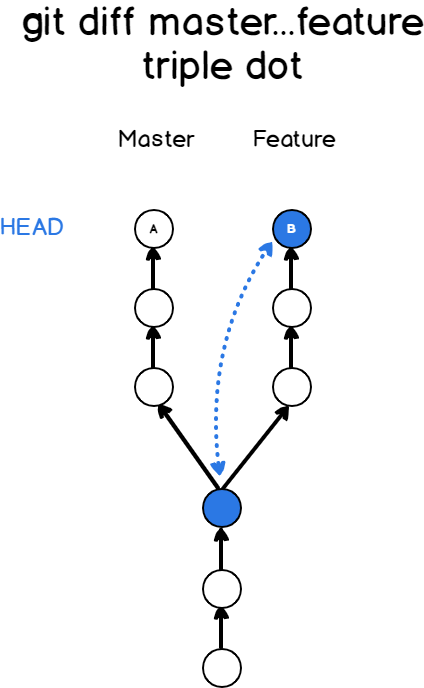
In order to compare two branches, you can also use the “git diff” command and provide the branch names separated by three dots.
$ git diff branch1...branch2
So what’s the difference with the previous command?
Using “git diff” with three dots compares the top of the right branch (the HEAD) with the common ancestor of the two branches.
As always, a diagram speaks a hundred words, so here is the description of the diff command with three dots.
So which method should you use in order to compare the two branches?
Most of the time, you want to stick with the first method, meaning using only two dots in order to compare two branches.
Why?
When you are developing a new feature, you are most of the time doing it on your own branch. However, developing on your own branch does not prevent the branch you checked out from having other commits.
This is particularly true whenever you are checking out a new branch from the master branch: other commits might be integrated to master while you are working on your feature.
As a consequence, in order to compare the two branches, you almost always want to stick with the first method we described.
$ git diff branch1..branch2
Compare two branches in Git using git-merge
As an alternative, you can make a git-merge with the –no-ff and –no-commit option. This assures that the current branch is not modified or updated by the merge command.
For example, the below will merge the master branch to the current branch without committing the changes.
git merge –no-commit –no-ff master
Once the merge is done, you can use Git visual tools such as gitk and git-gui to envision the differences. Once you’re finished, you can abort the merge with the –abort option. This will replace the pre-merge state.
git merge –abort

Compare Specific File Between Two Branches
You may want to see all changes done to a specific file on the current branch you are working on in some cases.
To see the differences done to a file between two branches, use the “git diff” command, specify the two branches and the filename.
$ git diff master..feature -- <file>
For example that the file that you modified between those two branches is called “README”.
In order to see the differences done to this file, you would run the following command
$ git diff master..feature -- README

diff --git a/README b/README
new file mode 100644
index 0000000..add9a1c
--- /dev/null
+++ b/README
@@ -0,0 +1 @@
+this is the README file
Note that you can use the triple-dot syntax we saw earlier in order to compare those files.
$ git diff master...feature -- <file>Compare commits between two branches
In some cases, you may be interested in knowing the commit differences between the two branches.
In order to see the commit differences between two branches, use the “git log” command and specify the branches that you want to compare.
$ git log branch1..branch2Note that this command won’t show you the actual file differences between the two branches but only the commits.
Back to the example, we provided before comparing the commit differences between the master and the feature branch would be written
$ git log master..feature

commit 802a2abed7f88d67e0ab9a0e780b858651c5813b (HEAD -> feature, origin/feature)
Author: SCHKN <test@gmail.com>
Date:   Wed Dec 4 13:10:01 2019 -0500

    feature commit
If you are not interested in all the information provided by this command, there is a way to get shorter commit lines.
In order to compare two branches using commit abbreviations, use the “git log” command with the following options.
$ git log --oneline --graph --decorate --abbrev-commit branch1..branch2
Using the example we provided before, this command would give us the following output
$ git log --oneline --graph --decorate --abbrev-commit master..feature
* 802a2ab (HEAD -> feature, origin/feature) feature commit
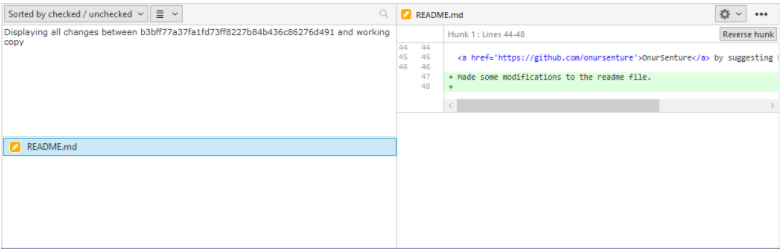
Compare two branches using Sourcetree
In some cases, you might be interested in viewing differences in a Git graphical client.
For this example, I am going to use the popular Sourcetree Git GUI in order to display the differences between the two branches.
Given the repository view, you have access to all your branches in the left side menu.
In order to see the differences between two branches, on the Sourcetree left menu, click on the branch that you want to compare and click “Diff Against Current”
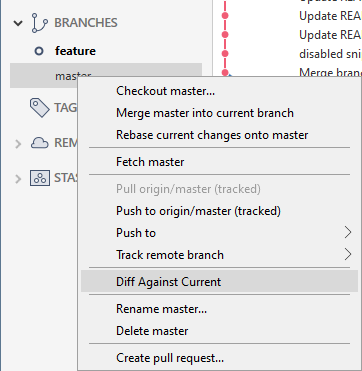
After clicking on “Diff Against Current”, you will be presented with the list of differences between your files, whether they are in your working tree or if they are in your index already.
Conclusion
In this tutorial, you discovered how you can compare two branches easily using Git commands (specifically the git diff and git log commands). Also, You learned that it is possible to use graphical tools such as Sourcetree in order to compare your branches and commits easily. If you are passionate about Git, then make use of this website fully by viewing the complete section dedicated to Git.