Power supply not recognized by M-series router

Some power supplies for M7i and M10i might contain an incorrectly programmed I2C ID.
As a result the following errors appear in the show chassis alarms output:

  user@M10i-re0> show chassis alarms 
  2 alarms currently active
  Alarm time               Class  Description
  2006-11-29 16:21:22 GMT  Major  PEM 0 Unrecognized for the platform
  2006-11-29 16:21:22 GMT  Major  PEM 1 Unrecognized for the platform

A fix is provided in JUNOS  8.1R2, 8.2R1 and higher JUNOS releases.

Below there is an example with a step by step procedure:

  • Check which power supplies are not recognized properly:
    root@Junos-re0> show chassis alarms
    2 alarms currently active
    Alarm time               Class  Description
    2006-11-29 16:21:22 GMT  Major  PEM 0 Unrecognized for the platform
    2006-11-29 16:21:22 GMT  Major  PEM 1 Unrecognized for the platform
  • Go to the shell and and use command su to change to super-user:
    root@Junos-re0> start shell
    % su
    Password:
    root@Junos-re0%
  • Use the smbc command to read out the currently (incorrectly) programmed I2C ID for PSU in slot 0:
    root@Junos-re0% smbc -g 2 -o 5 0x56 1
    Read from bus address 0x56 returns:
    0x06
  • Re-program the I2C ID for the same PSU:
    root@Junos-re0% smbc -w -g 2 -o 5 0x56 0x0E
  • Verify if the the I2C IC has been programmed correctly
    root@Junos-re0% smbc -g 2 -o 5 0x56 1
    Read from bus address 0x56 returns:
    0x0e
  • Repeat the same steps for PSU in slot 1
    root@Junos-re0% smbc -g 3 -o 5 0x56 1
    Read from bus address 0x56 returns:
    0x06
    root@Junos-re0% smbc -w -g 3 -o 5 0x56 0x0E
    root@Junos-re0% smbc -g 3 -o 5 0x56 1
    Read from bus address 0x56 returns:
    0x0e
  • Go back to the shell

root@Junos-re0% exit

Chassisd has to be restarted in order to have the alarms cleared.  Note: This is traffic affecting! :

root@Junos-re0> restart chassis-control
Chassis control process started, pid 3553
Verify that no PSU related alarms are active:

root@Junos-re0> show chassis alarms
No alarms currently active
linkFlapErrDisabled error on cisco Nexus5500 Chassis

linkFlapErrDisabled error on cisco Nexus5500 Chassis

We observed linkFlapErrDisabled error on interface ethernet 2/7 on cisco Nexus5548 Chassis. We observed link flap on this interface 1week(s) 1day(s) ago.

Nexus5500# sh interface ethernet 2/7
Ethernet2/7 is down (linkFlapErrDisabled)
Dedicated Interface
Hardware: 1000/10000 Ethernet, address: 002a.6a18.ff86 (bia 002a.6a18.ff86)
MTU 1500 bytes, BW 10000000 Kbit, DLY 10 usec
reliability 255/255, txload 1/255, rxload 1/255
Encapsulation ARPA
Port mode is trunk
auto-duplex, 10 Gb/s, media type is 10G
Beacon is turned off
Input flow-control is on, output flow-control is on
Rate mode is dedicated
Switchport monitor is off
EtherType is 0x8100
Last link flapped 1week(s) 1day(s)
Last clearing of "show interface" counters never
32 interface resets
30 seconds input rate 0 bits/sec, 0 packets/sec
30 seconds output rate 0 bits/sec, 0 packets/sec
Load-Interval #2: 5 minute (300 seconds)

We did a shut and unshut on this port and we see interface 2/7 up.

Nexus5500# conf t
Enter configuration commands, one per line. End with CNTL/Z.
Nexus5500(config)# int ethernet 2/7
Nexus5500(config-if)# shu
Nexus5500(config-if)# no shut
Nexus5500(config-if)# end
Nexus5500# sh interface ethernet 2/7
Ethernet2/7 is up
Dedicated Interface
Hardware: 1000/10000 Ethernet, address: 002a.6a18.ff86 (bia 002a.6a18.ff86)
MTU 1500 bytes, BW 10000000 Kbit, DLY 10 usec
reliability 255/255, txload 1/255, rxload 1/255
Encapsulation ARPA
Port mode is trunk
full-duplex, 10 Gb/s, media type is 10G
Beacon is turned off
Input flow-control is on, output flow-control is on
Rate mode is dedicated
Switchport monitor is off
EtherType is 0x8100
Last link flapped 00:00:04
Last clearing of "show interface" counters never
33 interface resets
30 seconds input rate 0 bits/sec, 0 packets/sec
30 seconds output rate 0 bits/sec, 0 packets/sec
Load-Interval #2: 5 minute (300 seconds)

Bash Concatenate Strings

Concatenation is one of the most popular and used string operations. String concatenation is just a decorative programming word for joining strings collectively by adding one string to another string’s end.

In this article, we will show how to concatenate strings in bash.

Concatenating Strings

The easiest way to concatenate two or more string variables is to write them one after another:

VAR1= "Hi,"
VAR2=" Lucky"
VAR3="$VAR1 $VAR2"
echo "$VAR3."

The last line will echo the concatenated string:

Output:
Hi, Lucky

With the help of a literal string, you can concatenate one or more variable:

VAR1= "Hey,"
VAR2= "${VAR1}World."
echo "$VAR2."
Output:
Hello, World

The example over variable VAR1 is enveloped in curly braces to guard the variable name against surrounding characters. When another valid variable-name character reflects the variable, you must have it in curly braces ${VAR1}.

To circumvent any word splitting or globbing issues, you should regularly try to use double quotes nearby the variable name if you want to suppress variable addition and special treatment of the backslash character rather than dual-use single quotes.

Bash does not separate variables by “type”; variables are used as integer or string depending on contexts. You can also combine variables that contain only digits.

VAR1 = "Hey, "
VAR2 = 2
VAR3 = " Lucky"
VAR4 = "$VAR1$VAR2$VAR3"
echo "$VAR4"
Output:
Hey, 2 Lucky

Concatenating Strings with the += operator

The other way of concatenating strings in bash is by combining variables or literal strings to a variable using the += Operator:

VAR1="Hey, "
VAR1+=" Lucky"
echo "$VAR1."
Output:
Hey, Lucky

The following sample is using the += operator to concatenate strings in bash for loop :

languages. sh
VAR= ""
for ELEMENT in 'Oxygen' 'Helium' 'Lime' 'Belly'; do
VAR+="${ELEMENT} "
done
echo "$VAR."
Output:
Oxygen Helium Lime Belly

Conclusion
Concatenating string variables is one of the most significant operations in Bash scripting. After reading this article, you should have a good knowledge of how to concatenate strings in bash. If you have any queries related to bash connect with us now.

system services

root@Ex# set ?
Possible completions:
+ apply-groups         Groups from which to inherit configuration data
+ apply-groups-except  Don’t inherit configuration data from these groups
> dhcp                 Configure DHCP server
> finger               Allow finger requests from remote systems
> ftp                  Allow FTP file transfers
> netconf              Allow NETCONF connections
> outbound-ssh         Initiate outbound SSH connection
> service-deployment   Configuration for Service Deployment (SDXD) management application
> ssh                  Allow ssh access
> subscriber-management  Subscriber management configuration
> telnet               Allow telnet login
> tftp-server          Allow TFTP file transfers in default routing instance
> web-management       Web management configuration
> xnm-clear-text       Allow clear text-based JUNOScript connections
> xnm-ssl              Allow SSL-based JUNOScript connections
[edit system services]
root@Ex# set

show system snapshot media internal – To know Junos installed in both partitions of Ex

root> show system snapshot media internal 
fpc0:
--------------------------------------------------------------------------
Information for snapshot on       internal (/dev/da0s1a) (primary)
Creation date: Feb 11 23:59:41 2013
JUNOS version on snapshot:
  jbase  : ex-12.3R1.7
  jcrypto-ex: 12.3R1.7
  jdocs-ex: 12.3R1.7
  jroute-ex: 12.3R1.7
  jswitch-ex: 12.3R1.7
  jweb-ex: 12.3R1.7
Information for snapshot on       internal (/dev/da0s2a) (backup)
Creation date: Feb 6 08:38:13 2013
JUNOS version on snapshot:
  jbase  : 11.3R4.2
  jcrypto-ex: 11.3R4.2
  jdocs-ex: 11.3R4.2
  jroute-ex: 11.3R4.2
  jswitch-ex: 11.3R4.2
  jweb-ex: 11.3R4.2

{master:0}
root>


show system storage partitions – Show active partitions information for the boot media in juniper ex

root> show system storage partitions 
fpc0:
--------------------------------------------------------------------------
Boot Media: internal (da0)
Active Partition: da0s1a         <<<< Ex is currently booted from slice da0s1a partition
Backup Partition: da0s2a
Currently booted from: active (da0s1a)

Partitions information:
  Partition  Size   Mountpoint
  s1a        183M   /         
  s2a        184M   altroot   
  s3d        369M   /var/tmp  
  s3e        123M   /var      
  s4d        62M    /config   

{master:0}
root>

How to Increment and Decrement Variable in Bash (Counter)

One of the most popular arithmetic operations when addressing Bash scripts is incrementing and decrementing variables. This is most regularly used in loops as a counter, but it can happen elsewhere in the script.

Incrementing and Decrementing center on adding or subtracting a value (usually 1), respectively, from the value of a numeric variable. The arithmetic augmentation can be performed using the double parentheses ((…)) and $((…)) or with the built-in let command.

In bash, there are various ways to increment/decrement a variable. In this article, some are explained.

Using + and – Operators

The easiest way to increment/decrement a variable is by using the + and – operators.

i=$((i+1))

((i=i+1))

let "i=i+1"
i=$((i-1))

((i=i-1))

let "i=i-1"

This method enables you to increment/decrement the variable by any value you want.

Here is an example of incrementing a variable within an until loop:

i=0

until [ $i -gt 3 ]

do

  echo i: $i

  ((i=i+1))

done

Output:

i: 0

i: 1

i: 2

i: 3

The += and -= Operators

In addition to the basic operators explained above, bash also provides the assignment operators += and -=. These operators are used to increment/decrement the left operand’s value with the value specified after the operator.

((i+=1))

let "i+=1"
((i-=1))

let "i-=1"

Copy

In the example below, we will show how to decrement the I variable’s value by 5.

i=20

while [ $i -ge 5 ]

do

  echo Number: $i

  let "i-=5" 

done

Output:

Number: 20

Number: 15

Number: 10

Number: 5

Using the ++ and — Operators

The ++ and — operators increment and decrement, respectively, its operand by 1 and return the value.

((i++))

((++i))

let "i++"

let "++i"
((i--))

((--i))

let "i--"

let "--i"

The operators can be used before or after the operand. They are also known as:

  • prefix increment: ++i
  • prefix decrement: –i
  • postfix increment: i++
  • postfix decrement: i–

The prefix operators first increment/decrement the operators by one and then return the new value to the operator. On the other hand, the postfix operators return the operators` value before incrementing/decremented the operator’s value.

If you only want to increment/decrement the variable, then there is no difference if you use the prefix or postfix operator. It only makes a difference if the operators’ result is accepted in some other operation or assigned to another variable.

The example below will show how the ++ operator works when is used before and after its operant:

x=5

y=$((x++))

echo x: $x

echo y: $y

Output

x: 6

y: 5
x=5

y=$((++x))

echo x: $x

echo y: $y
Copy

x: 6

y: 6

The example below shows us how to use the postfix incrementor in a bash script:

#!/bin/bash

i=0

while true; do

  if [[ "$i" -gt 3 ]]; then

    exit 1

  fi

  echo i: $i

  ((i++))

done

The downside of using these operators is that the variable can only be incremented or decremented by one only.

Conclusion                      

In bash, incrementing and decrementing variables can be performed in many different ways. So whatever method you use, the result is the same. If you have any query related to this, please write us.

How to Find the Length of a List in Python

Lists are one of the most commonly used data types in Python and store collections of the same kind.

In this article, we will see how to find the length of a list.

len() Function

If you want to find the length of the given object, then in Python, there is a built-in function len(), giving you the length of the given object (object means a list, tuple, string, dictionary, etc.)

The syntax of the len() function is as follows:

len(list)

The function allows only one argument. The declared value is an integer that is the number of elements in the list.

Here is an example:

capitals = ['Tokyo', 'Sofia', 'India', 'Budapest', 'America']

list_len = len(capitals)

print("The list has {0} elements.".format(list_len))
Output:

The list has 5 elements.

Using Loop

Another way to find the length of a list is to use them for a loop. This works by fixing up a counter and looping through all the elements of the list. On each repetition, the current value of the counter variable is incremented by one.

With the help of the following code, the snippet will get an idea of finding the length of an object using the loop.

capitals = ['Japan', 'America', 'India', 'Budapest', 'Italy']

counter = 0

for capital in capitals:

  counter = counter + 1

print("The list has {0} elements.".format(counter))
output:

The list has 5 elements.

As we cannot trust this method, it favors using the len() function in Python.

Conclusion

In this article, we have seen finding the length of a list in Python list and using the len() function only. If you have any queries related to this len(), then feel free to connect us.

Fdisk Command in Linux (Create Disk Partitions)

Whenever you install a new SSD or hard disk, the first thing you have to do is to partition it. A drive requires to have at least one partition before you can format it and store files on it.

In Linux, there are many tools that you can use to generate partitions, with fdisk being the most usually used one.

In this article, let us see about the fdisk command.

fdisk is a menu-driven command-line utility that enables you to design and manipulate partition tables on a hard disk.

Be aware that fdisk is a severe tool and should be used with absolute caution. Only root or users with sudo privileges can manage the partition tables.

List Partitions

To list the partition table of a project, invoke the fdisk command with the -l option, followed by the device name. For example, to list the /dev/sda partition table and partitions, you would run:

$ fdisk -l /dev/sda

When no device is given as an argument, fdisk will print partition tables of all devices listed in the /proc/partitions file:

$ fdisk -l
Output:

Disk /dev/nvme0n1: 232.91 GiB, 250059350016 bytes, 488397168 sectors

Disk model: Samsung SSD 960 EVO 250GB

Units: sectors of 1 * 512 = 512 bytes

Sector size (logical/physical): 512 bytes / 512 bytes

I/O size (minimum/optimal): 512 bytes / 512 bytes

Disklabel type: gpt

Disk identifier: 6907D1B3-B3AB-7E43-AD20-0707A656A1B5

Device            Start       End   Sectors   Size Type

/dev/nvme0n1p1     2048   1050623   1048576   512M EFI System

/dev/nvme0n1p2  1050624  34605055  33554432    16G Linux swap

/dev/nvme0n1p3 34605056 488397134 453792079 216.4G Linux filesystem

Disk /dev/sda: 465.78 GiB, 500107862016 bytes, 976773168 sectors

Disk model: WDC WD5000AAKS-0

Units: sectors of 1 * 512 = 512 bytes

Sector size (logical/physical): 512 bytes / 512 bytes

I/O size (minimum/optimal): 512 bytes / 512 bytes

Disklabel type: dos

Disk identifier: 0x0001cca3

Device     Boot Start       End   Sectors   Size Id Type

/dev/sda1        2048 976771071 976769024 465.8G 83 Linux

The output over shows the current partition tables of all devices that are connected to your system. Generally, SATA device signs follow the pattern /dev/sd[a-z], while NVMe device signs have the following pattern /dev/nvme[1-9]n[1-9].

Creating Partition Table

To start partitioning the drive, run fdisk with the device name. In this example, we will work on /dev/sdb:

fdisk /dev/sdb

The command prompt will vary, and the fdisk dialogue where you can type in commands will open:

Welcome to fdisk (util-linux 2.34).

Corrections will remain in memory only until you decide to write them.

Be careful before using the write command.

Command (m for help):
Corrections you make to the partition table won't affect you until you write them with the w command. You can exit the fdisk dialogue without saving the changes using the q command.

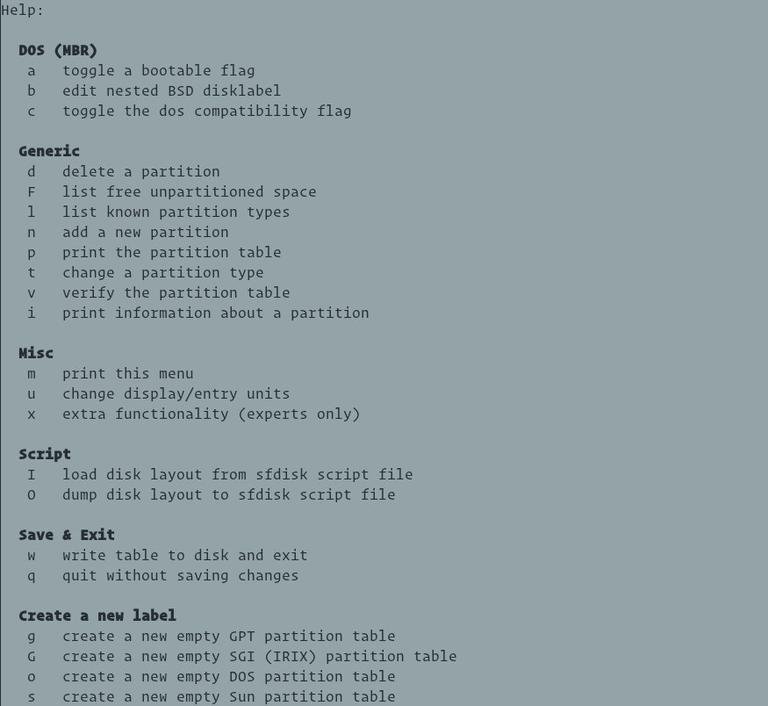
To get a list of all available commands, enter m

(command m for help) m

Fdisk Command in Linux

If you are partitioning a new drive, you need to create a partition table before starting to create partitions. Skip this step if the device already has a partition table and you want to keep it.

fdisk supports several partitioning schemes. MBR and GPT are the two most popular partition scheme standards that store the partitioning information on a drive differently. GPT is a newer standard allowing and has many advantages over MBR. The main points to consider when choosing what partitioning standard to use:

  • Use MBR to boot the disk in legacy BIOS mode.
  • Use GPT to boot the disk in UEFI mode.
  • The MBR standard supports creating a disk partition up to 2 TiB. If you have a disk of 2 TiB or larger, use GPT.
  • MBR has a limit of 4 primary partitions. If you need more sections, one of the preceding sections can be set as an extended partition and hold additional logical partitions. With GPT, you can have up to 128 sections. GPT doesn’t support extended or logical partitions.

In this example, we will use a GPT partition table.

Enter g to create a new empty GPT partition table:

command (m for help) g

Output:

Created a new GPT disklabel (GUID: 4649EE36-3013-214E-961C-51A9187A7503).

The next step is to create the new partitions.

We will create two partitions. The first one with a size of 100 GiB, and the second one will take the rest of the disk space.

Run the n command to create a new partition:

command (m for help) n

You’ll be prompted to enter the partition number. Hit “Enter” to use the default value (1):

Partition number (1-128, default 1):

Next, the command will ask you to specify the first sector. Generally, it is always recommended to use the default values for the first value. Hit “Enter” to use the default value (2048):

First sector (2048-500118158, default 2048):

On the next prompt, you’ll need to enter the last sector. You can use an absolute value for the previous sector or relative importance to the start sector, using the + symbol following the partition size. The size can be specified in kibibytes (K), mebibytes (M), gibibytes (G), tebibytes (T), or pebibytes (P).

Enter +100G to set the partition size to 100 GiB:

Last sector, +/-sectors or +/-size{K,M,G,T,P} (2048-500118158, default 500118158): +100G
Output:

Created a new partition 1 of type' Linux filesystem' and size 100 GiB.

By default, the new partition type is set to “Linux filesystem,” which should be sufficient for most cases if you want to change the type, press l to get a list of partition types and then press t to change the style.

Let’s create the second partition that will take the rest of the disk space:

command (m for help) n
Partition number (2-128, default 2):

First sector (209717248-625142414, default 209717248):

Last sector, +/-sectors or +/-size{K,M,G,T,P} (209717248-625142414, default 625142414):

Once done creating partitions, use the p command to display the new partition table:

command (m for help) p

Disk /dev/sdb: 298.9 GiB, 320072933376 bytes, 625142448 sectors

Disk model: nal USB 3.0

Units: sectors of 1 * 512 = 512 bytes

Sector size (logical/physical): 512 bytes / 4096 bytes

I/O size (minimum/optimal): 4096 bytes / 4096 bytes

Disklabel type: gpt

Disk identifier: F8365250-AF58-F74E-B592-D56E3A5DEED1

Device Start End Sectors Size Type

/dev/sdb1 2048 209717247 209715200 100G Linux filesystem

/dev/sdb2 209717248 625142414 415425167 198.1G Linux filesystem
If you want to delete a partition, use the d command.

Save the changes by running the w command:

command (m for help) p

The command will write the table to disk and exit the fdisk menu.

Output:

The partition table has been altered.

Calling ioctl() to re-read partition table.

Syncing disks.

The kernel will read the device partition table without the need to reboot the system.

Activating the Partitions

Now that the partitions have been created, the next step is to format the partitions and mount them to the system’s directory tree.

We’ll format both partitions to ext4:

sudo mkfs.ext4 -F /dev/sdb1sudo mkfs.ext4 -F /dev/sdb2

mke2fs 1.45.5 (07-Jan-2020)

Creating filesystem with 51928145 4k blocks and 12984320 inodes

Filesystem UUID: 63a3457e-c3a1-43f4-a0e6-01a7dbe7dfed

Superblock backups stored on blocks:

32768, 98304, 163840, 229376, 294912, 819200, 884736, 1605632, 2654208,

4096000, 7962624, 11239424, 20480000, 23887872

Allocating group tables: done

Writing inode tables: done

Creating journal (262144 blocks): done

Writing superblocks and filesystem accounting information: done

We will mount the partitions to /mnt/audio and /mnt/video directories in this example.

Create the mount points with mkdir :

sudo mkdir -p /mnt/audio /mnt/video

Mount the new partition:

sudo mount /dev/sdb1 /mnt/audio
sudo mount /dev/sdb2 /mnt/video

Partitions will stay mounted until you unmount it or shut down the machine. To automatically mount a partition when your Linux system starts up, define the mount in the /etc/fstab file.

That’s it! You can now use the new partitions to store your files.
Conclusion
fdisk is a command-line tool for creating partition schemes. For more information about the fdisk command, type man fdisk in your terminal.

Chown Command in Linux (File Ownership)

If you want to change the user and/or group ownership of a given file, directory, or symbolic link, the chown command is used. So in this article, we will show you how to use the chown command through practical examples.

Let us see How to Use chown.

Before moving into how to use the chown command, let’s begin by examining the basic syntax.

The chown command expressions take the subsequent form:

chown [OPTIONS] USER[:GROUP] FILE(s)

USER is nothing but the user name or the user ID (UID) of the new owner. The name of the group ID (GID) or the new group is GROUP. The name of one or more directories, files, or links is FILE(s). Remember, always numeric IDs should be prefixed with the + symbol.

  • USER – If only the user is defined, the defined user will grow the given file owner, the group ownership is not changed.
  • USER: – When the username is succeeded by a colon: and the group name is not given, the user will become the owner of the files, and the files group ownership is transferred to the user’s login group.
  • USER: GROUP – If both the group and the user are defined (with no space between them), the user ownership of the files is transferred to the given user, and the group ownership is transferred to the given group.
  • GROUP – If the User is canceled and the group is prefixed with a colon, only the files’ group ownership is transferred to the given group.
  • : If only a colon: is given, without defining the user and the group, no change is made in it.

By default, on success, chown doesn’t give any output and returns zero.

To find out who holds a file or what group the file refers to, use the ls -l command:

$ ls -l filename.txt
Output:

-rw-r--r-- 12 linuxize users 12.0K Apr 8 20:51 filename.txt

Regular users can replace the filegroup only if they own the file and only to a group they are a member of. Administrative users can replace the group ownership of all files.

How to Replace the Owner of a File

If you want to replace the owner of a file, then use the chown command succeeded by the user name of the new owner and the target file as an argument:

chown USER FILE

For example, the subsequent command will transfer the ownership of a file named file1 to a new owner named linuxize:

$ chown linuxize file1

To transfer the ownership of multiple files or directories, define them as a space-separated list. The command below turns the ownership of a file named file1 and directory dir1 to a new owner named linuxize:

$ chown linuxize file1 dir1

For example, the subsequent command will transfer the ownership of a file named file1 to a new owner named linuxize:

$ chown linuxize file1

To transfer the ownership of multiple files or directories, specify them as a space-separated list. The command following transfers the ownership of a directory with name dir1 and a file with name file1 to a new owner named linuxize:

$ chown linuxize file1 dir1

The alternatively used for the username is the numeric user ID (UID). The following example will transfer the ownership of a file named file2 to a new owner with a UID of 1000:

$ chown 1000 file2

If a numeric owner survives as a user name, then the ownership will be transferred to the user name. To bypass this, prefix the ID with +:

$ chown 1000 file2

How to Replace the Owner and Group of a File

If you want to replace both the owner and the group of a file, use the chown command supported by the new owner and group separated by a colon (:) with no intermediary spaces and the target file.

$ chown USER: GROUP FILE

The subsequent command will transfer the ownership of a file named file1 to a new owner named linuxize and group users:

$ chown linuxize: users file1

If you cancel the group name after the colon (:) the group of the file is replaced to the specified user’s login group:chown linuxize: file1

How to Replace the Group of a File

To replace only the group of a file, use the chown command followed by a colon (:) and the new group name (with no space between them) and the target file as an argument:

$ chown: GROUP FILE

The subsequent command will replace the owning group of a file named file1 to www-data:

$ chown :www-data file1

Another command that you can use to replace the group ownership of files is chgrp.

How to Replace Symbolic Links Ownership

When the recursive alternative is not used, the chown command replaces the group ownership of the files to which the symlinks point, not the symbolic links themselves.

For example, if you try to replace the owner and the group of the symbolic link symlink1 that points to /var/www/file1, chown will change the ownership of the file or directory the symlink points to:

$ chown www-data: symlink1

The possibilities are that instead of changing the target ownership, you will get an error “cannot dereference ‘symlink1’: Permission denied”.

The error happens because, by default on most Linux distributions, symlinks are protected, and you cannot work on target files. This option is defined in /proc/sys/fs/protected_symlinks. One means enabled, and zero means disabled. We suggest not to disable the symlink protection.

To replace the group ownership of the symlink itself, use the -h option:

$ chown -h www-data symlink1

How to Recursively Replace the File Ownership

To recursively run on all files and directories under the given directory, use the -R (–recursive) alternative:

$ chown -R USER: GROUP DIRECTORY

The following example will transfer the ownership of all files and subdirectories under the /var/www directory to a new owner and group named www-data:

$ chown -R www-data: /var/www

If the directory contains symbolic links, pass the -h option:

$ chown -hR www-data: /var/www

Other alternatives that can be used when recursively replacing the directory ownership are -H and -L.

If the argument passed to the chown command is a symbolic link pointing to a directory, the -H option will create the command to cross it. -L tells chown to cross each symbolic link to a guide that is found. Usually, it would be best to use these choices because you might mess up your system or perform a security risk.

Using a Reference File

The -- reference = ref_file option enables you to change the user and group ownership of given files to be the same as those of the detailed reference file (ref_file). Chown will use the target file user and group; if the reference file is a symbolic link.

$ chown --reference=REF_FILE FILE

For instance, the subsequent command will allow the user and group ownership of the file1 to file2

$ chown --reference=file1 file2

Conclusion

The chown is a Linux/UNIX command-line service for developing the file’s user and/or group ownership.

To discover more about the chown command, visit the chown man page or type man chown in your terminal. If you have any questions or feedback, please leave a comment below or contact us directly.